Automation and Version Control
Automation and Version ControlThis section is for tips and tricks to help automate your Drupal site maintenance tasks, specifically using the Drush command line interface. Also covered is the use of version control systems like GitHub.
GitHub at Georgia Tech
GitHub at Georgia TechGeorgia Tech staff, students, and faculty can now use a Georgia Tech instance of GitHub, a version/revision control system. This service is available thanks to the College of Engineering's brilliant proof of concept with GitHub Enterprise, and the ensuing excited buy-in from the Office of Information Technology.
What is GitHub and Why Should I Use Revision Control?
GitHub is a proprietary hosted extension of the open-source Git version/revision control system commonly used for open-source software projects. It is very useful for multi-developer projects, as it allows coordinating and tracking code changes and the orderly acceptance and integration of those changes into the master project. Version control also makes it much easier to revert back to an earlier version of the software if it is discovered that accepted changes have caused unexpected problems.
Or, to put it short, it'll save your bacon. Figuratively, not literally.
Support Policy
OIT does not offer technical support or training for Git or GitHub usage. If you want to learn how to use git, see below for many educational resources.
Accessing Georgia Tech GitHub Enterprise
Just go to https://github.gatech.edu and log in with your GT Account Username and password.
GitHub User Software
You can access repositories in GitHub using git from the command line of most Unix based operating systems (see GitHub's KB), but you can also use a variety of GUI (graphical user interface) applications, such as:
- For beginners, GitHub's Desktop (for Mac OS X or Windows).
- For something that works on both Windows and Mac, try SourceTree.
- There are also lots more graphical clients to use with git.
Drupal List
We have a Drupal community group in GitHub that allows users to share and collaborate on projects. Please add collaborative projects to the GT Drupal group on GitHub at Georgia Tech.
Learn to Use git with GitHub Resources
You can learn how to use git (and GitHub) with these tools from GitHub Enterprise, such as:
- Guides: Tutorials, tips, and workflows to help you and your team learn about GitHub.
- Reference Sheets: Quick reference guides and manuals for GitHub
Learn to Use git with General Internet Resources
The internet has lots of other great places to teach you about git. Here are a few:
- Lynda.com - GitHub for Web Designers
- Lynda.com - Fundamentals of Software Revision Control
- Learn Git Branching - A good interactive visual guide to Git's concept of version control.
Local GitHub Guides and Resources
Forking a GitHub Repository and Using Pull Requests
Forking a GitHub Repository and Using Pull RequestsForking creates a copy of a repository which you can work on. You can then submit a pull request to have your changes reviewed and integrated with the master repo. This is the order of operations:
FORK > SYNC > BRANCH > COMMIT > PUSH > PULL REQUEST
Download a PDF version of this guide.
Forking a Repository
Reference: https://help.github.com/articles/fork-a-repo/
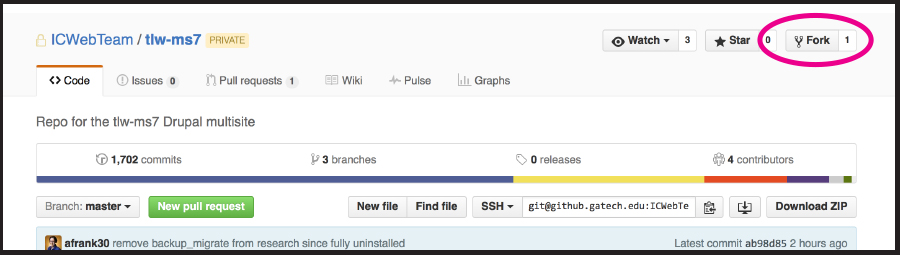
In Github, navigate to the repository to be forked and select “Fork” on the upper right. Select your own user name when prompted. This creates a copy of the repository for you on Github.
Now you should see your fork. Copy the URL using this button:
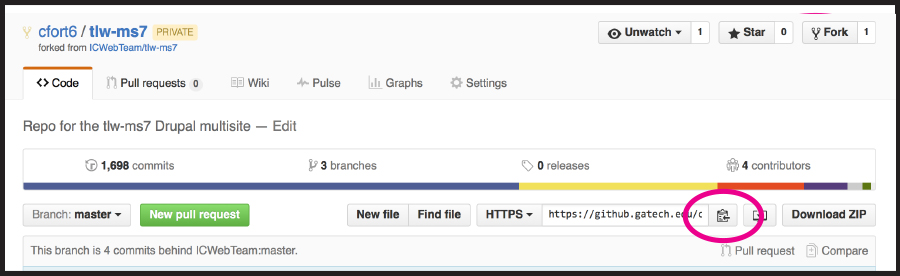
Open Terminal and type:
git clone https://github.gatech.edu/ORG_NAME/Repo-Name
Here (after clone) you should paste the URL you copied at the beginning of this step. This creates a local copy of your clone on your machine under your current directory.
Connect your Fork to the Master
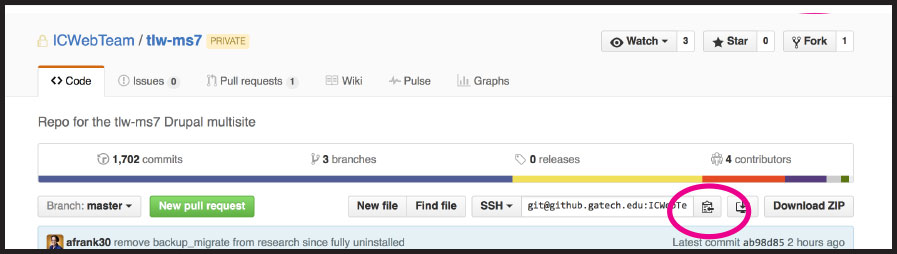
Next, sync your fork with the master to ensure that any changes going on with the master will be reflected in your local fork/clone.
Navigate in Github to the original repository. Copy the URL as shown:
-
Open Terminal and change directories to the fork you cloned.
cd(enter)ls(look for your cloned fork/repository name)cd Fork_Namegit remote -v
git remote add upstream https://github.gatech.edu/ORG_NAME/Repo-Name -
Alternately, you can both add and fetch (sync with) your master by using this instead:
git remote add -f upstream https://github.gatech.edu/ORG_NAME/Repo-Name -
Verify your upstream repository is syncing.
git remote -v
Syncing Your Fork
Reference: https://help.github.com/articles/syncing-a-fork/
You probably want your fork to mirror the latest changes being made to the main repository. If you used “git remote add -f upstream” in the previous step, this is already done. If you used “git remote add upstream” and now you need to fetch upstream to sync your fork, you can use this method.
-
In Terminal, change to the directory of your local clone and fetch upstream to sync with the original master repository.
cd Fork_Namegit fetch upstream -
Check out your fork’s local master branch.
git checkout mastergit merge upstream/master
Branch Your Fork
Now Branch your issue locally.
In Terminal:
git checkout -b name_of_your_new_branch
Committing Changes to Your Fork
-
Change your files as needed.
-
In Terminal,
git statusThis will confirm that git is watching your modifications.
-
Add the files to staging (substitute your file name or names)
git add path/file_name -
Then commit
git commit -m “First commit”
You will get feedback saying how many files were changed and how.
Note for newbies: A branch may contain many commits. Name your branch to reflect what you’re working on and name commits to reflect more specific changes.
Pushing Your Changes to GitHub
In Terminal,
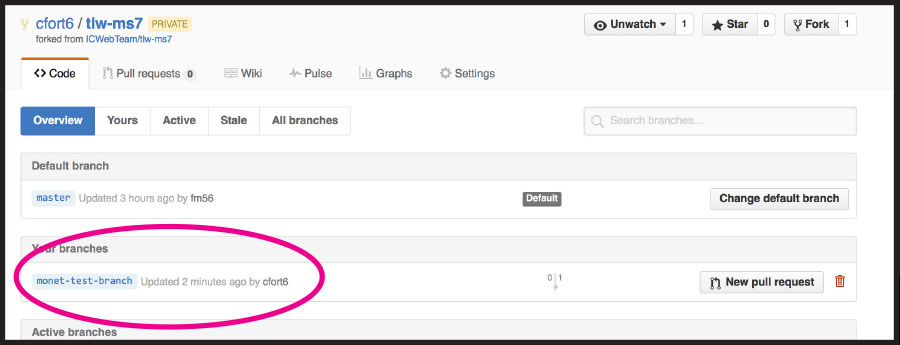
git push origin name_of_your_new_branch
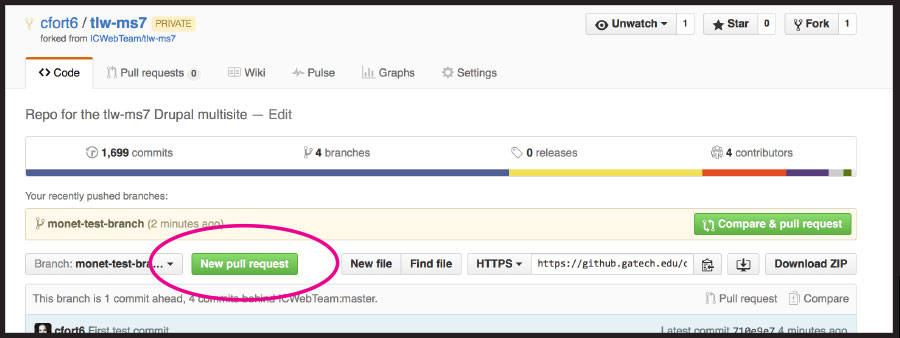
Now you should see your branch show up in Github.
Making a Pull Request
Reference: https://help.github.com/articles/using-pull-requests/
-
Select your branch in Github. Select “New pull request”
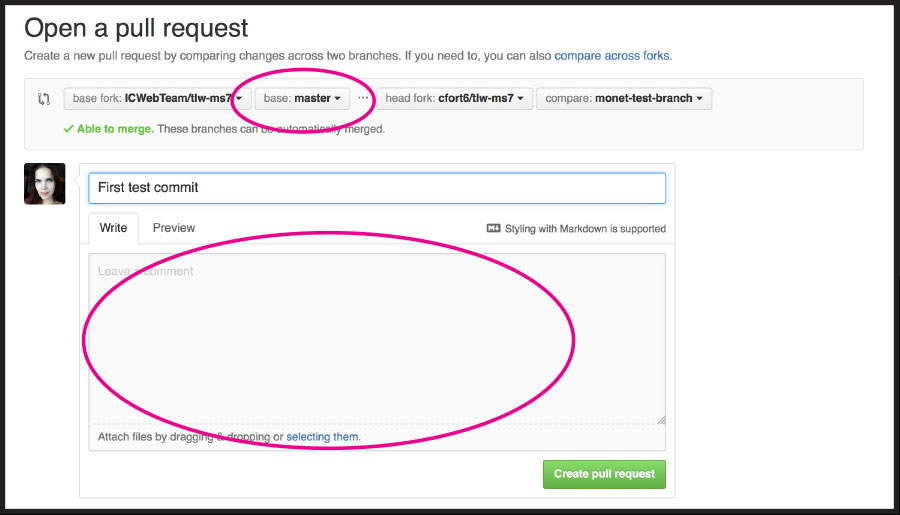
You can enter details about the changes you are suggesting. You can also select a branch to send the request to, if it’s not the master branch.
-
When you’re ready, select “Create pull request” at the bottom.
After you send a pull request, any commit that’s pushed to your branch will be automatically added to your pull request, which is useful if you’re making additional changes.
GitHub Submodule Management
GitHub Submodule ManagementSubmodules allow you to keep a Git repository as a subdirectory of another Git repository. This lets you clone another repository into your project and keep your commits separate.
To define the submodules for the various GT Theme components, add the following sections to the .gitmodules file for each repository:
[submodule "gt_tools"]
path = web/modules/contrib/gt_tools
url = https://github.gatech.edu/ICWebTeam/gt_tools-8.x.git
update = checkout
branch = master
ignore = dirty
shallow = TRUE

[submodule "gt_theme"]
path = web/themes/contrib/gt_theme
url = https://github.gatech.edu/ICWebTeam/gt_theme-8.x.git
update = checkout
branch = master
ignore = dirty
shallow = TRUE

[submodule "hg_reader"]
path = web/modules/contrib/hg_reader
url = https://github.gatech.edu/ICWebTeam/hg_reader-8.x.git
update = checkout
branch = master
ignore = dirty
shallow = TRUE

[submodule "gt_profile_curie"]
path = web/profiles/contrib/gt_profile_curie
url = https://github.gatech.edu/ICWebTeam/gt_profile_curie.git
update = checkout
branch = master
ignore = dirty
shallow = TRUE
To initialize your local configuration file and fetch all the data from each project and check out the appropriate commit, run the following command:
git submodule update --init --recursive
To initialize your local configuration file and fetch all the data from each project and check out the appropriate commit, run the following command:
git submodule update --recursive
For more information about submodules, see the Git product documentation on modules: https://www.git-scm.com/docs/gitmodules
Documentation courtesy of Veronique Topping
Drush (Drupal Shell)
Drush (Drupal Shell)Drush (Drupal Shell) is a great Drupal "module" to accomplish many administrative tasks via the command-line. It is not a module in the normal sense, because it's not enabled/disabled from the Drupal admin. Instead, it actually lives anywhere on your local system and is run like any other local executable. Here are some of its key features from the Drush Drupal.org page:
A few core drush features:
- The Drush Package Manager allows you to download, enable, disable, uninstall, update modules/themes/profiles/translations from the command line in a very simple way (apt-get style) - just type e.g. drush dl views and drush enable views in a Drupal directory to install the Views project!
- Additionally, the Drush Package Manager also allows you to update all your modules with just one command - drush update.
- Drush Core: several useful utilities for site administrators and developers (e.g. drush cron or drush cache clear)
- Drupal SQL Commands help you issue queries to any of your databases (i.e. is multi-site aware) and even helps you migrate databases between your environments.
- Drush simpletest commands make it easy to run unit tests from the command line and email results to your dev team.
- Drush now supports aliases which let's you perform actions on separate Drupal installations. This is very useful for multi-site configurations.
Drush Guides and Resources
Updating Modules via Drush
Updating Modules via DrushIf you have to perform module updates on your Drupal site, then Drush is the way to go. Drush will help you to update all modules on your site(s) quickly and painlessly.
Prerequisites
- SSH/shell access
- Somewhat higher than basic Unix/Linux command-line experience
Process
Drush has many commands and options. These commands need to be run from the directory where the settings.php file for your site is, i.e.
/path/to/drupal/sites/default
/path/to/drupal/sites/gpburdell.gatech.edu
For the purpose of updating your modules you will basically use it like below:
drush update
This is interactive and will give you a listing of all the modules that need to be updated for a given site. You can then choose to update them all or continue. Unless you are certain you want to do all of your updates at once, I suggest you use this command to see what updates are needed, then use the below command to update a few of the modules separately at one time. For short you can also use use "drush up".
drush update modulename0 modulename1
This let's you specify a list of modules you want to update.
drush updatedb
This command will perform any updates to the database schema for your modules. This is run automatically after every Drush update. For short you can also use "drush updb".
If you have multi-sites then after you do a Drush update you may have to move to your other multi-site folder to do a drush updatedb to update any changes to the database schema.
Best Practices
- Limit the number of modules you use on your Drupal sites as much as possible.
- Try to keep modules that are shared by more than one multi-site in the
sites/all/modulesfolder. - Always check the release notes for any new modules to see if installing them will require any other changes or dependencies.
Gotchas
- Drush expects a backup directory to be present in the root of your Drupal installation like
/path/to/drupal/backupwhere it backs up the previous version of the module to. Make sure you have write access to this directory. - If you had any modified files in the previous module directory you will need to copy those back to the correct place after the module is updated. Luckily everything will be in the backup directory.
- Depending on permissions you may need to run Drush as the super user. Ask your system administrator for sudo access if needed.
Using Drush on OIT Web Hosting
Using Drush on OIT Web HostingIf you are hosting a Drupal website on OIT Web Hosting, you can SSH into your host, but you cannot run the command-line tool Drush from your SSH session because OIT doesn't allow PHP to be run directly from the SSH command line of Web Hosting accounts. However, this doesn't mean that you cannot use Drush at all with OIT Web Hosting – you just have to work around this limitation.
Disclaimer
THESE INSTRUCTIONS ARE COMPLETELY, 100%, NO, EVEN 1000%, NOT SUPPORTED IN ANY OFFICIAL WAY BY OIT WEB HOSTING. No warranty expressed or implied. Always back up your site and database(s) before trying these instructions. These instructions, though tested on several sites, may break your site, cause data loss, or even make your dog not like you any more. Be careful!
Process
Essentially, you will run Drush locally on your computer, but have it operate on an OIT Web Hosting site. To do this, you will need to:
- Establish an SSH tunnel for the database connection, and
- Mount your site's files over ssh via SSHFS.
Note: The instructions presented below are for using Drush on a Mac. If you want to try this from a Windows computer, both SSH (<) and SSHFS (WebDrive) clients are available for Windows.
Prerequisites
-
Drush, installed locally – Installation instructions are available at the Drush Docs site. If you have the Acquia Dev Deskstop installed, you already have Drush. You can also install it via homebrew.
-
An SSH client – Suggested products are:
-
An SSHFS client to let you mount a remote filesystem over SSH – Suggested products are:
- The commercial Transmit (mac OS / Mac OS X; $34, free 7-day trial available),
- The commercial WebDrive (Windows, mac OS / Mac OS X; free for all Faculty/Staff/Students at software.oit.gatech.edu ), and
- The free fuse4x/sshfs components (Linux, mac OS, / Mac OS X)
-
Access to your site via SSH – You must know the password for your site's (unfortunately named) FTP Login account, which you can set/reset via your web hosting administration panel in the Web Hosting Settings screen. (Note as of the 2015/16 Plesk upgrades, you can now set up and use an SSH key instead of needing the SSH/FTP password.)
-
Be on campus or have access to the campus VPN Service, as OIT Web Hosting does not allow SSH directly from off-campus.
Steps to Drush Bliss
In the instructions below, foo.gatech.edu is a placeholder for your site's actual hostname, and foo is a placeholder for your site's SSH/FTP account. Replace these with your site's hostname and SSH/FTP account where appropriate. Also, these instructions assume you are using Transmit as your SSHFS client. Configuration screens for WebDrive will be similar.
- Install Drupal, if you haven't already... via source, Installatron, etc.
- Edit your httpdocs/sites/default/settings.php file, changing the databases array's host and port entries to read:
 'host' => php_sapi_name() == 'cli' ? '127.0.0.1' : 'mysql.localhost',
 'port' => php_sapi_name() == 'cli' ? '3307' : '3306',
- Create a file named dbip.php in your sites httpdocs directory:
<?php if (array_key_exists('REMOTE_ADDR', $_SERVER) && ((substr($_SERVER['REMOTE_ADDR'], 0,7) == '128.61.') || (substr($_SERVER['REMOTE_ADDR'], 0,8) == '130.207.') || (substr($_SERVER['REMOTE_ADDR'], 0,8) == '143.215.') || (substr($_SERVER['REMOTE_ADDR'], 0,9) == '192.93.8'))) { echo gethostbyname('mysql.localhost'); } ?> - On your local machine, in a terminal window, open up an SSH tunnel through your Web Hosting server to your Web Hosting account's database host:
ssh -N foo@foo.gatech.edu -L 3307/`curl -s http://foo.gatech.edu/dbip.php`/3306
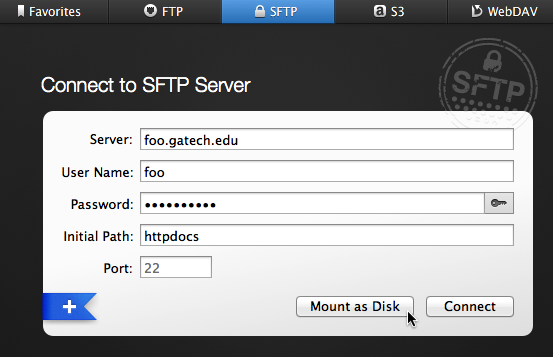
- Use an SSHFS client to mount your site's httpdocs directory. For Transmit, use the SFTP connection and choose Mount as Disk:
- In a terminal, navigate to the mount point ( /Volumes/foo.gatech.edu/ ) and run drush status to test your configuration. You should see the message "Database : Connected and Drupal bootstrap: Successful."
- When you are finished using Drush on your site, remember to close (control-C) the SSH command doing the tunneling and unmount your site's filesystem (drag it to the Trash).