User Authentication and Authorization
User Authentication and AuthorizationAuthentication and authorization are often confused with each other.
Authentication is the process of securely identifying a user based on credentials presented (username, password, security token, etc.) For website user authentication, Georgia Tech predominantly uses Central Authentication Service (CAS), often times referred to as the GT Login Service.
Authorization is the process of determining what roles and/or privileges an authenticated user has been granted. For user authorization, there are options available through both CAS SAML attributes and through LDAP queries.
Authentication and Authorization Guides and Resources
CAS Single Sign-On
CAS Single Sign-OnCentral Authentication Service (CAS) based single sign-on is the main method of doing authentication via GT Account Usernames for Drupal website logins. Once users have logged into the GT CAS system, the can access any Georgia Tech website that utilizes CAS without having to enter their GT Account Username again, as long as they don't completely close their browser or clear their browser's cookie cache.
CAS Guides and Resources
Installing CAS
Installing CASEditor's Note: If you are using Drupal Express (Drupal 10 or Drupal 7), then CAS is already installed as part of your Drupal Express installation. You may want to look at the sections here about configuring CAS, should you want to customize your configuration, but you do not need to go through any of the installation processes.
There are two components needed to add CAS support to a Drupal website: the phpCAS Library, and two supporting Drupal modules.
phpCAS Library
This library is only needed for Drupal 7. If you are installing the CAS module for Drupal 10, you can skip this section.
- Download and install the current, stable version of the phpCAS Library. As of 2019, the current version was phpCAS 1.3.8 – if you are using and older version, you should consider upgrading as soon as possible to get the latest security patches.
- Install it under the sites/all/libraries/ directory of your Drupal site. Rename the top level directory to CAS so that you have the CAS.php file inside of sites/all/libraries/CAS/
Drupal Modules
You will need to configure CAS to talk to the Georgia Tech CAS service.
- Log into the special original user account (user #1) that you setup when creating your Drupal site. This is the main administrative account that has full power over everything in your site. If this account is the same as someone's GT Account Username, you should rename the account to something else (good names are "root" or "admin", which make it easy to identify the account later on.
- For Drupal 10, download and install the External Authentication and CAS modules into your Drupal site's
sites/all/modules/directory, or if your site supports it, install them via the Install Module option in the Modules section of your site's administrative controls. - For Drupal 7, download and install the Libraries and CAS modules into your Drupal site's
sites/all/modules/directory, or if your site supports it, install them via the Install Module option in the Modules section of your site's administrative controls. - Go to the Modules page of your site's administrative controls and enable (turn on) both modules. Once you have enabled these modules DO NOT LOG OUT OF THE SITE until you have finished the remaining steps. Otherwise, you will find yourself locked out of your site!
- For Drupal 7 only, go to the Permissions page of your site's administrative controls (found under the People section), and make sure that the following permissions are enabled for the highest level user role in your site (commonly "administrator", or for sites using the GT Profile, "super administrator") (Don't forget to save your changes!) :
- CAS -> Administer CAS
- User -> Administer Permissions
- User -> Administer Users
- Go to the CAS settings page of your site's administrative controls (found under the Configuration -> People section) and configure your CAS settings (see Drupal version specific links below for more details).
- Add a new user to the site with the username and "CAS username" both being the same as your GT Account Username. Set the other fields as needed (enter a random value for the password field) and give the account the highest access level available (usually 'administrator'). Don't forget to save the new account.
- In a different web browser from the one in which you are currently using (or via your browser's private browsing feature), browse to your Drupal site and verify that you can login with your personal GT Account Username and password. You should not see the normal Drupal login prompt - if you are prompted at all, you should be taken to the Georgia Tech Login service and then brought back to the Drupal site after you've successfully logged in to your GT Account.
- Repeat step #7 above for each user who should have access to the site, setting the access level as appropriate for the individual user.
CAS Configuration Guides
Configure CAS (Drupal 10)
Configure CAS (Drupal 10)The following settings should be adequate for most Georgia Tech developers using Drupal version 10.
The CAS configuration page can be found on the black administration toolbar under Configuration -> People -> CAS
Alternatively, you can access the configuration page by adding "/admin/config/people/cas" to the end of your site's front page URL.
CAS Server
- Version — 3.0 or higher
- HTTP Protocol — HTTPS (secure)
- Hostname — sso.gatech.edu
- Port — 443
- URI — /cas
- SSL Verification — Verify using your web server's default certificate authority (CA) chain.
All other sections are optional, but you will want to either:
- Enable Login link enabled under the GENERAL SETTINGS section (to show a CAS login link on the regular Drupal login form/page). This could be combined with the GATEWAY feature to speed up login for users already logged into their GT Account.
- Post a link to
/casloginto your front page - Configure the FORCED LOGIN section, should you want to have visiting a path like
/userautomatically to log the user into CAS
NOTE: The Drupal 8 CAS module originally used a different login path (/caslogin) from what CAS used in Drupal 6 and 7, which was /cas . However, the module now supports both URL paths, though it considers /cas to be a legacy path.
An explanation on GATEWAY: this feature will check to see if the user is already logged into his/her GT Account and if so log him/her into the website. If the user is not already logged in, then the user will simply access the site as a guest (anonymous) user. For this reason, you must also enable the login link setting or post a login link to your front page to allow users to log into the site when they are not already logged into their GT Account. (All GATEWAY does is to save users the trouble of selecting a login link when they've already logged into their GT Account.)
Important: If you turn on both GATEWAY logins and Auto register users, then every Georgia Tech user who visits your site and is already logged into their GT Account will have a Drupal account created for them on your site. This can result in your site ending up with thousands of user accounts, which can be a headache when it comes to managing the accounts of users who actually have special editing privileges on your site. In general, you really don't want to configure a site this way unless you specifically want to allow all Georgia Tech community members to be able to create content and/or post comments to existing content. An example of this kind of usage is this Georgia Tech Drupal community site.
The FORCED LOGIN feature will require every visitor to have a Drupal account on your site and will log the visitor into their account when first accessing the site in a browser session. Visitors who do not have a Drupal account will be denied access to the site. You probably do not want to enable this for the whole site (unless the site is meant to be a private intranet), but it can be useful to enable FORCED LOGIN for subsections of a site (e.g. "/admin/*" to automatically force login when trying to access any administrative page.)
Configure CAS (Drupal 7)
Configure CAS (Drupal 7)The following settings should be adequate for most Georgia Tech developers using Drupal version 7.
The CAS configuration page can be found on the black administration toolbar under Configuration -> People -> CAS Settings
Alternatively, you can access the configuration page by adding "/admin/config/people/cas" to the end of your site's front page URL.
CAS Server
- Version — 3.0 or higher
- Hostname — sso.gatech.edu
- Port — 443
- URI — /cas
- Certificate Authority PEM Certificate — /etc/pki/tls/certs/ca-bundle.crt
Login Form
- Add CAS link to login forms — Make CAS login default on login forms
- CAS login invitation — Log In
- Drupal login invitation — default
- Redirection notification message — You will be redirected to the secure GT login page.
- Successful login message — Logged in via GT as %cas_username.
User Accounts
- Automatically create Drupal accounts — unchecked/checked
(Whether a Drupal account is automatically created the first time a CAS user logs into the site. If disabled, you will need to pre-register Drupal accounts for authorized users.) - Email address: username@ — gatech.edu
- Roles — authenticated user
- Users cannot change email address — checked
- Users cannot change password — checked
Redirection
- Check with the CAS server to see if the user is already logged in? — unchecked
- Require CAS login for — specific pages
(Enter one page per line as Drupal paths. The '*' character is a wildcard. Example paths are 'contact' for the site-wide contact form, 'user' for the sitewide login page, 'forms/*' for every form you create under this fake directory.) - Excluded pages — default
Login/Logout Destinations
- Initial login destination —
https://yoursite.gatech.edu/
(Drupal path or URL. Enter a destination if you want the user to be redirected to this page on their first CAS login. An example path is "<front>" for the front page, or "user" for the user's page.) - Logout destination — <none>
- Change password URL —
https://passport.gatech.edu/ - Registration URL — blank
Miscellaneous & Experimental
- Initialize CAS as proxy — unchecked
- CAS debugging output filename — leave blank
Redirecting Users to the Campus CAS Logout Page
Redirecting Users to the Campus CAS Logout PageDrupal and CAS utilize different logout functions. Sending the user to /logout will log the user out of your site only and just return the user to the front/home page.
Sending the user to /caslogout will log the user out of your site and redirect the user to the logout page for CAS.
One way to send users to the CAS logout page without hunting down and changing every script that calls logout is to set up /logout as an alias for /caslogout.
Setting up the Alias
- While logged in as an administrator, go to Configuration -> Search and metadata -> URL aliases -> Add alias (
/admin/config/search/path/add) - Enter
caslogoutin the Existing system path field - Enter
logoutin the Path alias field - Select the Save button.
Requiring User Login for Specific Pages
Requiring User Login for Specific PagesIf you are using the CAS module for user authentication, you can require users to be logged in to their GT accounts before they can access specific pages on your Drupal site.
Enabling Restrictive Access (Drupal 7)
- Visit the CAS configuration page on your Drupal 7 site, at Configuration -> People -> CAS settings
- Under REDIRECTION, locate Require CAS login for and check the setting for specific pages.
- In the textbox under Specific pages, type in one page path per line (with no starting slashes)
- Select Save configuration at the bottom of the page once completed.
Enabling Restrictive Access (Drupal 10)
- Visit the CAS configuration page on your Drupal 10 site, at Configuration -> People -> CAS
- Under FORCED LOGIN, locate Pages and type in one page path per line (include starting slashes)
- You may need to select the Enabled checkbox - untested and unclear as to whether Enabled has to be on when only forcing logins on specific pages.
- Select Save configuration at the bottom of the page once completed.
Commonly Protected Paths
Commonly protected paths include:
- 'contact' for the site-wide contact form
- 'user' for the site-wide login page
- 'forms/*' for every form you create under this fake directory
CAS Logout Error
CAS Logout ErrorCourtesy of Doug Curtis in OIT:
People are receiving a 500 error when using the "GT Logout" link on a Drupal page. It looks like the problem is that the Drupal CAS module is appending the "service=" query string to the end of the CAS logout URL. The GT CAS server will accept "url=" query string but it doesn't accept the "service=" query string. Previously, the CAS service would quietly ignore appended query strings it didn't recognize but that isn't currently the case.
The way to fix this is to leave the "Logout destination" field blank in the phpCAS module's settings. The "Logout destination" is supposed to be used to specify a URL to redirect the user to after the user has been logged out. It is NOT supposed to be the URL for logging out of CAS. By leaving the field blank, the application will be logged out of your Drupal site, but the user will still be authenticated in CAS.
Updating the CAS Library to the Latest Version [Drupal 7]
Updating the CAS Library to the Latest Version [Drupal 7]While the phpCAS library is pretty stable, its maintainers do still release updates periodically, and every now and then one of those updates is to fix a security issue. Below are step-by-step instructions for how to update your phpCAS library to the most current, secure version.
For this example, we will update from version 1.3.2 to version 1.3.3, but the same steps should apply to updating between any versions of the phpCAS library (which allows logins with GTaccounts to our drupal sites).
- Download the latest version of phpCAS from the phpCAS website.
- If you don't want to use ssh/command line, "extract" the files from this compressed archive on your computer (Windows users can use the free 7-zip program to do so), which will create a folder called
CAS-1.3.3, that has anotherCAS-1.3.3directory and apackage.xmlfile inside it. - Change the name the second
CAS-1.3.3folder (that is inside the other) to CAS. - Zip up that re-named "CAS" folder...usually by right-clicking and choosing either Compress "CAS" (on a Mac OS X computer) or Send to -> Compressed (zipped) folder (on a Windows computer).
- Now that you have a friendly zipped file, named "CAS.zip", find where the CAS library lives on your server. The best practices location on a Drupal site is under the "sites/all/libraries" folder (which often requires you to add the Libraries module to your Drupal site, first).
- Then, turn on your TEST site's maintenance mode (because, of course, you are not trying this out on your live site). For Drupal 7, you can enable this at: admin/config/development/maintenance
- Delete the current version of phpCAS that lives at
sites/all/libraries,so that there is no "CAS" folder anymore. - Upload your new
CAS.zipfile to your Test site's libraries folder, so that it looks like this:sites/all/libraries/CAS.zip. - Check the box next to
CAS.zipin your web hosting panel and then, from the menu of options at the top of your file list, choose More -> Extract Files and then select Okay. - Once you see your new "CAS" folder, you can then delete the "CAS.zip" file from this directory and your library has been updated.
- Remove your Test site from maintenance mode and make sure it works correctly.
- If all goes well, follow the same process on your Live site.
Using CAS to Retrieve GTED User Attributes
Using CAS to Retrieve GTED User AttributesCAS is capable of delivering some GTED attributes for the person logging in to Drupal, as part of the login process. This means you don't have to configure and maintain an LDAP module nor manage an LDAP service account (read: no need to keep up with an expiring service account password).
While Georgia Tech's CAS service will provide authentication for any site within the ".gatech.edu" domain, by default it won't release any attributes. You'll have to request what attributes your application needs by filling out the OIT IAM Data Steward Request Form (this is the same web form that you use to request a GTED LDAP service account.) Make sure you specify CAS authentication and whatever data you need under Data Request.
Once that has been approved and CAS has been set up, configure Drupal to talk to CAS just as it's documented here on previous pages, except for the CAS Server Version, which needs to be set to SAML Version 1.1. If the user's email address is one of the attributes you're requesting from CAS, then you'll want to leave the email address field under User Accounts blank.
Now, under the Attributes tab, select the CAS Attribute Tokens button (not the "LDAP Attribute Tokens" if you have that). It should show you a list of attributes Drupal is getting from CAS. You may have to log out and log back in. If you don't see the list, you may have to work with whoever handled your data steward request, sometimes these things take a bit of tweaking to get right.
Still on the Attributes tab, select the Settings button. You'll want Drupal to Fetch CAS Attributes "everytime a CAS user logs in" because, well, people's data changes all the time. You'll probably also want to always Overwrite existing values from attributes, to make sure Drupal doesn't store any old data. Under CAS ATTRIBUTE MAPPINGS, specify "[cas:name]" for the Username field and "[cas:attribute:email_primary]" (assuming you requested that) as the E-mail address field.
LDAP Directory Information
LDAP Directory InformationLightweight Directory Access Protocol (LDAP) is an open protocol for sharing directory information and can be used as an alternative to CAS to allow users to log in to a web application using their GT Account Username and password. Unless your application doesn't support CAS, it's best to use it instead of LDAP, since LDAP requires obtaining a special GTED LDAP user account for your application.
If you just want basic directory information for users without the ability to do user authentication, there is a public GT LDAP server called 'Whitepages' that can be queried from any server or workstation on-campus.
LDAP Guides and Resources
Whitepages GT Directory Server
Whitepages GT Directory ServerThere is a public-facing LDAP server from which you can pull general directory information from without authentication. This server is only accessible from servers and workstations located on one of the Georgia Tech campus subnets.
Connection Settings
Use the default settings, unless otherwise stated beow:
- LDAP Server Type - Open LDAP
- LDAP Server - ldap://whitepages.gatech.edu
- LDAP Port - 389
- Binding Method - Anonymous Bind
- Base DNs for LDAP users, groups, and other entires this server configuration - dc=whitepages,dc=gatech,dc=edu
- AuthName attribute - uid
- Email attribute - mail
Testing Queries
To test queries, see the OIT article on LDAP.
Specific Clients
- Mac Mail: LDAP Server: whitepages.gatech.edu (adding "ldap://" into the field causes the lookup to fail for me. --Sterling)
Two-Factor Authentication
Two-Factor AuthenticationAll Georgia Tech users who have been enabled for two factor authentication (2FA) are required to log into CAS with their two-factor token via the Duo 2FA service. As of summer 2017, this includes virtually all campus employees, and will soon include all students.
So, long story short, there is no reason to add your own two-factor authentication to your Drupal websites - you would, in effect, just be creating three-factor authentication, which would likely create more headaches than benefits.
More information on the campus program can be found on the OIT Two-Factor Authentication website.
Finding a Person's GT Account Username
Finding a Person's GT Account UsernameThe GT Account Username is the standard computer account for everyone at Georgia Tech. It is used to access a variety of systems including TechWorks, BuzzPort, and Mercury, and can be used to access your Drupal site by installing the CAS module.
You may often find that need to add someone to a group in Mercury or to your Drupal site, and you need to know the person's GT Account Username. Here are several ways that you can look up that information:
Using Office 365
[Instructions courtesy of Noel Moreno]
- Go to the "People" area (click on the "waffle" in the upper left, then select "People").
- In the left column, check the radio button for "Directory".
- Enter the person's name, email address, partial name, etc. in the search box.
- Results are returned on the right. Select the person of interest.
- In the data returned, the GT Account Username will in the person's "IM" value. It will be "sip:[gt account]@gatech.edu".
Using Command Line tools
Note: Any command line tools to query data via the Georgia Tech "White Pages" (which both the Georgia Tech Directory Tools and the 'ldapsearch' examples use) will only work from on-campus or over the campus VPN.
- Georgia Tech Directory Tools [Tip from Shawn Carnley]
- UNIX 'ldapsearch' Command Line Query [Code Included]
Creating a Georgia Tech Guest User Account
Creating a Georgia Tech Guest User AccountIf you have enabled CAS authentication to help keep your site secure, but have a limited number of non-GT users who need access to certain protected features of your Drupal site, you can create guest GT Account Usernames for them.
Creating a New Guest User Account
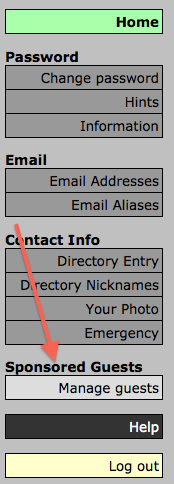
- Log into PASSPORT (https://passport.gatech.edu)
- Under Sponsored Guests, choose Manage guests.
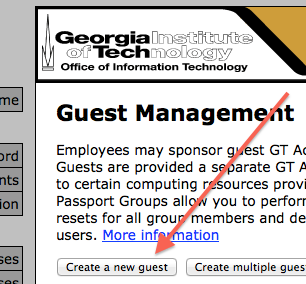
- Select the Create a new guest button and follow the instructions to create your guest user.
- Only grant LAWN wireless or T-Square access if necessary.
- Only grant permissions for the length of time the guest will need access (1-365 days).
- Write down the Guest's new GT Account Username and Password, so you can communicate it to them over the phone or in person (since it's not very safe to send passwords electronically).
Solving Post-Migration Login Issues
Solving Post-Migration Login IssuesIf you are unable to log in with CAS after migrating a site, make sure you copied the .htaccess file in the root of your site (httpdocs on OIT Web Hosting).
Please note that this file may be hidden to some file browsers. If so, configure your file browser to show hidden files.
Technical Details
CAS requires that Clean URLs be enabled. When Clean URLs is enabled, Drupal edits the .htaccess file to properly handle normal-looking URLs.
When a Drupal website is migrated without the .htaccess file, Drupal reverts to the ugly URL schema (i.e. http://drupal.gatech.edu?q=user/login). This has the side-effect of also disallowing CAS from working properly.