MySQL Databases for Developers
MySQL Databases for DevelopersThis section contains selected resources and guides for dealing with the MySQL databases that are integral to every Drupal website.
MySQL Resources and Guides
Creating a MySQL Database
Creating a MySQL DatabaseCreating a new MySQL database for a site hosted on OIT Web Hosting can be a little confusing. Below are the steps for getting a database set up and configured properly via the Web Hosting Plesk control panel, as well as generic steps for creating a new database on any MySQL instance that has phpMyAdmin installed.
MySQL Database Creation on OIT Web Hosting
- Visit OIT Web Hosting [https://hosting.gatech.edu/] and select the website you want to work with from the list of sites that you manage.
- Select the Databases management link.
- On the Databases management page, select the Add New Database link.
- Fill in the fields on the Add New Database form, and be sure to copy down everything for future reference. Use the password generate to generate a secure password (select the 'Show' button to see the generated value so that you can copy it down.)
- Select the OK button to create your new database.
- Back on the Databases management page, you should see a listing in the table for your new database. The Webadmin link on that row will let you access your database via phpMyAdmin.
Video Tutorial (1:13)
MySQL Database Creation on a Standard Apache HTTPD Server Via phpMyAdmin
- Log into phpMyAdmin on your server with the master (root) user account for your mySQL instance.
- Select the Databases tab.
- In the box under Create database, enter the name for your new database and select the Create button.
- Select the Users tab and create a new user with a unique name and password. Be sure to write down the name of the database you create, as well as the username and password you make for it. (As always, try to choose a fairly-secure database username and password and do NOT use your GTaccount - jdoe3).
- Once the account is created, grant it access to the database that you created. You'll probably want to give the account all privileges for the database except "grant", as you usually don't want the account to be able to give out access to other accounts.
Video Tutorial (0:39)
MySQL Database Connection Tools
MySQL Database Connection ToolsYou can view any MySQL database on an OIT Web Hosting website using many different GUI based applications. Below are a few implementations that have been used by members of our community:
General Instructions
OIT has an FAQ entry explaining how to connect to your hosting database, which also discusses using phpMyAdmin to view your database(s) from your hosting control panel (which doesn't require any additional software).
Rochester University has a nice tutorial on using phpMyAdmin with MySQL.
Elsewhere in this handbook is a more in-depth post on SSH tunneling.
The general information you'll need, if you choose to connect with a more graphical software application, is:
- the domain name of the site your database uses (example: mydepartment.gatech.edu)
- the SSH or FTP Login account name and password for this site
- the host your database lives on: for OIT Web Hosting, use "mysql.localhost" instead of plain "localhost".
- the database account's username and password (this will be different from the SSH/FTP login account and password)
- the port for your database: 3306
MySQL Workbench
Andrew Dugenskei (a member of the GT Drupal community) has a preference for MySQL Workbench.
Fortunately, MySQL Workbench (available for Mac OSX and Windows) makes it very easy to communicate with OIT web hosted databases and it is free. If you're on campus, no other software is needed. If you're off campus, you just need to first make sure you are connected to the VPN.
Below is a screen capture from the Workbench connection manager with some pseudo values. Once the correct values are entered, connecting to an OIT databases is a just a click away.
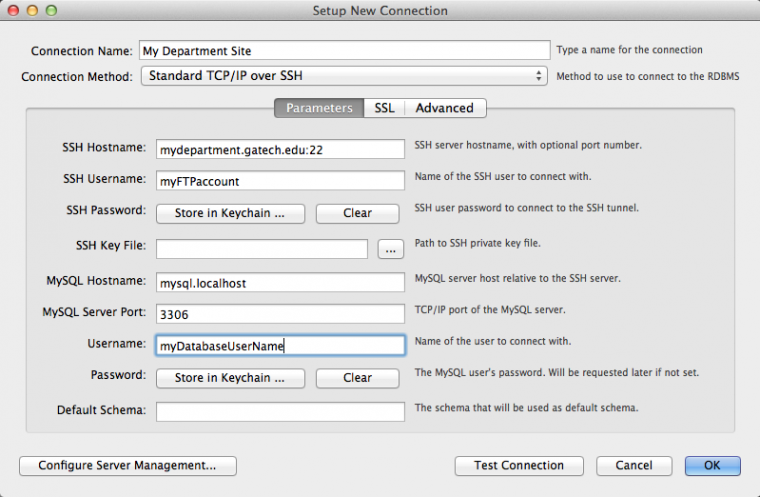
From the above screen capture and based on the Workbench Installation Guide, you can use these settings.
Under the Connection Tab, Choose "Standard TCP/IP over SSH" and then enter these parameters for your site:
- SSH Hostname: mydepartment.gatech.edu (port name ":22" at end is optional)
- SSH Username: myFTPaccount (for your SSH or "Local FTP" account on Web Hosting)
- SSH Password: myFTPpassword (for your SSH or "Local FTP" account on Web Hosting)
- MySQL Hostname: mysql.localhost (for web hosting, just use this instead of worrying about which server you're on)
- MySQL Server Port (leave same): 3306
- Username: database_user (for this database only)
- Password: database_password (for this database only)
- Default Schema: leave blank
Navicat (Mac, Windows, Linux)
Mike Alberghini (a member of the GT Drupal community) has a preference for Navicat because the software:
- Has a good GUI
- Handles multiple databases well,
- Has Mac OS X support
- Is 40% off for educational users
- Saves connection info for ssh tunnels and start them as needed to connect to servers
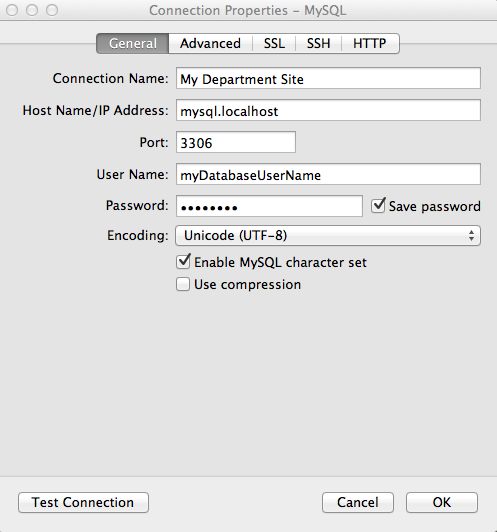
Screenshots of a successful Web hosting database connection with Navicat are below.
For Navicat, use the following settings on the "General" tab:
- Connection Name = My Department Site
- Hostname/IP Address = mysql.localhost (this is important for you to connect to Web Hosting)
- Port (leave same) = 3306
- User name = This is the username for your DATABASE's user.
- Password = This is the password for your DATABASE's user.
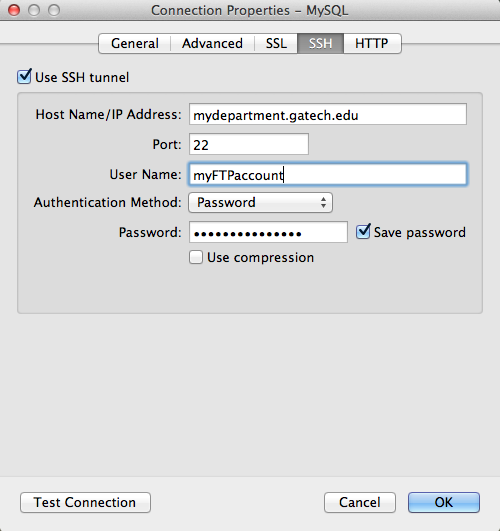
To finish your connection with Navicat, use the following settings on the "SSH" tab:
- Use SSH tunnel = check YES
- Hostname/IP Address = mydepartment.gatech.edu
- Port (leave same) = 22
- Username = This is the username of the web hosting FTP account for this site.
- password = This is the password for the web hosting FTP account for this site.
Sequel Pro (Mac)
Adam Arrowood (a member of the GT Drupal community) has a preference for Sequel Pro because the product:
- Has a nice GUI, ssh tunneling, etc. as found in other similar products.
- Runs (only) on Mac OS X.
- Is a free product.
MySQL Restrictions in Drupal 8 and Later
MySQL Restrictions in Drupal 8 and LaterDrupal 7 began forcing mySQL to act like a traditional SQL server so that all SQL code used in Drupal will be highly compatible with other database systems like PostgreSQL or SQLite. This means that mySQL statements that syntactically work in other contexts may produce errors under Drupal 7 or 9. Drupal 8+ adds the 'ONLY_FULL_GROUP_BY' restriction, which can potentially cause custom mySQL code that worked in Drupal 7 to fail with errors in Drupal 8+.
Here's the exact settings being used in Drupal 8:
- SET sql_mode = 'ANSI, STRICT_TRANS_TABLES, STRICT_ALL_TABLES, NO_ZERO_IN_DATE, NO_ZERO_DATE, ERROR_FOR_DIVISION_BY_ZERO, NO_AUTO_CREATE_USER, ONLY_FULL_GROUP_BY'
The mySQL Reference Guide has full details on these SQL modes and their effects. (See especially the section on STRICT mode and ONLY_FULL_GROUP_BY mode.)