Optimization and Performance
Optimization and PerformanceThis section documents ways that you can optimize your Drupal site for better performance.
Guides and Resources
Drupal Core Optimization
Drupal Core OptimizationA number of performance settings are recommended to cache Drupal data objects and speed up your site.
Enable Caching and Aggragation Settings
These settings can be enabled in Drupal 7 via the administrative control panel under Configuration -> Development -> Performance
- Cache pages for anonymous users
- Cache blocks
- Compress cached pages
- Aggregate and compress CSS files
- Aggregate JavaScript files
- Set Minimum cache lifetime = 15 minutes
Disable and Remove Unnecessary Modules
Several key internal functions in Drupal will scan all installed modules, so be sure to not only disable but also uninstall and remove any third-party (contrib) modules that you are not using. This not only improves your site's speed but also helps to keep it better secured.
Core modules should not be removed, since they'll just reappear the next time you do a core upgrade. However, consider turning the following off to help speed up your site:
- Statistics - You can offload this computation to Google Analytics.
- Syslog - We recommend using dblog instead.
- Tracker - This can generate a lot of data, so turn it off unless you have a real need for knowing what individual users are doing.
- Overlay - A potentially useful module, but can generate noticeable frontend lag.
Additional Optimization Techniques
Performance Modules
Performance ModulesThere are also quite a few modules that attempt to cache resource-heavy actions on Drupal.
Getting Started with Performance Module
For most websites, core Drupal caching should be sufficient to keep CPU/memory usage down and keep your website running smoothly. However, for larger and more complex websites, additional caching and optimization will be needed.
For your specific website (and its use cases, structure, and workflows), please browse through the modules below and see which module(s) may work for your website.
Advanced CSS/JS Aggregation
Availability: Drupal 7, Drupal 10
From the module's Drupal.org page: AdvAgg allows you to improve the frontend performance of your site. The performance benefits are achieved by using some of the features found in AdvAgg and its sub modules. Out of the box AdvAgg's frontend performance will be similar to cores.
Boost
Availability: Drupal 7
Boost provides static page caching for Drupal enabling a very significant performance and scalability boost for sites that receive mostly anonymous traffic. For shared hosting this is your best option in terms of improving performance.
- Boost is not recommended for large websites (nodes >= 1000), as the caching process will take up the websites' allotment of CPU cycles. This will slow down the website to be unusable for end-users.
- Boost can be used alongside Memcache API and Integration
- No configuration for Boost is necessary beyond installing and enabling the module.
- Core caching in Drupal must be disabled for Boost to work properly
CDN
Availability: Drupal 7, Drupal 10
CDN provides easy Content Delivery Network integration for Drupal sites. It alters file URLs, so that files are downloaded from a CDN instead of your web server.
Before you begin, you will need to select a CDN provider. CDN have different costs and features depending on your needs.
- These CDNs are currently used on campus:
- Keycdn.com - Used by the Office of International Education (Jimmy Kriigel)
- http://oie.gatech.edu
- http://pacific.gatech.edu
- http://oxford.gatech.edu
- Keycdn.com - Used by the Office of International Education (Jimmy Kriigel)
- This module is best used for websites with lots of traffic and lots of images and/or locally hosted videos.
- KeyCDN has made a CDN Drupal Integration Tutorial available.
- The CDN module has TEST Mode. If you don't want to use the CDN to serve files to your visitors yet, but you do want to see if it's working well for your site, then enable testing mode. Users will only get the files from the CDN if they have the permission to "Access files on CDN when in testing mode".
- The "Far Future expiration" option doesn't work with the IMCE module.
- Update: IMCE has a patch in their dev branch for this issue.
- You can manually flush a CDN cache file by having the Display statistics Shows enabled and scrolling down to the bottom of the page and selecting "Touch" to purge the file.
Entity Cache
Availability: Drupal 7
From the module's Drupal.org page: Entity cache puts core entities into Drupal's cache API. Due to the entity loading changes in Drupal 7, no core patches are required.
Don't bother using this module if you're not also going to use Memcache API and Integration or Redis – the purpose of Entity Cache is to allow queries to be offloaded from the database onto alternative storage, and there are minimal, if any, gains from using it with the default database cache.
Memcache API and Integration
Availability: Drupal 7
This module provides integration between Drupal and Memcached with the following features:
- An API for using Memcached and the PECL Memcache or Memcached libraries with Drupal.
- Memcache backends for the following systems (all drop-in):
- Caching (memcache.inc)
- Locking (memcache-lock.inc)
- Sessions (memcache-session.inc) (D6 only)
- A module that provides a comprehensive administrative overview of Drupal's interaction with Memcached and stats.
- A set of tests that can be run to test your memcache setup.
Memcache is ideal when there are lots of database reads and writes, as it is a cache for the data layer (this is also why it can so easily whitescreen your site when things go wrong). This article does a decent job of explaining the "whens" and "whys" of APC, Varnish and Memcached.
Recommended Settings
After enabling the memcache module, add this text to the bottom of your settings.php:
$conf['cache_backends'][] = 'sites/all/modules/memcache/memcache.inc';
$conf['lock_inc'] = 'sites/all/modules/memcache/memcache-lock.inc';
$conf['memcache_stampede_protection'] = TRUE;
$conf['cache_default_class'] = 'MemCacheDrupal';
$conf['cache_class_cache_form'] = 'DrupalDatabaseCache';
$conf['page_cache_without_database'] = TRUE;
$conf['page_cache_invoke_hooks'] = FALSE;
$conf['memcache_servers'] = array('localhost:11211' => 'default');
You will need to adjust the module directories if your module is installed in a different directory.
Troubleshooting
In some cases, Drupal will white-screen after settings.php is edited to reflect the new memcache settings. If this occurs, please check your error log on Web Hosting. If you see a 'Fatal Error', follow the directions below (taken from this Drupal.org thread):
- Backup your website.
- Download registry_rebuild and upload to sites/all/modules.
- Run registry_rebuild by navigating your browser to: [yourdomain]/sites/all/modules/registry_rebuild/registry_rebuild.php
- If no errors show up, your registry has been rebuilt.
- Delete the module from the sites/all/modules directory.
Varnish HTTP Accelerator
Availability: Drupal 7
Varnish HTTP Accelerator provides integration between your Drupal site and the Varnish Cache, an advanced and very fast reverse-proxy system. Basically, Varnish handles serving static files and anonymous page-views for your site much faster and at higher volumes than Apache, in the neighborhood of 3000 requests per second.
Other Ways of Increasing Performance
Other Ways of Increasing PerformanceBesides performance modules, there are several other methods for increasing the performance of your Drupal site.
Disable Modules Only Needed During Development
Only enable these modules while actively developing, and then turn them off the rest of the time.
- Field UI (in core)
- Rules UI/Admin
- Views UI
- Module Filter
- Advanced Help
- Fast Permissions Administration
- Devel
Track Your Site's Performance Baselines
- Drupal's Devel module
- Execution time and memory usage
- Query logging
- Web optimization
- Web testing
- Browser-based
- Saas products
Locate and Fix PHP Errors/Warnings
- Turn on verbose error reporting to find errors and warnings (check Apache error logs as well)
- Perform performance testing of any custom coding.
Optimize Javascript and Other Front-End Features
- Example modules using JavaScript: Views Slideshow and Conditional Fields.
Automating Drupal Cron on OIT Web Hosting
Automating Drupal Cron on OIT Web HostingUnless you manually configure Drupal cron to be run by your web hosting server, it will be automatically run when someone visits a page on your Drupal site after a certain amount of time has passed. This method works perfectly fine, but can slow down the display of the page the user requested since the cron run will block page generation until it has finished. This becomes more noticeable on site visited less frequently as more tasks can accumulate that need to be executed during a cron run.
To keep this from happening, you can schedule Drupal cron to run automatically in the background. On a web server that you fully control, you can use UNIX style cron to run the Drupal cron job. You can also do this on OIT Web Hosting, but you have to configure the job via the Plesk Control Panel.
Step by Step Instructions
- Log into your hosting account's Plesk control panel.
- On the main control panel page, navigate to Schedule Tasks, found in the right-hand sidebar menu.
- On the Scheduled Tasks page, select the Add button
- Fill out the form as follows (the example here will set up Drupal cron to run every eight hours):
- Minute: 0
- Hour: 0,8,16
- Day of the Month / Month / Day of the Week: * (insert an asterisk)
- In the text field, Command, enter the following:
You can find the link to put at the end of this command (curl --silent --compressed http://YOURDRUPALSITE.gatech.edu/cron.php?KEY-FROM-ADMIN-REPORTS-STATUS-PAGEKEY-FROM-ADMIN-REPORTS-STATUS-PAGE) on your Drupal site's status report page at Reports -> Status report (admin/reports/status)

Video Tutorial
Logs and Logging Tools
Logs and Logging ToolsLogging details about your site's usage can be very valuable, but if not configured properly, can also be a huge resource drain. The following articles provide useful best practices for managing your Drupal site's logging functions.
Logs and Logging Guides and Resources
Errors, Warnings, and Log Settings
Errors, Warnings, and Log SettingsFix Errors Whenever Possible
Although hiding error messages is important from a security perspective, errors and warnings mean that something isn't working correctly, and that could likely have a negative effect on your site. It's best to try to fix them to fix them if you can (especially if they are in your own code), or for third-party contrib modules, report them to the module or project owner.
PHP Message Types
PHP, which Drupal runs under, can generate three types of messages:
- Notices - Something to be aware of that you might want to do differently, but probably won't keep your site from working.
- Warnings - More serious issues than Notices, but are not keeping your site from running.
- Errors - A serious issue that has caused the site code to stop running before reaching a normal completion.
In short, errors are problems that have to be fixed, because they are impeding use of your site. Warnings and notices ought to be fixed, but notices may be things that you have a reason for doing in an unusual way.
Drupal 7+ Message Settings
To change the way your Drupal 7 or 8 site shows PHP messages, go to the Configuration -> Development -> Logging and errors (admin/config/development/logging) administrative control page.
The recommended settings for a live, production site are:
- Error messages to display: None.
- Database log messages to keep: 100 (unless you need a longer audit trail)
- Note: Do not enable the core syslog module if you are using OIT hosting. According to the syslog module's documentation, it is not appropriate for shared hosting. You should be able to find most useful debugging information by looking at the error logs, as described below.
Error Logs on OIT Web Hosting
If using OIT Web Hosting, you will find a record (or log) of errors the server is tracking in your Plesk control panel.
From the main panel, go into the Logs section and look for the log file called "error_log". You can either view or download this file, which lists detailed error log messages.
Other forms of web hosting will have their own logging areas where you can look for error logs. Check with your server administrator to find out where the logs are on any non-OIT server that you might be using.
One thing to keep in mind is that server error logs will only contain messages from PHP. Any messages generated by Drupal itself will be found in the Drupal Error log, found in the administrative area of your site under Reports -> Recent log messages.
Sample Error Messages on Web Hosting
Here are some examples of error messages you might find in your hosting log:
[Mon Jun 15 03:01:53 2014] [warn] RSA server certificate CommonName (CN) `hosting.gatech.edu' does NOT match server name!?
[Mon Jun 15 08:52:25 2014] [error] [client 130.207.000.00] File does not exist: /var/www/vhosts/mysite.gatech.edu/httpdocs/favicon.ico, referer: http://mysite.gatech.edu/node/77
[Mon Jun 15 09:03:20 2014] [warn] [client 130.207.000.00] mod_fcgid: stderr: PHP Warning:  chdir(): open_basedir restriction in effect. File() is not within the allowed path(s): (/var/www/vhosts/mysite.gatech.edu/:/tmp/:/usr/share/pear:/var/cache/hg:/opt/atomic/atomic-php55/root/usr/share/pear) in /var/www/vhosts/mysite.gatech.edu/httpdocs/custom-file.php on line 88
Database Logging Configuration
Database Logging ConfigurationIf using the "Database logging" module in core, be sure to keep only a small number of entries (1,000 seems reasonable).
Until we have a solution that can feed syslog information from Drupal into regular system logs on OIT Web Hosting, we use the "Database logging" module in core to track errors, logins, and other system messages. This module stores its logs in the watchdog table.
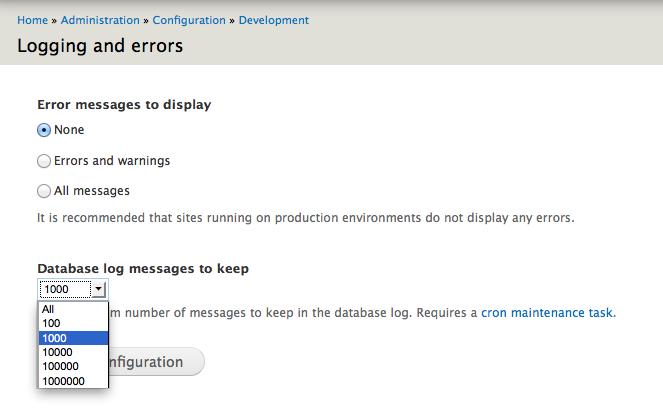
It is important to set this module to only keep a small number of log entries (such as 1,000), so that our database servers don't get overwhelmed. You can change the settings for your Drupal 7 site at: Configuration -> Development -> Logging (admin/config/development/logging).
Making Sure Access Logs Are Tamed
Making Sure Access Logs Are TamedIt looks like there's a bug in Drupal 7 where, if you ever turn on and activate the Statistics module (enabling the logging of accesses to the database), and then decide to turn off the Statistics module, Drupal keeps on logging to the table that it creates (accesslog), and cron never clears anything out of that table, so it can just keep growing indefinitely. On a busy site, this can result in multiple millions of entries in that table.
Here's what you can do to check for this condition:
- If you know how to use something like phpMyAdmin to examine your database, look for an accesslog table (it may have a prefix on it, depending on how your copy of Drupal was set up). If it exists, then your site has Statistics turned on, or did at some point in the past. If the number of rows is huge, then you probably need to do the next step.
- If you know you need to fix this problem, or if you don't know how to use phpMyAdmin, you can do the following:
- Go into your Drupal site and turn on the Statistics core module.
- Next, go to Administration -> Configuration -> System -> Statistics and look at the settings there. Disable Enable access log, set Discard access logs older than to '1 hour', and then save the configuration.
- Finally, go to Administration -> Reports -> Status report, and initiate a manual cron run to clear the accesslog table. Note that this may fail to complete if you have over a million entries in the table. If so, then you'll need to use phpMyAdmin or something similar to clear out the table.
- Once you've gotten past step 2.3, go back to your Modules page and disable Statistics.
Of course, if you actually want to use the Statistics module, then make sure that Discard access logs older than is set to something other than 'never', so that the accesslog table doesn't grow indefinitely.