DUG Content Morgue
DUG Content MorgueThis book is for collecting out-of-date pages rather than deleting them permanently. Anything found here should be assumed to be unreliable and kept for historical purposes only.
Please copy the following header to all pages moved here:
Configure CAS (Drupal 6)
Configure CAS (Drupal 6)
The following settings should be adequate for most Georgia Tech developers using Drupal version 6.
The CAS configuration page can be found at: http://yoursite/admin/user/cas
CAS Server Settings
- CAS version — 2.0 or higher
- CAS server — login.gatech.edu
- CAS port — 443
- CAS URI — cas
- Check to see if a user is already logged in? — The function of this setting is unclear. It doesn't seem to do anything, but we (Communications & Marketing) leave it unchecked.
- CAS PEM certificate verification — Do not verify the certificate
- CAS PEM Certificate (phpCAS 0.6 or greater) — leave blank
- Initialize CAS as proxy — unchecked
- CAS PGT storage file format — Plain Text
- CAS PGT storage path — leave blank
- Enable CAS Single Sign Out (CAS server 3.1 or greater) — unchecked
- CAS debugging output filename — leave blank
User Account Settings
- Is Drupal also the CAS user repository — unchecked
- If Drupal is not the user repository, should cas hijack users with the same name? — You will probably want this box checked. This will allow you to create people's Drupal accounts before they log in. If you leave it unchecked, you will need to make user the following box is checked and you will have to get people to log in before you configure their accounts.
- Should Drupal user accounts be automatically created? — If you want any GT user to be able to log into your site, you will want this box checked. If you want to pre-approve selected users, you will want to uncheck this box and make sure the previous box is checked. Warning: if you leave both this box and the previous box unchecked, there will be no way for CAS to associate its users with Drupal accounts.
- Email Domain — mail.gatech.edu
- Users cannot change email address — Checked, unless you want users to be able to use non-GT addresses.
- Users cannot change password — checked
- Auto-assign users to the role(s) — This is entirely up to you. Be warned, however: if you are allowing accounts to be created automatically and you are automatically endowing them with godlike powers, well, you might as well leave your house keys hanging from your mailbox while you're at it.
Redirection Settings
- Require CAS login for — You may specify protected pages if you have some portion of your site that is to be password-protected. If you are merely using CAS to authenticate site administrators, you make leave these fields blank.
- Force redirection on initial login — If you want all users directed to a particular page upon login, check this box and enter the path in the following field.
- Successful login message — We recommend the default unless you have specific other needs.
- Redirect user on logout — https://login.gatech.edu/cas/login
Miscellaneous Settings
- Change password URL — https://passport.gatech.edu/
- Registration URL — leave blank
Login Form Settings
- Add CAS link to login forms — Make CAS login default on login forms
- CAS login invitation — default
- Drupal login invitation — default
- Redirection notification message — default
Creating a True WYSIWYG Environment in CKEditor [Drupal 7]
Creating a True WYSIWYG Environment in CKEditor [Drupal 7]If you'd like the look and feel of your body text field to better mimic the look and feel of your site's theme when editing pages then you'll need to configure the CSS settings for the appropriate CKEditor profiles to use your theme's CSS.
- Go to Configuration -> Content authoring -> CKEditor
- Select the Edit link under the OPERATIONS row for the appropriate CKEditor profile (advanced, basic, etc.)
- Under the CSS accordion fieldset change the Editor CSS drop-down to use "Define CSS"
- In the CSS file path field you'll need to enter the path to the CSS file(s) of your theme. If you'd like it to use the CSS from the main GT theme, enter the following:
/sites/all/themes/gt/css/reset.css?v=1,/sites/all/themes/gt/css/default.css?v=1,/sites/all/themes/gt/css/typography.css?v=1,/sites/all/themes/gt/css/editor.css?v=1
Note the query string at the end of each CSS file listed (i.e., "?v=1") If you are experimenting with adding links to your own stylesheets and are finding your changes aren't showing up, just change the value in the query string, save the CKEditor settings, and next time you edit a page your changes will most likely show up. By changing the query string value you'll get CKEditor to reload the stylesheet.
See Adding Classes to the CKEditor Styles Dropdown List if you'd like to add new custom styles there as well.
Drupal 9 CKEditor Enhancements, Tips and Tricks
Drupal 9 CKEditor Enhancements, Tips and TricksDrupal 10 includes the popular What You See is What You Get (WYSIWYG) editor CKEditor, but out of the box it only provides the 'minimal' configuration, which is missing a lot of the features you may have come to enjoy when implementing CKEditor in Drupal 7 using the CKEditor module and the full version of CKEditor.
Fortunately, there are a few easy ways to make CKEditor much more useful. To start, the Drupal core team has assembled a list of add-on modules that implement popular CKEditor plugins, which makes it very easy to add official CKEditor features to your site:
CK Editor Modules and Plugins | Drupal.org
Important: Most if not all of these modules do not include the actual plugin. You will need to go to ckeditor.com and download the matching plugin, then create a 'libraries' directory at the root of your Drupal installation and unpack the plugin into that directory. For example, for the 'font' plugin, you should end up with a 'libraries/font' directory, which would have a file named 'plugin.js' in it, along with any other supporting files for the plugin.
When downloading a plugin, you will need the version that works with CKEditor 4.17.1, as that is what comes with Drupal 9.3. For future versions of Drupal, to determine what version of CKEditor you have, go to a page with the CKEditor editor visible, then open your browser's developer console and type:
alert(CKEDITOR.version);
In addition to the plugin based modules referenced above, the following special purpose Drupal 9 / CK Editor modules may also be of interest:
- Editor Advanced Link - Adds additional properties (title, class, id, target, rel) to the Link properties box
- Editor File - Adds the ability to upload files directly into CKEditor (just like you can now do with Images)
Here are a few more tips and tricks for enhancing CKEditor:
Where Did Image Properties Go?
One thing you won't find in any of the lists above is a means of bringing back the extensive set of image properties available in CKEditor under Drupal 7, and there's a reason for this. The designers of Drupal 8+ want you to upload properly sized images and let Drupal handle their placement, so that they can be as responsive as possible. This is actually a good thing in retrospect, as it's going to minimize the situations where a content editor uploads a giant 3000+ pixel image and then uses the size properties to make it fit on the screen.
That said, you're probably going to want a way to float images left and right. That ability still exists and is enabled via Configuation -> Content authoring -> Text formats and editors. Modify one of your text formats and look for the "Align images" checkbox under "Enabled Filters". The explanation for the option isn't very informative, but enabling it will enable options on the CKEditor image placement pop-up to left or right align (float) the image.
You'll also want to enable "Caption images" directly below "Align images", as it provides a very useful feature for entering automatically positioned and formatted visible image captions.
Expanding CKEditor's Default Window Height
Editor's Note: All current versions of Drupal 8+ now support CKEditor's dynamic height feature, which automatically grows the height of the editor box based on the number of lines of text it contains. So, the following is no longer needed, but has been left here in case someone should still want to force the default height to be larger.
One feature lost in Drupal 8 is the ability to set the number of rows on a textarea field and have CKEditor expand to fill that space. However, you can still manually set the height of CKEditor, but you have to do it by creating a simple module. We won't go into how to write a module here, as there are plenty of tutorials out there covering this basic topic. Once you have the skeleton of a bare bones module in place, add this function to it, replacing 'xxxxxx' with the machine name of your module:
function xxxxxx_editor_js_settings_alter(array &$settings) { foreach (array_keys($settings['editor']['formats']) as $text_format_id) { if ($settings['editor']['formats'][$text_format_id]['editor'] === 'ckeditor') { $settings['editor']['formats'][$text_format_id]['editorSettings']['height'] = '600px'; } }}
This will set your CKEditor window height to 600px tall. Just change 600 to another value if you prefer the window to he taller or shorter.
Adding a Font Size Drop-Down
While it is not recommendable to add a font selection drop down on Georgia Tech sites, many content editors want to be able to make lines of text bigger, and if you don't give them a way to do it correctly, they'll make those lines headings, which creates accessibility problems.
The easiest way to fix this is to add the CKEditor Font plugin using the CKEditor Font module. Once installed you can edit any of your text formats and add the 'S' button (for font 'S'ize) to the button bar. However, if you want to be fully accessibility compliant, you should also change the available size list from point sizes to percentages. That can be done by creating another bare bones module (see the Window Height section above) and putting the following code into it:
function xxxxxx_editor_js_settings_alter(array &$settings) { foreach (array_keys($settings['editor']['formats']) as $text_format_id) { if ($settings['editor']['formats'][$text_format_id]['editor'] === 'ckeditor') { $settings['editor']['formats'][$text_format_id]['editorSettings']['fontSize_sizes'] ='80%/80%;90%/90%;Normal/100%;110%/110%;120%/120%;130%/130%;140%/140%;150%/150%'; } }}
Note: if you want to change both the font size menu and the window height, you can (and should) combine the code into a single function in a single module. Just add the innermost assignment line from one of the code snippets to the other snippet.
Getting CKEditor to Use Your Theme CSS
By default CKEditor uses a very basic set of CSS, so the text you create and edit won't look exactly like it will when displayed by your Drupal site's theme. However, you can tell CKEditor to use your site's CSS so that the editing experience better reflects reality.
To do this, you will need to be using a custom sub-theme. In your sub-theme's .info.yaml file, add the following lines:
ckeditor_stylesheets: - css/fonts.css - css/general.css
YAML is very picky about spacing, so take care to get it right: it's two blank spaces (no tabs allowed), then a dash, then one more space. Of course, replace fonts.css and general.css with whichever CSS files are needed to implement your theme's special text formatting. You can have any number of CSS lines underneath the 'ckeditor_stylesheets:' heading.
If you add this to a theme that is already active, be sure to flush all of your caches to get the change to take effect.
Installing GT Editor in Drupal 7
Installing GT Editor in Drupal 7Below are instructions for installing and configuring the GT Editor feature, which extends the CKEditor rich text editor to add additional tools for image, file, and video management, as well as security settings that filter out unacceptable code.
Editor's Note: These instructions are for version 7.x-2.3 of GT Editor.
Video introduction
Watch an overview of GT Editor in minutes 1:39 to 1:45 of this video from our November 2013 GT Build Day.
Train Your Editors
Training guides can be found under the "Basic Training for GT Editor" section of this site.
Prerequisites (Things to Install First)
User Roles and Content Types
This feature assumes you are using the three user roles and three content types created by GT Tools
Libraries
You must install the CKEditor Library (currently version 4.4.3-full) in sites/all/libraries.
GT Modules and Themes
You should also install these GT features/themes:
- GT Tools in sites/all/modules
- GT Theme in sites/all/themes
- GT SubTheme, in sites/all/themes
Drupal Contrib Modules
You should also install (in sites/all/modules) these contributed Drupal modules:
- ckeditor
- ctools
- diff
- features
- features_extra
- imce
- imce_mkdir
- libraries
- link
- linkit (version 3.x)
- revisioning
- strongarm
- transliteration
- video_embed_field
- wysiwyg_filter
GT Editor Installation
Once you have installed all of the above items, you can then install the GT Editor module like you would any other module.
Multi-sites and Path Issues
If you install GT Editor on a multi-site, you will need to change a number of path settings (as they are designed for a single, root site). Here are some of the locations to change paths:
- "Predefined styles path" at admin/config/content/ckeditor/edit/basic
- "File system" for public, private, and temporary file directories at admin/config/media/file-system
My Links Menu (A.K.A. "Editor menu of POWER")
GT Editor, when installed, creates a new My Links menu for the Editor role. Here are the links that GT Editor (as of version 7.x-2.3) adds to this menu:
- add or change Events (Mercury)
- get new Events (Mercury cache)
- find Pages (list)
- change Menu links
- new Page
- new Horizontal layout
- new Vertical layout
- new Multipurpose layout
- new Block
- move Blocks
You will need to alter the new link "get new Events (Mercury cache)", as the default link goes to "http://mysite.gatech.edu/?clearcache=1". You need to change "mysite" to whatever your site's actual domain name is. This link makes it easier for editors to clear their cache in Mercury, to force updated events and news to show up in their Mercury blocks almost as soon as they are added to the Mercury system.
Is Your Site Trying to Use the Google Search Appliance (GSA)?
Is Your Site Trying to Use the Google Search Appliance (GSA)?The Georgia Tech Google Search Appliance (GSA) was shut down at the end of December 2016. If you are running version 2.9 or later of the GT Theme, then you do not need to worry about this, as version 2.9 and later of the them has had everything related to the Google Search Appliance removed.
If you are still running an older version of the theme, then we recommend that you upgrade to version 2.9 if you can. If for some reason this is not feasible, then you can make sure your site is not trying to use the Google Search Appliance by doing the following:
- Visual check: Select the 'SEARCH' link (shown with a magnifying glass) on your site. If the drop-down has any checkboxes below the white search text field, then you need to follow the remediation instructions below.
- Search check: If you don't have those checkboxes, then type something into the box and press Enter or Return. If you are taken directly to Google, then you need to follow the remediation instructions below.
Remediation Instructions
Again, these instructions only apply if you are running Drupal 7 and the GT Theme.
- Log into your site as an administrator
- Under Appearance (
/admin/appearance), locate your site's active theme under the 'Enabled Themes' section. The active theme for your site is indicated by the words '(default theme)'. - Select the Settings link underneath the active theme's name (example:
/admin/appearance/settings/gt_subtheme). - Under the Search Options section, choose the Search This Site option.
To give better results when using Drupal 7's native search ability, you need to change the default search configuration settings.
Go to the Search configuration page at Configuration > Search and metadata > Search settings (or /admin/config/search/settings).
Under the Content Ranking section, change the default value of 0 for these settings:
- Change Keyword relevance to a nice high number, such as 8.
- Change Recently posted to a slightly lower number, such as 6.
Important Considerations for the Built-in Search Engine
Anyone leveraging Views or a page replacement module (Panels, Display Suite) will want to thoroughly test the local Drupal search engine, as Drupal's default search does not properly query Views. In short, pages generated by views or Panels / Display Suite will not be cataloged and will not show up in relevant search query results.
On the flip side, just about all published content in any Drupal content type will be cataloged and shown in relevant search query results. This means that search queries may turn up pages on your site that you have hidden by simply not linking them into any menus nor linking to them from any menu-linked pages. Searches will also turn up Super Blocks and old GT Carousel image slides as individual content pages.
If this is a concern for you, you may wish to install the Custom Search module, which will allow you to hide content that you do not want showing up in search query results.
After installing Custom Search, navigate to the Configuration > Search and metadata > Custom Search > Content tab (found at admin/config/search/custom_search/content). At the bottom of the page, under the Content exclusion section, check the types of content, such as Super Blocks, that should NOT appear in search results.
Keeping your Site Safe
Keeping your Site SafeThis page is now deprecated. Please see the Best Practices for Configuring and Managing Drupal page for an enhanced list of security and site management tips.
Editor's Note: These tips are based on notes from “Securing Drupal 7: Don’t get Hacked or Spammed to Death!” presented at the February 2013 Georgia Tech Drupal User's Group Meeting. Please feel free update with additional tips for securing Drupal sites!
Secure YOUR Code
- Drupal.org Guide to Writing Secure Code
- Be careful if you write a module or make code changes to a Theme!!
- Separate/Comment any changes to Code.
- Don't hack CORE!
- Don't install non-recommended modules, libraries, or themes
- Test anything you're not sure about in a separate sandbox instance of Drupal
Secure Drupal Core
Update Drupal Core When Needed
- Make sure the Update manager module is ON and configured for security emails (admin/reports/updates/settings)
- Apply every security patch after backing up EVERYTHING
- Module updates are EASY in Drupal 7
- Installatron makes CORE updates easier (but MUST backup .htaccess and robots.txt).
- Drupal Security Review Contrib Module - Scans your installation for common security problems
Properly Configure Modules and Module Settings
- Turn off the following modules unless you really need them:
- PHP filter (Always keep this one off!)
- Tracker
- Comments
- Configuration -> Logging and errors -> Error messages to display: Set to None
- Configuration -> Logging and errors -> Error messages to display: Set to 1000 (or 10,000 if you have a really busy site)
- Configuration -> Media -> File system: Consider making private if that works for your site
Properly Configure User Account Settings
- Check over the User Account settings (Configuration -> People -> Account Settings)
- Self registration for user accounts is enabled by default! Configure Who can register accounts? so that only Administrators can register accounts.
- Set the default for When cancelling a user account to "Disable the account and keep its content.”, because deleting users who have created content could lead to access bypass. Alternatively, validate whether or not the user had ever created any content, and reassign the content to someone else before deleting the user account.
- Disable the setting Enable personal contact form by default
- Disable the setting Enable signatures (because it applies to ALL)
- Disable the setting Enable user pictures (because it applies to ALL)
- Regularly review your list of users (admin/people)
- Disable User #1 in Drupal 7 as it is not needed
- Configure a regular user account with administrative powers and use it instead
- Rename user #1 from something common like 'admin' or 'root' to make it harder for hackers to guess the username
Properly Configure User Permissions
- Review user permissions regularly (admin/people/permissions)
- Give the ANONYMOUS and AUTHENTICATED roles only View published content, add more permissions only if NEEDED.
- Only Developer/SuperAdmin roles should get any permission that stats with "Administer”
- (Possible) Exception. You might give EDITORS "Administer” for: Blocks, Comments, Menus.
- Contrib Modules for fine grained permissions:
- Override Node Options,
- Role Delegation
- Field Permissions, etc.
Properly Configure Filters
NOTE: Tailor the following to the needs of your site - not all sites need such strict rules in place.
- Drupal.org Guide to Configuring Text Formats
- Do NOT allow these tags: SCRIPT, IMG, IFRAME, EMBED, OBJECT, INPUT, LINK, STYLE, META, FRAMESET, DIV, SPAN, BASE, TABLE, TR, TD
- ORDER of Filters (plain text for ALL at TOP)
- Filter Permissions (limit ANONYMOUS & AUTHENTICATED to plain, give EDITOR basic)
- More filters details in the Contrib modules section below.
Contrib (Third Party) Modules and Themes
- Disable or un-install modules you are not using (UI & Devel modules, like Masquerade). Regularly audit sites for unused modules.
- Criteria for evaluating contrib (Erik Webb):
- supported version(s)
- maintainer reputation
- total usage
- number of open issues
- usage change over time
- Criteria 2: allows PHP execution? Some modules that do are: Devel; CCK fields; Views; Webform
Contrib: CAS and Captcha/Spamicide
- For GTaccount holders, CAS module (requiring GT Logins for certain pages/forms) will usually be sufficient to protect individual content types/forms
- admin/config/people/cas
- Redirection > Specific pages
- If ANONYMOUS users can Add content or can Login, MUST HAVE Captcha + Spamicide
- Helpful Tool: StopSpamForum.com (esp if you Block IPs in your Drupal site).
Contrib: Editor and More Filters
- Because user content is dangerous, pay attention to settings for editing and file uploading modules.
- Who can use IMCE to add files/images & which file extensions are allowed? (profile)
- Who can use LinkIt to make a Link? (profile)
- Use WYSIWYG Filter to strip out unwanted code
- Limit buttons on CKEditor Toolbar
- Use Plain Text for ANONYMOUS users and on most TextArea Fields.
Contrib: Field Permissions and Privacy
- Create unique names for every field that holds remotely-sensitive info. Why? Because permissions are by FIELD NAME regardless of content type
- Example: field_user_address, if used on 2 different forms, has the SAME permissions on both forms.
- Tip: Use bundle_copy module to make a generic Content Type with pre-set fields & display settings that’s easy to alter & copy.
- Types of data NOT to store and NOT to share:
- FERPA student data not in directory (directory = name, email, field/dept)
- HIPAA health-related
- Identity theft-prone (SSN, Birthdate, etc.)
- Types of permissions for fields and content types:
- create
- edit OWN; view OWN (might be safe)
- edit ANY; view ANY (editors or admins only)
- delete OWN; delete ANY (be careful, admins only)
Contrib: Webform
- http://drupal.org/project/webform
- NOT good at fine-grained permissions
- Can have PHP execution vulnerabilities
- You have MUCH better better access control & reporting options (Views), if you use Content Types, instead.
- Content types are Safer, but harder to delegate to editors for set up.
Contrib: Views
- http://drupal.org/project/views
- Very popular, will be Core in Drupal 8.
- Allows you to report out on data in LOTs of ways
- Must take care with PERMISSIONS, esp by Role, for each View, esp if any data is private or sensitive.
- Be careful not to allow PHP in arguments, unless necessary.
Contrib: Pathauto and Auto Label
- http://drupal.org/project/auto_entitylabel
- If hide Title field and auto create the Title, don't give away private info in that Title.
- http://drupal.org/project/pathauto
- [user:name] not good default path for user URLs (will show gtaccount)
- Do your content type auto aliases reveal too much about content?
External Libraries and Code
- SUGGESTIONS requested. HOW Can we: ?
- Regularly check libraries for security notices (CKeditor, phpCAS, jquery.cycle, etc.).
- Audit 3rd party code for security holes (such as superglobals like $_GET)
- Audit libraries’ example code or other 4th party included packages.
- Discover unneeded code to remove from libraries (and, of course, notate in README.txt file)
Editor Support
- Training, especially security implications of:
- forms
- comments
- file types
- tag choices in HTML
- Regular audits of content + users
- every semester
- less files/revisions/people to look over if hacked
- less chance of un-used file/account being co-opted
Server and Monitoring
- Not a good use of time to try to hide clues that a site runs on Drupal (http://drupal.org/node/766404)
- Robots.txt (only works on good search engines)
- .htaccess (can limit to on-campus or VPN access, Drupal already hides directories)
- use HTTPS, instead of HTTP
- Securing file permissions and ownership (settings.php, etc., http://drupal.org/node/244924)
- Regular BACKUPS (and diffs for comparison)
- Avoid installing multiple applications on same hosting account (i.e. Wordpress AND Drupal)
- Avoid storing ANYTHING other than the Drupal install in the web ROOT (httpdocs).
References
- Securing Your Drupal Site (Last updated in 2016)
- List of security-related contrib modules (Last updated in 2016)
- Supporting Drupal Over the Long Run (BadCamp 2012)
- Performance for Site Builders (2012)
Adding Classes to the CKEditor Styles Dropdown List [Drupal 7]
Adding Classes to the CKEditor Styles Dropdown List [Drupal 7]If you want your editors to be able to easily apply your custom CSS classes via the Styles drop-down list in the GT Editor:
- Copy the
js/ckeditor.styles.jsfile from the GT Theme (version 7.x-2.2 and above) into your subtheme folder. - Add your own CSS styles to this file. The CKEditor documentation explains how this works.
- Go to Configuration -> Content authoring -> CKEditor
- Select the Edit link under the OPERATIONS row for the appropriate CKEditor profile (advanced, basic, etc.)
- Under the CSS accordion fieldset change the Predefined styles drop-down to "Use theme ckeditor.styles.js"
- Flush your browser's caches to get CKEditor to pick up the new file. You'll need to flush your browser's caches each time you update this file.
If you'd rather not rely on users caches expiring or telling them to flush their caches, you can use another technique to specify your styles file:
- Go to Configuration -> Content authoring -> CKEditor
- Select the Edit link under the OPERATIONS row for the appropriate CKEditor profile (advanced, basic, etc.)
- Under the CSS accordion fieldset change the Predefined styles drop-down to "Define path to ckeditor.styles.js"
- Set the Predefined styles path to point to your custom styles file. Add "?v=XXX" where XXX is some random value. Change this value each time you make changes to your styles file. This change will trigger web browsers to consider the file to be updated and to ignore the version held in the browser cache.
NOTE: If you implement a custom ckeditor.styles.js file, you'll need to remember to integrate into this file any changes to the standard styles introduced by any newer version of the GT Theme.
Adjusting the 'From' Address in Webform Generated Emails [Drupal 7]
Adjusting the 'From' Address in Webform Generated Emails [Drupal 7]A bug exists in Webform 3.x that can prevent you from changing the "From" address in an automated email template. There is an existing Drupal.org discussion about this issue: https://www.drupal.org/node/1804214#comment-9661515
Drupal 7 Fix
- Visit Configuration -> Content -> Webform (
admin/config/content/webform). - Uncheck the Use Reply-To header option
- Save your changes.
Allowing Additional CSS Classes in GT Editor [Drupal 7]
Allowing Additional CSS Classes in GT Editor [Drupal 7]Are you adding design elements with CSS and want editors to be able to use your new CSS classes within GT Editor? You may have discovered that those classes are being stripped out when the page is saved. What's happening is that GT Editor operates on a whitelist principle to keep your site and its content safe. You must add any elements, classes, etc. that you want to use to the editor's whitelist - otherwise, it will assume the worst and remove them when you save a page. GT Editor strips all non-whitelisted classes and elements using the WYSIWYG Filter module. This module is configured within each text format (such as the "basic text editor" format that comes standard in GT Editor).
The Easy Way: Use Standard "gt-ed-*" Class Naming
The latest versions of GT Editor (7.x-2.0-beta1 and above) will allow any CSS class that starts with "gt-ed-". So, if you don't mind adding CSS classes that use this naming format, you're done.
Create Your Own Text Format
If you want to use CSS classes that aren't in the "gt-ed-" naming format, you will need to create your own text format (at admin/config/content/formats). This way, any changes you make to the format won't be overwritten when you update the GT Editor.
It is recommended that you copy the settings from the existing basic text editor text format into your new format, and THEN make changes. If you take this approach, you'll need to remember to integrate changes to this format from each new GT Editor version.
To add to the whitelist of classes, look under your text format's WYSIWYG Filter settings at: admin/config/content/formats/text_editor_basic. You will see sections called Rules for Class Names and Rules for Element IDs where these filters are configured.
GT Theme v2.8 - Search Text Box Not Appearing
GT Theme v2.8 - Search Text Box Not AppearingGeorgia Tech Drupal websites may notice that their search bar stops working after upgrading to version 2.8 of the official Georgia Tech Theme. If your website was built by a developer or a vendor and uses overwritten template files, your website will likely exhibit this problem.
Symptoms
Search Box Does Not Appear
If your search selector shows an empty box (instead of the usual search box), you need to fix your Georgia Tech subtheme to match the new templates implemented in version 2.8.
![]()
Errors in Your System Logs
If you see an error like the following in your Drupal system log, your website likely has a broken search box.
Notice: Undefined variable: search_option_value in include() (line X of /var/www/vhosts/dev.coe.gatech.edu/httpdocs/sites/all/themes/[theme name]/page.tpl.php).
Solution
To fix this bug, replace the blob for your search box in any page-*.tpl.php files in your subtheme (sites/all/themes/[subtheme]/templates/[any page- tpl.php file] with the blob of search box code found in the file GT 2.8 Theme file sites/all/themes/gt/templates/page.tpl.php
Do not simply replace/overwrite the subtheme template file, as your subtheme may utilize custom template structure beyond the search box.
Popular Drupal 7 Contrib Modules
Popular Drupal 7 Contrib ModulesPlease see the introduction to contrib (third-party) modules before installing anything listed on this page.
The following information is provided as-is with no warranty or guarantees of any kind! While members of the campus community have recommended the following modules for their listed purposes, it's perfectly possible you could blow up your Drupal website if you don't know what you're doing and install them incorrectly or alongside other modules that are incompatible.
Most descriptions are borrowed from the module's home page on the Drupal.org website.
Editor's Note: Virtually all development work has ceased on Drupal 7 modules, and in many cases modules have been abandoned, meaning that no one is supporting those modules. You should consider all Drupal 7 modules to be unsupported at this time. Units are strongly advised to begin moving from Drupal 7 to either Drupal 9 or another content management system as soon as possible.
APIs
These are only needed if required by another module. The ones listed below are some of the most commonly used API modules.
- Libraries - Introduces a common repository for libraries in
sites/all/libraries and sites/<domain>/libraries - Chaos Tools (CTools) - A set of APIs and tools to improve the developer experience
- Entity API - Extends the entity API of Drupal core in order to provide a unified way to deal with entities and their properties
- FlexSlider - Integrates the Flex Slider library with Drupal, which allows you to build responsive, resizable slideshows
- Advanced Help - Provides support for advanced help documentation in modules provided in standard HTML format
- JQuery Update - Upgrades the version of jQuery in Drupal core to a newer version of jQuery
Administrative Tools
- Administration Menu - Administrative links are displayed in a CSS/JS-based menu at the top on all pages of your site, including links to common tasks and actions
- Module Filter - Lets you more easily see installed modules grouped by type and quickly search through them
- Filter Permissions - Provides filters at the top of the Permissions page for easier management.
- Node Convert - Node Convert adds a menu tab "Convert" on the node view page that gives the ability to convert the node from its current content type to another content type.
User Authentication
- CAS - Provides single sign-on capability for your Drupal site by implementing the CAS protocol.
- LDAP - Provides integration with LDAP (Lightweight Directory Access Protocol) for authentication, user provisioning, authorization, etc.
Security
- SpamSpan - Obfuscates email addresses to help prevent spambots from collecting them
- Honeypot - Uses both the honeypot and timestamp methods of deterring spam bots from completing forms on your Drupal site
- CAPTCHA - Provides CAPTCHA ("Are you a human?") challenge-response tests to virtually any user facing web form on a Drupal site.
- reCAPTCHA - Uses the Google reCAPTCHA web service to improve the CAPTCHA system and protect email addresses [Requires CAPTCHA module]
- Spamicide - Spamicide adds an input field to each form then hides it with css, when spam bots fill in the field the form is discarded
- BOTCHA - In BOTCHA, we don't abuse our human users - protection is completely transparent to them and non-intrusive. BOTCHA lets spambots to prove they are bots, and lets real users zip by
- Mollom - Connects your site with the Mollom network to help determine if posts or comments are spam.
- Security Review - Automates testing for many of the easy-to-make mistakes that can make your site insecure
User Interface
- CK Editor - Allows Drupal to replace textarea fields with the CKEditor - a visual HTML editor, usually called a WYSIWYG editor
- IMCE - An image/file uploader and browser that supports personal directories and quota
- Image Resize Filter - Just insert an image and set it's height and width properties in HTML (done automatically by WYSIWYG editors) and the image is resized on output to match the HTML
- Adaptive Image Styles - Allows any image to be adaptive simply by setting it to be rendered with the 'adaptive' image style. Adaptive images are sized down based on the user's detected screen size, reducing bandwidth and load times. [Requires .htaccess modifications]
Navigation / URL Paths
- 404 Navigation - Causes Drupal to render the primary/main menu on 404 (page not found) error pages
- Pathauto - Automatically generates URL/path aliases for various kinds of content (nodes, taxonomy terms, users) without requiring the user to manually specify the path alias
- Pathologic - An input filter that can correct paths in links and images in your Drupal content in situations which would otherwise cause them to “break;” for example, if the URL of the site changes, or the content was moved to a different server
- Redirect - Work in progress for a Drupal 7 integration and collaboration between redirection-type modules: Path Redirect and Global Redirect
- Global Redirect - Makes sure that all ways to access a page redirect with 301 errors to a single URL path, which optimizes a site for search engines
Design / Layout
- Paragraphs - Allows you — Site Builders — to make things cleaner so that you can give more editing power to your end-users
- Node Block - Allows you to have nodes of specific content type(s) be provided as blocks, combining the editing flexibility of node fields with the placement flexibility of Drupal blocks
- Panels - Allows a site administrator to create customized layouts for multiple uses
- Menu Mini-Panels - A system for building "megamenu" -style (explanation) dropdown menus using Mini Panels, which provides tremendous flexibility in what can be displayed.
- Menu Block - Provides configurable blocks of menu trees starting with any level of any menu
Flow and Logic
- Workflow - Allows you to create arbitrary Workflows, and assign them to Entities
- Revisioning - Allows for the configuration of workflows to create, moderate and publish content revisions
- Rules - Allows site administrators to define conditionally executed actions based on occurring events (known as reactive or ECA rules)
- Override Node Options - Allows permissions to be set to each field within the Authoring information and Publishing options field sets on the node form
Data Integration / Migration
- Views - Provides a GUI for processing, sorting, and displaying data
- Views Data Export - Provides a way to export large amounts of data from views [Requires Views module]
- Views Bulk Operations - Augments Views by allowing bulk operations to be executed on the displayed rows [Requires Views module]
- Feeds - Import or aggregate data as nodes, users, taxonomy terms or simple database records
- Feeds Extebsible Parser - A set of extensible parsers for Feeds [Requires Feeds module]
- Feeds Tamper - Provides a small plugin architecture for Feeds to modify data before it gets saved [Requires Feeds module]
- Bundle Copy - This module has export/import support for: Node types, Taxonomy, User, Field API fields, and Field groups
Fields and Forms
- Link - Provides a standard custom content field for links
- Date - This package contains both a flexible date/time field type Date field and a Date API that other modules can use
- Location - Allows real-world geographic locations to be associated with Drupal nodes, including people, places, and other content
- GMap - Provides an interface to the Google Maps API within Drupal [Requires the Location module]
- Local Location and GMap Resources
- Entity Reference - Provides a field type that can reference arbitrary entities
- Block Reference - Defines a field type that creates a relationship to a block and allows the block to be displayed as the content of the field
- File (Field) Paths - Allows you to automatically sort and rename your uploaded files using token based replacement patterns to maintain a nice clean filesystem
- Transliteration - Provides one-way string transliteration (romanization) and cleans file names during upload by replacing unwanted characters
- Conditional Fields - User interface to the new States API, plus the ability to modify fields appearance and behavior on certain conditions when viewing content
- Field Permissions - Allows site administrators to set field-level permissions to edit, view and create fields on any entity
- Field Group - All fieldable entities will have the possibility to add groups to wrap their fields together. Fieldgroup comes with default HTML wrappers like vertical tabs, horizontal tabs, accordions, fieldsets or div wrappers
- Webform - Allows for the creation of user friendly forms and surveys in Drupal complete with email receipts and data export
Using Node Convert to Change a Node's Content Type [Drupal 7]
Using Node Convert to Change a Node's Content Type [Drupal 7]Editor's Note: Node Convert has not been ported to Drupal 8, but a replacement module called Convert Bundles is under development. At the time of writing, Convert Bundles was still in alpha testing, so it isn't ready for prime time yet, but is worth watching for future developments.
The Node Convert module can be used to switch between different page layouts without losing existing content. One example is changing a Basic page so that it uses a Horizontal Landing Page layout.
Overview of Process
- After backing everything up, install the Node Convert module in the usual way.
- Go to People -> Permissions and set permissions for your different user roles.
- Optionally, if you have a LOT of content to convert, or are just feeling super fancy, you can also create "node convert templates".
Set Permissions for Users, Based on Their Role
In your site's Administration interface, go to the page where you manage which features people can use on your site. In Drupal 7, this can be found at People -> Permissions (admin/people/permissions). The main roles usually needing permissions for converting layouts are Editor and Super Administrator.
Editor Permissions
Give the "Editor" role permission to convert To AND From each of the four (4) main page layouts, by checking the boxes next to these specific permissions:
- convert from page
- convert to page
- convert from horizontal_landing_page
- convert to horizontal_landing_page
- convert from multipurpose_page
- convert to multipurpose_page
- convert from vertical_landing_page
- convert to vertical_landing_page
Super Administrator Permissions
Give the "Super Administrator" role all of the same permissions as an Editor, but then also check the "administer conversion" box.
(Optional) Make Templates for converting content in large batches
If you need to convert a LARGE amount of content, you can make this easier by creating "Node Convert templates" (under "admin/structure/node_convert_templates" in Drupal 7).
Read documentation and examples of how to create and use these templates at:
Block Regions
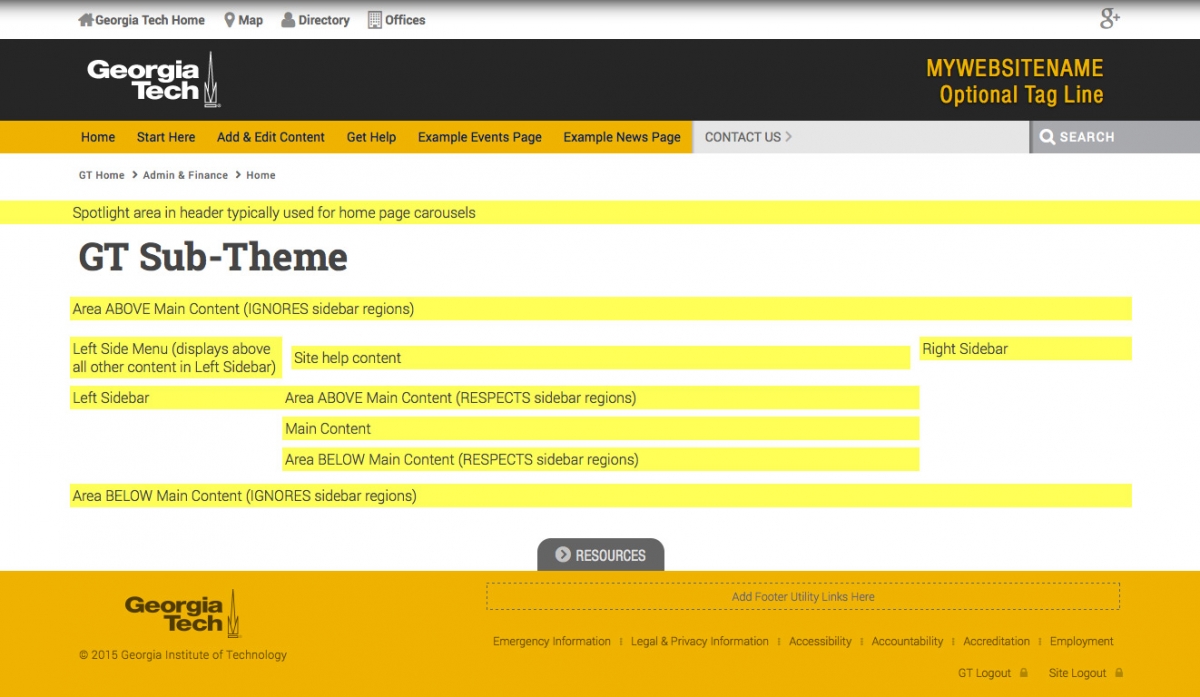
Block RegionsBlock Regions are areas on a Web page where blocks can be placed. Using Block Regions to place blocks on a page is different than adding blocks directly to a Horizontal Landing Page, Vertical Landing Page, or Multipurpose page.
Available Block Regions in the GT Theme
The following regions are available in the GT Theme. If you are using a different theme, it will likely have a different set of regions.
- Spotlight area in header typically used for home page carousels
- Area ABOVE Main Content (IGNORES sidebar regions)
- Left Side Menu (displays above all other content in Left Sidebar)
- Left Sidebar
- Site help content
- Area ABOVE Main Content (RESPECTS sidebar regions)
- Main Content
- Area BELOW Main Content (RESPECTS sidebar regions)
- Right Sidebar
- Area BELOW Main Content (IGNORES sidebar regions)
How to Add Block Styles to Your GT Theme
How to Add Block Styles to Your GT ThemeThe GT theme includes some pre-set design treatments for blocks (see lists below of "Body styles" and "Title styles").
All versions of the new GT Theme include the CSS to display these design treatments for blocks, or "block styles". However, you have to manually add these styles to your site via the GT Tools settings to make them available as options when adding/editing blocks.
Option 1: Import SQL code into your database
The fastest way to get the standard styles is to import this sql code into your block_classes table (via phpMyAdmin in your web hosting panel).
Option 2: Create styles manually in your site's administrative interface
Another way to get the standard styles is via the block style class options, which you'll find under the GT Tools options. This is located under the System link (Configuration -> System -> GT Tools if you're using the Administration Menu module).
You can use this same method to add new block designs for your GT SubTheme, using CSS class declarations in your SubTheme and adding block styles classes through the interface (as described above).
Remember, the "Class name" must:
- exactly match that of the class declaration in your CSS style sheet (e.g. "promo-block"),
- begin with a letter, and
- contain only numbers, lowercase letters, hyphens, or underscores.
Default Class names
- promo-block
- related-info-block
- icon-info-title
- icon-link-title
- icon-alert-title
- icon-download-title
As of version 2.5 of the GT Theme, the following styles were added:
- icon-mortar-board
- icon-institution
- block-title-bg-gt-blue
- block-title-bg-gt-gold
- block-title-bg-gray
How to Install Acquia Dev Desktop as a Local Development Environment
How to Install Acquia Dev Desktop as a Local Development EnvironmentAquia Dev Desktop is being phased out and will no longer be supported after June of 2021. The following instructions are left here until then to assist those already using the product, but there is no point in installing Dev Desktop at this point. Instead, take a look at Lando to see if it will work for your needs.
With the Acquia Dev Desktop (ADD) tool, you can easily and quickly set up a local development environment for Drupal on your computer.
Install Acquia Dev Desktop (ADD)
This handy, easy-to-install software is the fastest way to Drupal on your own computer! It includes all the pieces you need to run Drupal on Mac or Windows. With Acquia Dev Desktop, you can develop and test locally, then export to your server(s).
Make sure to write down where you install this on your computer (so you can find it later) and which default username and password you choose.
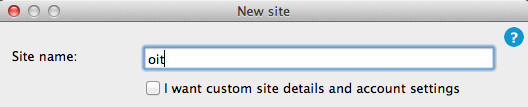
Add new ADD site
You can add a fresh new Drupal 7 site in Acquia Dev Desktop by clicking: Settings > Sites > New. (See Acquia's documentation for more information).
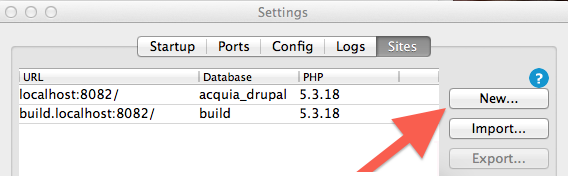
In this example, we will leave all the default settings for acquia, and change only the "Site name" (to "oit").
Using the DX Shell Script with ADD
See instructions on how to use ADD with the Drupal Express Shell Script.
How to Use the Drupal Express Shell Script on your computer with Acquia Dev Desktop
How to Use the Drupal Express Shell Script on your computer with Acquia Dev DesktopAquia Dev Desktop is being phased out and will no longer be supported after June of 2021. The following instructions are left here until then to assist those already using the product, but there is no point in installing Dev Desktop at this point. Instead, take a look at Lando to see if it will work for your needs.
The following instructions are for using the Drupal Express Shell Script on your local computer to test Drupal site settings. These partially-complete instructions use Acquia Dev Desktop (ADD) and have only been tested on a Mac. (The author would be super grateful is someone could test on Windows and share any problems they encounter!)
Install Acquia Dev Desktop (ADD)
We have a separate page detailing ho to install Acquia Dev Desktop on your computer.
Prepare Your Folders and Files
- Change the permissions to allow "Writing" for your new site's folder (oit.localhost), so that you can make changes.
- Delete all the folders and files underneath "oit.localhost" (except settings.php).
- (Optional) Decide if you want to delete any acquia modules (under profiles/acquia/modules), such as acquia_connector
- (Optional) Decide if you want to add any modules you commonly use to sites/all/modules.
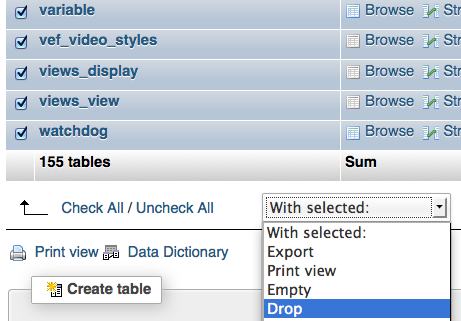
Empty Your Database
- Choose the "Manage my database" option in Acquia Dev Desktop.
- Select the "Check ALL" option at the bottom of the view for this site's database only, and choose "Drop". This will remove all the tables from this database.
Copy DX Database
Download the DX SQL.
Using phpmyadmin, follow the instructions in the README file, starting at "Import SQL file into your database" for the database ADD created for you (oit). This will make sure your user account (gburdell1) can log in to your new site.
Copy DX Files
Download the DX Files and then replace all the files and folders underneath "oit.localhost" (except settings.php).
Run update.php
In your settings.php file, find the line that says $update_free_access = FALSE; and change the "FALSE" to "TRUE". Save your settings.php file (you will need to change this back at the end).
Using the Acquia popup box, choose "Go to my site" (while the site chosen is your new oit.localhost site).
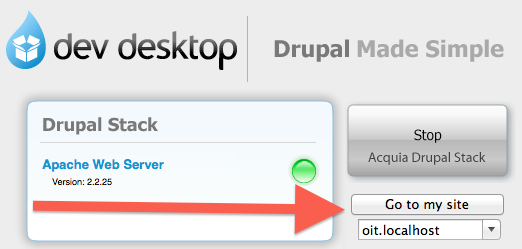
At the end of the web address it sends you to (such as oit.localhost), add "update.php" and hit Return. Run updates as you might normally on a Drupal site.
Change File System
Once finished updating, change the value in your settings.php file back to $update_free_access = FALSE;.
The design of the site won't look quite right until you change your site's file system (which was automatically set in the GT Editor module) by logging in to the site and visiting: admin/config/media/file-system
Change the "default" folder in each of these three paths to your site (oit.localhost):
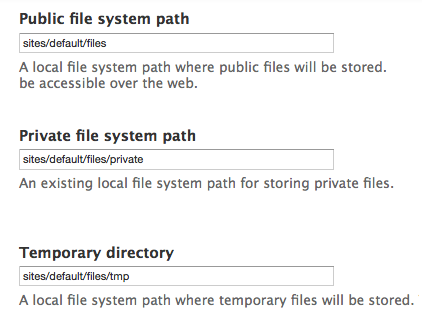
- Public file system path:sites/default/files, becomes sites/oit.localhost/files
- Private file system path: sites/default/files/private, becomes sites/oit.localhost/files/private
- Temporary directory: sites/default/files/tmp, becomes sites/oit.localhost/files/tmp
After you save these changes, your site should work.
Location and Gmap
Location and GmapLocation and gmap modules provide embedded Google Maps for Drupal websites.
However, the documentation and readme for configuring both of these modules is sparse, if available. Most documentation on how to utilize these modules as a pairing exist in knowledgebase entries and bug reports, which makes development using these two modules a chore.
Installing and configuring these modules takes a few main steps.
Installation
- Download Location and Gmap from Drupal, using the most recent stable releases for Drupal 7.
- Add these modules to your sites/all/modules folder.
- Log in to the website you wish to add these modules to.
- Enable these modules.
Configuration: Google
- Using a Google account, access the Google API Console.
- Create a new project.
- Under APIs & auth -> APIs, enable Geocoding API (for the Geocoding service of Location) and Google Maps Javascript API v3 (for Gmap).
- Create a server key (for Geocoding), making sure to restrict the IPs to your server.
- Create a browser key (Gmap), making sure to restrict the referers to your domain(s).
Configuration: Drupal
- Log in as an administrator to your website.
- First, edit Location at: admin/config/content/location
- Under 'Geocoding Options', enable 'Google Maps' for United Statres.
- Under 'Configure parameters', enter the server key from above into the 'Google Geocoding API Server Key'.
- Click 'Save Configuration'.
- Second, edit Google Maps at: admin/config/services/gmap
- Under 'Google Maps API Key', enter the browser key from above.
- Click 'Save Configuration'.
Configuration: Field
- Create a content type which utilizes a Location field.
- On the field options, disable the postal code, as this feature tends to break geolocation in some instances.
- Save the field.
- Test by creating a new node!
GT Theme Provided Menus
GT Theme Provided MenusThe GT Theme, by default, will use your site's "main menu" for your primary menu. The primary menu is the gold-colored horizontal one that sits below the main Georgia Tech logo. This menu will show the top-level links in a horizontal line, with child links appearing as drop-down boxes.
Additional menus provided by the GT Theme that you can modify include:
Social Media Links
Shown in the upper-right corner of every page, this menu includes presets for Facebook, Twitter, Google +, LinkedIn, Youtube, etc., plus an RSS feed icon. You can change the location that each icon links to. Be sure to let Institute Communications know if there are other social media outlets you think should be included.
Action Links
This menu appears to the right of your main menu, with a greater-than sign ('>') after each link. To keep things nice and streamlined we've limited the action links to three.
(Super)Footer Links
For the super footer you'll find three separate menus listed as footer links 1-3. If you opt to have a configurable super footer via the theme's appearance settings you'll get a list of default resource links that are hard coded into the the theme (Georgia Tech Resources, and Visitor Resources), and appear as the left column of links in the super footer, but you can customize up to three additional lists.
One thing to note is that the theme includes styling for "nolink" items added via the Special Menu Items module. If you install this module you can add links that serve as headers within a list of resource links to help break them up into different categories. "No link" items would appear like the Visitor Resources header does in the superfooter links on this site. You can also change the name of your resource links menus, which shows up at the top of the list of links.
Footer Utility Links
These links will appear above the standard "legal" links in the footer (Emergency Information, Legal & Privacy Info, etc.) This is ideal for adding a customized "Contact Us" link which can go to your own contact form.
Updating From version 7.x-1.x of the GT Theme to version 7.x-2.x
Updating From version 7.x-1.x of the GT Theme to version 7.x-2.xEditor's Note: The following information is rather outdated, but believe it or not, there are still a few sites out there that are running version 1 of the GT Theme. Our current-day recommendation for anyone running that theme is to strongly consider just rebuilding your site from scratch with a fresh copy of Drupal 9, as if your theme is that much out-of-date (version 2 was released in late 2013), your content and other site structures are also likely to be pretty out-of-date as well.
Below are tips and/or steps on how to update your Drupal 7 site from version 1 of the GT Theme (unofficial) to version 2 (official).
- Put your site in maintenance mode (and try this on a TEST site first!).
- Change the "Appearance" of your site, so that it uses only CORE-provided themes (such as garland).
- After you make copies of them and save them somewhere safe, disable any older versions of the GT Theme and any subthemes you made that were based upon it.
- Remove any the actual files for the older GT Theme and its subthemes from your file system.
- Flush the caches on your site and, just for fun, run "update.php", too.
- Install the parts that are required for the 2.x version of the GT Theme in this general order:
- GT Content Types (submodule of GT Tools)
- GT Tools
- GT Theme
- THEN, the GT Subtheme
- Check to make sure can now add the new content types (such as Horizontal landing page) that come with version 2.x of the GT Theme.
- Under Appearance, choose the GT Subtheme (NOT the GT Theme itself) as your default theme for this site.
- If re-using the same blocks for this new look, you'll need to put them into regions for this theme under Structure > Blocks.
Installing and Using CKEditor in Drupal 7
Installing and Using CKEditor in Drupal 7There are two parts to installing CKEditor for Drupal 7 (Drupal 8 comes with it already installed):
- The CKEditor Drupal module, which is placed in the
sites/all/modulesfolder. - The CKEditor library, which is placed INSIDE the
sites/all/librariesfolder.
After installing the module and library, enable the module and it should take effect immediately.
If you want to customize your CKEditor settings, look in the administrative configuration area under Content Authoring -> CKEditor.
Additional Resources for Using CKEditor in Drupal 7
LDAP and CAS Integration [Drupal 7]
LDAP and CAS Integration [Drupal 7]Integration between LDAP and CAS allows you to grab user data fields and attributes available from the campus LDAP servers while still authenticating users via CAS.
Editor's Note: As the CAS Attributes module is not participating in the Drupal security advisory policy, and the code is still in beta and hasn't been updated since 2013, we can't recommend using this technique, but we are providing the instructions below as a reference. At this time, there is no usable version of CAS Attributes for Drupal 8, so this method is only usable currently for Drupal 7 sites.
Drupal 7 Instructions
- Make sure the LDAP, CAS, and CAS Attributes modules are installed.
- Configure LDAP and CAS according to this handbook's instructions. Be sure to use the public-facing LDAP server for easiest setup.
- Go to the CAS Attributes settings page at Configuration -> People -> CAS -> Attributes (
admin/config/people/cas/attributes) - Open LDAP tokens in a second tab.
- Copy and paste the appropriate Tokens back to the profile fields on the CAS Attributes main settings page.
- You may also want to use the Real Name module to replace displays of the user's username with a combination of other Profile fields.
Make Your Pages Readable for People Who Are Blind
Make Your Pages Readable for People Who Are BlindTWO simple things you can do, which make your web pages easier to use for people who are losing their eyesight or are blind.
Eyes vs. Software
People who cannot see your actual page often use software called screen readers, which reads that page read aloud. This software reads pages differently than one might visually. But TWO simple changes in the way we edit web pages can make that difference easier to manage.
If you'd like to get a better understanding of how someone experiences the web when using screen reader software, watch the YouTube video below. Otherwise, you can skip to the first tip for making your pages more accessible.
[VIDEO::http://www.youtube.com/watch?v=VvWCnFjAGgo]
Describe Each Image With "Alternative Text"
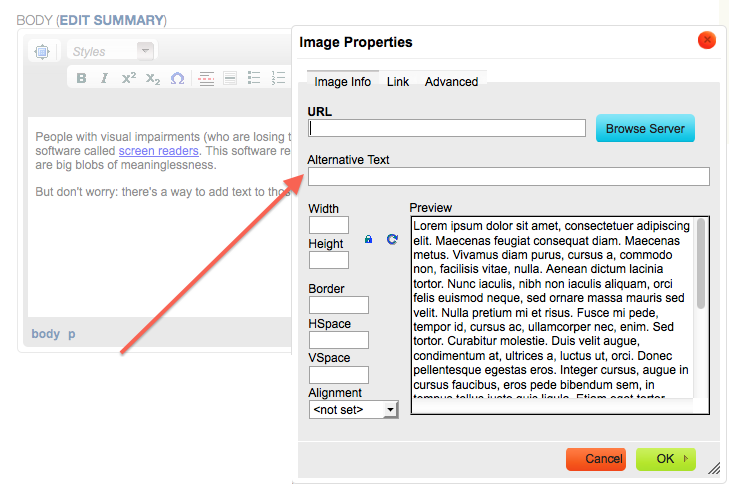
Because the software cannot read images, any pictures or graphics on your website are big blobs of meaninglessness.
But don't worry, there's a way to add text to those images: "Alternative Text"!
When you are following the instructions on how to add an image to your page with the GT Editor, one of the final steps is to type descriptive words into the "Alternative Text" area of the image popup box. By describing what each image is supposed to communicate, you make it accessible. This is especially crucial when your image contains actual words (which, because they are part of an image, cannot be read as text by the screen reader).
How long should my Alt Text be?
While there is no official length restriction on the length of alt text, many experts recommend 125 characters or fewer because of restrictions within the JAWS screen reader. In addition, Google will stop reading alt text after 16 words.
Add Real Headings to Your Pages
Another way that people visually use your page is to quickly scan it to see what it is about. This is especially important on pages that have a lot of content!
To make it possible for screen readers to do the same thing and quickly skim your page's content, you need to provide an outline of your page using headings.
Headings are not just visual clues, but have special code behind the scenes. This means you cannot make text bold and have it work as a heading.
To make a real heading, first, highlight a line of text on your page that indicates another section or division of content on the page. Then, in your GT Editor toolbar, select the "Styles" option in the toolbar.

A list drops down underneath "Styles" and offers you a number of options, but the most important for your outline are these four:
- Heading
- Subheading 1
- Subheading 2
- Subheading 3
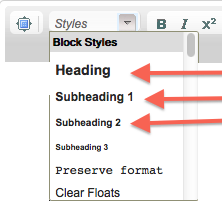
By choosing one of these headings, you are allowing the software to quickly scan the page for its users and read just the headings to them, so they can skim a page's contents just as one might do visually. Unless your pages are very long, you will probably only use the "Heading" and "Subheading 1" options with any regularity.
GT Theme Troubleshooting and Advanced Topics
GT Theme Troubleshooting and Advanced TopicsThe topics below are for troubleshooting specific problems and doing advanced implementations of the Georgia Tech Drupal theme. Implementing some of these features will require knowledge of advanced Drupal development techniques and/or PHP coding skills.
Advanced Topics Pages
Migrating to Drupal 7 from Drupal 6
Migrating to Drupal 7 from Drupal 6
Editor's Note: We sincerely hope that no one is still running a site on Drupal 6 at this point, but just in case you should inherit a site that turns out to still be on Drupal 6, we're leaving the following instructions in place, even though they are a bit outdated now, and there's no guarantee that the external links will continue to work.
Before You Begin
Create a SEPARATE Test site to use for this process, so you don't kill your Live, Production site and...BACK UP EVERYTHING!
The Recommended Process
Almost no one does a regular upgrade, because so much has changed between Drupal 6 and Drupal 7, and many contributed modules don't even exist in version 7. Instead, the process usually involves:
- Creating a new development Drupal 7 instance.
- Recreating any important content types and functionality in that development site.
- Removing any un-needed modules from the new site (this also keeps your maintenance work easier).
- Moving/migrating or recreating actual content (nodes, pages, users, files, taxonomy, etc.) into this new site.
How-To Links on Migration/Upgrading
- Find out which databases tables and files are most important on your Drupal 6 and Drupal 7 sites.
- Direct Drupal 5 to Drupal 7 Migration in 24hrs
- More than 50 Drupal modules moved into Drupal 7
- Migration Worksheet (from Stanford)
Use the Feeds XPath Parser module to move content
- Step by Step Instructions for Migrating Pages with Feeds Xpath Parser.
Common Migration Problems
One of the more common problems with migrating Drupal 6 to Drupal 7 is that Drupal 6 did not have the now standard field system. Instead, many developers of complex sites used a third-party (contrib) module called CCK (Content Construction Kit), which doesn't have a direct migration path into the Drupal 7 field system.
Another feature often used was the User Profile module, which while still present in Drupal 7, is officially deprecated and is only made available when you run a standard Drupal 7 upgrade process on a Drupal 6 installation. If your Drupal 6 site uses this module, then you should really take the time to properly migrate that profile information into the Drupal 7 field system, since the user profile module isn't available at all in Drupal 8.
It is possible to do some automated migration of CCK and User Profile data via custom PHP scripting run at the command line, but this is not a task for the novice user, as you need a good understanding of the Drupal 6 and 7 database schemas. For anyone else, you may either need to hire a web development company that can do this work, or consider hiring student assistants to manually re-enter the data (if the amount isn't too large) into a properly structured Drupal 7 development site.
Adding Multiple Jump Links to GT Super Blocks [Drupal 7]
Adding Multiple Jump Links to GT Super Blocks [Drupal 7]To allow more than one jump link on each Superblock, a quick hack is needed.
Please note: This is not guaranteed to work with future versions of Super Block, so proceed at your own risk.
Prerequisites
Log in to GT Github and download the templates/node--super-block.tpl.php file from the gt_ae project.
Adding Multiple Jump Links
- On your website, edit the content type Super Block.
- Select Manage Fields.
- Select Edit, to the right of Jump Link (field_nbsb_jump_link).
- Under Number of Values, increase the value from 1 to your desired number (supports up to unlimited).
- Add the templates/node--super-block.tpl.php file to your subtheme's templates/ folder.
- Clear caches.
- Test to see if it works.
Adding PHP Code to a Page: Alternate Method for Drupal 7
Adding PHP Code to a Page: Alternate Method for Drupal 7The Alternate Method (PHP, IFRAMEs, JavaScript) (Drupal 7)
The following method is a little more round-about, but doesn't require as much coding knowledge as the previous method. The main downside is that it may be difficult for someone in the future to figure out where your custom PHP or embed code has been stored, since this is a non-standard and uncommon method. It also sort of goes against design standards, which say that template files really should not contain any actual content, but rather should contain framework for content provided to them by the system using that template.
- Create a normal block (not a Super block!), and don't type anything other than spaces into the Body field.
- Write down the block's ID number, which will show in the URL after you save the block and go back to that block's "Configure" page. For example, in the URL
http://example.gatech.edu/admin/structure/block/manage/block/30/configure, the block id is the number between "block" and "configure", in this case, 30. - Add this block to a page on your site, preferably a test page that no one will find, and keep that page open in your web browser.
- In the subtheme for your site, usually within its "templates" folder, create a file that will only effect this specific block. For our example block #30, the file would be named
block--block--30.tpl.php - Inside this file, first paste the code for a generic block template file (Drupal 7) from the View source sub-section of the File section of the Drupal block API documentation page (Abbreviated source example copied below).
- If you want to completely overwrite what people might type into the Body field of this block, then replace the
<?php print $content ?>line. Otherwise, decide if your embed code should appear below or above whatever the Body field's content.
Sample Block Template Code (Drupal 7)
<?php
/**

* @file

* Default theme implementation to display a block.

* For variables definition, visit:

* https://api.drupal.org/api/drupal/modules!block!block.tpl.php/7

*/

?>

<div id="<?php print $block_html_id; ?>" class="<?php print $classes; ?>"<?php print $attributes; ?>>
<?php print render($title_prefix); ?>

<?php if ($block->subject): ?>

<h2<?php print $title_attributes; ?>><?php print $block->subject ?></h2>

<?php endif;?>

<?php print render($title_suffix); ?>
<div class="content"<?php print $content_attributes; ?>>

<!-- DELETE PRINT LINE BELOW IF OVERWRITING BODY OF BLOCK -->

<?php print $content ?>

<!-- START EMBED CODE HERE -->

<!-- END EMBED CODE HERE -->

</div>

</div>
After Upgrading to Drupal 7.50 (or Later), I Get Missing Module Warnings
After Upgrading to Drupal 7.50 (or Later), I Get Missing Module WarningsIssue
After upgrading to Drupal 7.50 (or later), you start seeing red error messages that read "The following module is missing from the file system...".
Drupal 7.50 began scanning more carefully for module and theme files, including files for modules and themes that had been disabled, but not uninstalled. Unfortunately, many Drupal site administrators have disabled and deleted modules in the past without running the uninstall process, and once the module has been deleted, you no longer have a way to uninstall it.
Solution
-
If the module listed is "mymodule", then the issue is most likely with the GT Tools module (specifically, the GT Content Types sub-module of GT Tools). Upgrade your site to the latest version of GT Tools, and that should fix the problem.
-
For other modules and themes, the easiest solution is to download a copy of the module or theme in question, install it back into your website's filesystem, then go to Modules -> Uninstall on the administration menu bar and uninstall that module. You can then delete the module or theme from your filesystem.
-
If you cannot obtain the a copy of the module again (e.g. it was a locally written custom module, and all copies have been deleted), you can suppress the error messages by updating your database (WARNING: Back up your database before attempting this proceedure!)
Via whichever MySQL tool you prefer to use (e.g. phpMyAdmin), run the following SQL commands against your Drupal database (replace 'XXXX' with the relative path from the Drupal site root directory to the module or theme in question -- e.g., "sites/all/modules/ctools"):
DELETE FROM `system` WHERE filename like 'XXXXXX'; -
If the missing object is a Drupal profile (e.g. "gt_profile" or "gt_install"), then fixing the problem is a little trickier. Please see the article on fixing a missing profile in Drupal 7.
After Upgrading to the GT 2.9 Theme, Formatting Breaks on Custom Content Types
After Upgrading to the GT 2.9 Theme, Formatting Breaks on Custom Content TypesIssue
After updating to the 2.9 version of the GT Theme, the formatting is broken for custom content types (such as Super Blocks and Slideshow Carousels), usually those created via the Features module. Often the types show CSS classes as text instead of as visual styling.
Example of broken Super Blocks
Solution
Find the theme_registry_alter function in your feature's .module file and make the following replacement
Replace:
$theme_registry['template-file']['path'] = drupal_get_path('module', 'gt_ct_carousel_slider') . "/templates/";
With:
// Defined path to the current module.
  $module_path = drupal_get_path('module', 'gt_ct_carousel_slider');
  // Find all .tpl.php files in this module's folder recursively.
  $template_file_objects = drupal_find_theme_templates($theme_registry, '.tpl.php', $module_path);
  // Iterate through all found template file objects.
  foreach ($template_file_objects as $key => $template_file_object) {
    // If the template has not already been overridden by a theme.
    if (!isset($theme_registry[$key]['theme path']) || !preg_match('#/themes/#', $theme_registry[$key]['theme path'])) {
      // Alter the theme path and template elements.
      $theme_registry[$key]['theme path'] = $module_path;
      $theme_registry[$key] = array_merge($theme_registry[$key], $template_file_object);
      $theme_registry[$key]['type'] = 'module';
    }
  }
For more information, see Using template (.tpl.php) files in your own module on the Drupal.org website.
CAS PEM certificate location [Drupal 7]
CAS PEM certificate location [Drupal 7]To use the CAS PEM certificate installed on websites hosted on OIT webhosting, please use the following path:
/etc/pki/tls/certs/ca-bundle.crt
Applying fix to resolve CAS redirect loop
- Login to Plesk via https://hosting.gatech.edu
- Click “Databases” in the side menu
- Click “phpMyAdmin” to edit your database
- Go to the “variable” table
- Look for a variable named “cas_cert”
- Click the “BLOB” link next to the variable name in the value column to download the “variable-value.bin” file
- When you open the file in Notepad++ (or your text editor of choice), you’ll see a line similar to this: s:33:" /etc/pki/tls/certs/ca-bundle.crt";
- Delete the PEM path (DO NOT DELETE THE QUOTES!) and save the file
- Click the “Edit” link next to the “cas_cert” variable
- In the “value” row item, click the “Browse” button to upload the edited file
- You can now login to your website (if you still see the CAS authentication error message, click the “reload” button on your browser)
Controlling Drupal 9 Caching
Controlling Drupal 9 CachingDrupal 8 and later has a much more sophisticated and ultimately aggressive caching system. While this is supposed to be a good change, sometimes it really gets in your way.
Kevin Pittman has written an blog post on Drupal 8 Internal Caching for Dummies that helps clarify the different types of caching that occur and how to configure them to work to your advantage.
(The advice that had been posted here by Kevin has been removed as it was no where near as accurate as what is in the blog post.)
Custom Emails for Webform 7.x-3.x
Custom Emails for Webform 7.x-3.xThe following instructions show how to make it easier to read Webform data sent in emails (for Webform 7.x-3.x).
Under the Emails tab for a Webform, find the section titled Email template.
Default template
If you choose "Default template" from the drop down box, you usually have this code:
Submitted on %date
Submitted by user: %username
Submitted values are:
%email_values

The results of this submission may be viewed at:
%submission_url
Custom template
However, if you choose "Custom template" from the drop down box, you can customize how your webform data is output in the email(s) that are sent. For example, unless people are creating accounts on your site, you may want to remove the %username line.
Key values
Of more frequent use, though, is the need to simplify submitted data and shorten the labels. To include and format a specific piece of data in this email, use %value[key], where key is the machine name of the field holding that data.
Keys can be found under the Form components tab for a webform. For each field you want to include in the email, select Edit"for that field's row, and copy the Field Key.
Example template
An example custom email template, where you let webform create the names of your field Keys, based on the Label you gave each field, might look like this:
Submitted on %date

DETAILS:

Contact Person:
%value[contact_person]
%value[email]
Work: %value[work_phone]
Cell: %value[cell_phone_if_applicable]

Event Details:
Name: %value[event_name]
Date: %value[event_date] from %value[event_start_time] to %value[event_end_time]
Location: %value[event_location_please_include_rain_location_if_applicable]

The results of this submission may be viewed at:

%submission_url
Drupal 7 Express Module Status
Drupal 7 Express Module StatusNote: "Abandoned" does not necessarily mean that the module has been completely abandoned - it just means that the Drupal 7 version appears to be abandoned. There could be a Drupal 9 version of the module that is being actively developed and supported. See our Drupal 7 Express migration guide for the Drupal 9 status of all of these modules.
| Component Name | Status? | Latest Version | Comments? |
|---|---|---|---|
| Admin Menu | Abandoned | 7.x-3.0-rc6 released 3 December 2018 | |
| Admin Views | Stable | 7.x-1.8 released 9 September 2021 | |
| Block Reference | Stable / Abandoned | 7.x-2.7 released 15 February 2018 | |
| CKEditor | Stable | 7.x-1.22 released 22 November 2021 | |
| CTools | Stable | 7.x-1.20 released 19 January 2022 | |
| Custom Search | Stable / Abandoned | 7.x-1.20 released 18 December 2015 | |
| Date | Stable | 7.x-2.12 released 7 October 2021 | |
| Diff | Stable / Abandoned | 7.x-3.4 released 5 November 2018 | |
| Field Group | Stable / Abandoned | 7.x-1.6 released 3 November 2017 | |
| Google Analytics | Stable / Abandoned | 7.x-2.6 released 31 January 2019 | |
| IMCE | Stable / Abandoned | 7.x-1.11 released 27 May 2017 | |
| IMCE MkDir | Stable / Abandoned | 7.x-1.0 released 20 October 2011 | |
| Libraries | Stable / Abandoned | 7.x-2.5 released 5 October 2018 | |
| Link | Stable | 7.x-1.9 released 19 April 2021 | |
| LinkIt | Stable | 7.x-3.6 released 26 December 2020 | |
| Menu Block | Stable | 7.x-2.9 released 19 January 2022 | |
| Module Filter | Stable / Abandoned | 7.x-2.2 released 27 March 2019 | |
| Nodeblock | Stable / Abandoned | 7.x-1.7 released 2 December 2015 | |
| Override Node Options | Stable / Abandoned | 7.x-1.14 released 31 March 2018 | |
| Pathauto | Stable? / Abandoned | 7.x-1.3 released 7 October 2015 | Has unit test failure against current Drupal 7 core. |
| Pathologic | Stable / Abandoned | 7.x-3.1 released 23 November 2015 | |
| Revisioning | Stable / Abandoned | 7.x-1.9 released 26 June 2014 | |
| Token | Stable | 7.x-1.9 released 12 January 2022 | |
| Transliteration | Stable / Abandoned | 7.x-3.2 released 17 March 2014 | |
| Video Embed Field | Abandoned | 7.x-2.0-beta11 released 7 September 2015 | |
| View Unpublishe | Stable / Abandoned | 7.x-1.2 released 30 October 2014 | |
| Views | Stable | 7.x-3.25 released 9 September 2021 | |
| Views Bulk Operations | Stable | 7.x-3.6 released 3 June 2020 | |
| WYSIWYG Filter | Abandoned | 7.x-1.6-rc9 released 24 October 2017 |
Drupal Module Status Chart
Drupal Module Status ChartThe following table, initially provided by the College of Computing (many thanks!) attempts to summarize the details of a large number of commonly used Drupal 7 modules and any known issues with their latest full (not development) version under PHP 7. In addition, Kevin Pittman of the College of Liberal Arts has added Drupal 9 compatibility details and removal recommendations, to help site administrators decide what to do as they review the modules installed their Drupal 7 sites.
In general, a module is recommended for removal ASAP if it is no longer being maintained and not covered by Drupal's security advisory policy. While not flagged with a removal recommendation, modules without a Drupal 9 version should be scrutinized to see if they are truly needed on a current Drupal 7 site, since there is likely not going to be a future support path for those modules.
Notes on the Drupal 9 column:
- In Core - The module is now part of the official Drupal 9 system and does not have to be downloaded and installed separately under Drupal 9
- Functionality In Core - The functionality provided by the module can be found in some form or fashion within Drupal 9
- In Development - Someone is working on porting the module to Drupal 9, but there is not a stable and production usable version yet
- In Release Candidate - A development version has reached a state where it could be used (with caveats) in production, but careful review by the site administrator is recommended
| Module | Machine Name | Category | Latest Version | Removal Recommended? | Drupal 9 Version | Covered by Security Advisory | Last Update (Non-Dev) | Key issue/bug info | Date Checked | Notes | ||
|---|---|---|---|---|---|---|---|---|---|---|---|---|
| 404 Navigation | navigation404 | Other | 7.x-1.0 |
N/A |
In Core | Y | 2011-01-07 | If you create and configure a 403 and 404 page within Drupal, you don't need this module and can remove it. 7.x-1.x-dev - updated on 5/9/14 | ||||
| Accordions | accordions | User interface | 7.x-1.0-alpha4 | Yes | N/A | N | 2013-04-23 | No further development No longer developed by its maintainers. |
||||
| Adaptive Image | adaptive_image | Other | 7.x-1.4 | No | Functionality in Core | Y | 2012-02-24 | 2018-10-05 | a few PHP related issues: https://www.drupal.org/project/issues/adaptive_image?text=&status=Open&priorities=All&categories=All&version=7.x&component=All | |||
| Address Field | addressfield | Fields | 7.x-1.2 | No | Functionality in Core | Y | 2015-10-07 | Patch for 7 compatibility issue https://www.drupal.org/project/addressfield/issues/2628592 | 2018-10-05 | used? Needed? Replaced by Address module in D8. | ||
| Admin | admin | Administration | 7.x-2.0-beta3 | Yes | Use admin_toolbar | N | 2014-12-19 | 2018-11-08 | ||||
| Administration menu | admin_menu | Administration | 7.x-3.0-rc5 | No | Use admin_toolbar | N | 2014-12-19 | 7.1 issue (https://www.drupal.org/project/admin_menu/issues/3000678) 7.2 - incompatibility by rc5 (https://www.drupal.org/project/admin_menu/issues/3000373) 7.2 issue patched (https://www.drupal.org/project/admin_menu/issues/2929025). |
2018-10-05 | couldn't replicate 7.1 issue locally. | ||
| Administration views | admin_views | Administration | 7.x-1.6 | No | In Core | Y | 2016-08-02 | 2018-10-05 | Included in D8 core. | |||
| Admin Tools | admin__tools | Administration | 7.x-1.1 | No | In Core | Y | 2016-08-02 | 2018-11-08 | Included in D8 core. | |||
| Advanced help | advanced_help | Other (Administration, Utility) | 7.x-1.4 | No | Yes | Y | 2018-04-14 | No major or critical issues | 2018-10-05 | This module is incompatible with the Fast 404 module. Installing Fast 404 will produce 404 (File not found) errors if you try to look up README.txt-files. | ||
| Alpha Pagination | alpha_pagination | Views | 7.x-1.7 | No | No | Y | 2017-09-21 | |||||
| Automatic Nodetitles | auto_nodetitle | Other | 7.x-1.0 | No | No | Y | 2011-06-07 | 2018-10-05 | ||||
| Back To Top | back_to_top | Other (Content, Content Display) | 7.x-1.5 | No | Yes | Y | 2015-12-16 | 2018-10-05 | ||||
| Better Exposed Filters | better_exposed_filters | Views | 7.x-3.6 | No | Yes | Y | 2018-09-03 | Remove usage of deprecrated each() function for PHP 7.2+ future proofing | ||||
| Block Class | block_class | Other (Content ,Content Display, Theme Enhancements) | 7.x-2.4 | No | Yes | Y | 2018-07-27 | No major or critical issues | 10/5/018 | |||
| Block Class Styles | block_class_styles | Other | 7.x-2.6 | No | No | Y | 2016-01-13 | No major or critical ssues | This module has not been ported to Drupal 8. Refer to this issue to find out its progress. | |||
| Block reference | blockreference | Fields | 7.x-2.7 | No | Functionality in Core (EntityReference) | Y | 2018-02-15 | 2018-10-05 | used? Required for GT Super blocks module, which we want to avoid using. | |||
| Block Title Link | block_titlelink | Other (Content Display, Theme Enhancements) | 7.x-1.5 | No | No | Y | 2015-08-19 | Block Title Link not working with PHP 7.* | This module is currently being ported to Drupal 8, but is not usable yet. Help us by following this issue. Couldn't replicate issue on local dev environmentThis module is currently being ported to Drupal 8, but is not usable yet. Help us by following this issue. Couldn't replicate issue on local dev environmentThis module is currently being ported to Drupal 8, but is not usable yet. Help us by following this issue. Couldn't replicate issue on local dev environment | |||
| Bootstrap Business | bootstrap_business | Other | 7.x-1.1 | No | In Development | Y | 2014-10-21 | No major or critical issues | ||||
| Brightcove | brightcove | Video | 7.x-6.x-dev | No | Yes | Y | 2018-01-30 | PHP 7 error with variable reuse $client. | ||||
| Calendar | calendar | Date/Time | 7.x-3.5 | No | In Development | Y | 2014-10-14 | 2018-10-05 | only used if have Event content type (likely connected to Mercury) | |||
| CAPTCHA | captcha | Spam control | 7.x-1.5 | No | Yes | Y | 2017-09-06 | PHP 7 - sometimes float instead of integer passed to srand() and mt_srand() in image_captcha_image() | This issue has been Closed(fixed) - [7.x-1.x-dev] | |||
| CAS | cas | Central Authentication Service | 7.x-1.7 | No | Yes | Y | 2018-02-12 | Library issue. | 2018-10-05 | Older versions of associated phpCAS library may have outdated PHP calls. Highly recommended (and for security updates) to upgrade to the latest phpCAS library. | ||
| CAS Attribute Tokens | cas_attributes | Central Authentication Service | 7.x-1.0-rc3 | Yes | No | N | 2013-11-13 | 2018-10-05 | used? | |||
| CCK | cck | CCK | 7.x-3.0-alpha3 | Yes | No | N | 2013-12-12 | 2018-10-05 | most moved into Core in D7, only used for a migration | |||
| Chaos tools | ctools | Chaos tool suite | 7.x-1.14 | No | Yes | Y | 2018-02-24 | 7.1 PHPCS warning (https://www.drupal.org/project/ctools/issues/2979350) patched incompatibility for a reserved word (https://www.drupal.org/project/ctools/issues/2941069) other patches (https://www.drupal.org/project/ctools/issues/2635876) (https://www.drupal.org/project/ctools/issues/2713377) |
2018-10-05 | |||
| CKEditor | ckeditor | User interface | 7.x-1.18 | No | In Core | Y | 2017-06-26 | |||||
| CKEditor Image | ckeditor_image | User interface | 7.x-1.2 | No | In Core | Y | 2013-07-09 | Drupal 8 has its own image plugin and supports center align. | ||||
| Collapsiblock | collapsiblock | User interface | 7.x-2.0 | No | Yes | Y | 2018-06-10 | |||||
| Context | context | Context | 7.x-3.7 | No | Yes | Y | 2016-05-18 | 7.2+ issue patch for create_function (https://www.drupal.org/project/context/issues/2946595) | 2018-10-05 | used? | ||
| Content Access | content access | Content Access | 7.x-1.2-beta2 | No | In Development | Y | 2013-04-15 | There are open security issues: Private files downloadable when node access is denied, needs support | 2018-11-05 | Content access makes use of Drupal's node access API. However, it's recommended to use only one module that does so. | ||
| CSS Injector | css_injector | Other (Theme Enhancements) | 7.x-1.10 | No | No | Y | 2013-12-17 | No Major or critical issues | ||||
| Custom Breadcrumbs | custom_breadcrumbs | Other | 7.x-2.0-beta11 | Yes | Yes | N | 2014-09-09 | This module has not been ported to Drupal 8. Refer to this issue to find out its progress. | ||||
| Custom Search | custom_search | Search | 7.x-1.20 | No | In Development | Y | 2015-12-18 | 2018-11-08 | ||||
| Date | date | Date/Time | 7.x-2.10 | No | In Core | Y | 2017-04-07 | version 2.11 planned to have 7.1 fixes, will need to update to this when it is released | 2018-10-05 | Included in D8 core (mostly). | ||
| Dates | dates | Date/Time | 7.x-1.0-alpha1 | Yes | No | N | 2012-10-20 | 2018-11-08 | may be able to uninstall module and still leave preset date formats behind | |||
| Diff | diff | Other (Administration, Content Display, Utility) | 7.x-3.3 | No | Release Candidate | Y | 2016-12-20 | Deprecating PHP4 style constructors | ||||
| Display Suite | ds | Display Suite | 7.x-2.16 | Yes | No | Y | 2018-07-03 | error (https://www.drupal.org/project/ds/issues/2986390) | 2018-10-05 | used? | ||
| Editable Views | editableviews | Views | 7.x-1.0-beta10 | Yes | No | N | 2015-07-28 | |||||
| Fields | 7.x-1.3 | No | Yes | Y | 2014-04-10 | 2018-10-05 | included in D8 core. | |||||
| Entity API | entity | Other | 7.x-1.9 | No | In Core | Y | 2/142018 | This module has been included with Drupal 8 core. Refer to this issue for more information. | ||||
| Entity Reference | entityreference | Fields | 7.x-1.5 | No | In Core | Y | 2017-08-16 | Warning only (https://www.drupal.org/project/entityreference/issues/3006199) | 2018-10-05 | |||
| Entity Rules | entity_rules | Other | 7.x-1.0-alpha4 | Yes | No | N | 2013-12-09 | |||||
| Entity to Text | entity2text | Other (Content Display) | 7.x-1.x-dev | Yes | No | N | 2015-09-01 | |||||
| Entity tokens | entity_token_display | 7.x-1.x-dev | Yes | No | N | 2015-09-01 | 2018-11-08 | |||||
| Entityform | entityform | Entityform | 7.x-2.0-rc4 | No | No (Use Webform) | Y | 2017-05-08 | 7.1 patch (https://www.drupal.org/project/entityform/issues/2834738) | 2018-10-05 | |||
| Exclude node title | exclude_node_title | Other | 7.x-1.9 | No | No | Y | 2015-06-26 | No major or critical issues | ||||
| External Links | extlink | User interface | 7.x-1.20 | No | Yes | Y | 2018-04-20 | |||||
| Fast Permissions Administration | fpa | Administration | 7.x-2.6 | No | No | Y | 2014-08-22 | 2018-10-05 | duplicate of filter_perms (but less-intuitive UI) | |||
| Features | features | Features | 7.x-2.10 | No | Yes (But you won't need it) | Y | 2016-04-18 | 7.2 issues (https://www.drupal.org/project/features/issues/2931464 https://www.drupal.org/project/features/issues/2957125 https://www.drupal.org/project/features/issues/2642642) |
2018-10-05 | |||
| Features Extra | features_extra | Features Extra | 7.x-1.0 | No | Yes (But you won't need it) | Y | 2016-04-18 | 2018-11-08 | ||||
| Feed Import | feed_import | Feeds | 7.x-3.4 | No | No | Y | 2015-01-07 | 2018-10-05 | Should just be for initial content import, not ongoing use. Not nearly as well supported or used as Feeds module. | |||
| Feeds | feeds | Feeds | 7.x-2.0-beta4 | Yes | In Development | N | 2017-09-24 | 2018-10-05 | used? Make sure in ongoing use, not just for initial content import. | |||
| Feeds Tamper | feeds_tamper | Feeds | 7.x-1.2 | No | In Development | Y | 2017-12-10 | 7-related issues (https://www.drupal.org/project/feeds_tamper/issues/2875221 - not really broken? https://www.drupal.org/project/feeds_tamper/issues/2567431 - has patch https://www.drupal.org/project/feeds_tamper/issues/2863574 - has patch) |
2018-10-05 | check if this is actually used or just left behind from testing/dev | ||
| Feeds XPath Parser | feeds_xpathparser | Feeds | 7.x-1.1 | Switch to Feeds Extensible Parser (feeds_ex) | No (Use Feeds Extensible Parser) | Y | 2015-07-03 | recommends using Feeds Extensible Parsers instead. | 2018-10-05 | used? | ||
| Field collection | field_collection | Fields | 7.x-1.0-beta12 | Yes (Switch to Paragraphs) | No | N | 2016-11-17 | 7.2 issues (https://www.drupal.org/project/field_collection/issues/2979033 https://www.drupal.org/project/field_collection/issues/2992575) |
2018-10-05 | poorly-supported/-integrated module. Deprecated in D8 for paragraphs | ||
| Field Collection Table | field_collection_table | Other (Content, Content Display, Fields) | 7.x-1.0-beta5 | Yes (Switch to Paragraphs) | No | N | 2017-02-21 | No major or critical issues | This module has not been ported to Drupal 8. Refer to this issue to find out its progress. | |||
| Field formatter settings API | field_formatter_settings | Other | 7.x-1.1 | No | In Core | Y | 2013-09-09 | no major or critical issues | ||||
| Field Group | field_group | Fields | 7.x-1.6 | No | In Development | Y | 2017-11-03 | PHP7 patched in current version (https://www.drupal.org/node/2649648) | 2018-10-05 | |||
| Field Permissions | field_permissions | Fields | 7.x-1.0 | No | In Release Candidate | Y | 2016-10-16 | 2018-10-05 | ||||
| Field Validation | field_validation | Fields | 7.x-2.6 | No | In Development | Y | 2015-06-20 | 2018-10-05 | ||||
| File Entity | file_entity | Media | 7.x-2.22 | No | In Core (as Media) | y | 2018-06-14 | |||||
| File Field Sources | filefield_sources | Fields | 7.x-1.11 | No | In Development | Y | 2018-02-07 | 2018-10-05 | ||||
| Filter permissions | filter_perms | Administration | 7.x-1.0 | No | No | Y | 2012-05-16 | 2018-10-05 | duplicate of fpa (but easier UI than fpa); not sure if it uninstalls cleanly | |||
| Flex Slider | flexslider | Flex Slider | 7.x-2.0-rc2 | Yes | No | N | 2017-02-12 | 2018-10-03 | No major issues. This site is running it on PHP 7.2, https://www.centralbaptistchurchah.org/ | |||
| Flex Slider Views Slideshow | flexslider_views_slideshow | Flex Slider | 7.x-2.x-dev | Yes | No | N | Flexslider Not Rendering the Thumbnails Field flexslider broken on plugin cache clear | This is the FlexSlider Views Slideshow module which used to be included in FlexSlider by default. | ||||
| Flickr | flickr | Flickr | 7.x-1.8 | No | In Development | Y | 2015-08-06 | No major or critical issues | 2018-10-03 | |||
| Form block | formblock | Other (Content) | 7.x-1.0-alpha1 | Yes | No | N | 2014-07-18 | No major or critical issues | ||||
| Github Flavored Markdown | gfm | Input filters | Yes | No | N | No major or critical issues | 2018-10-03 | |||||
| Global Redirect | globalredirect | Path management | 7.x-1.6 | No | No (Use Redirect) | Y | 2018-02-15 | Update: For Drupal 8 please use the redirect module. This project is deprecated for D8 |
||||
| Google Analytics | google_analytics | Statistics | 7.x-2.5 | No | Yes | Y | 2018-07-13 | |||||
| Google CSE | google_cse | Other | 7.x-2.5 | No | No | Y | 2017-04-26 | No major or critical issues | ||||
| GT Content Types | gt_content_types | GT | 7.x-2.9 | |||||||||
| GT Tools | gt_tools | GT | 7.x-2.9 | |||||||||
| GT Super block | gt_ct_super_block | GT | 7.x-2.9 | |||||||||
| GT Theme | gt | GT | 7.x-2.9 | |||||||||
| Hide the Toolbar | Hide the Toolbar | toolbar_admin_menu | 7.x-1.0 | No | In Development | Y | 2018-11-08 | |||||
| Htaccess | htaccess | Hide the Toolbar | 7.x-2.6 | No | In Development | Y | 2018-11-08 | |||||
| HTML Mail | htmlmail | 7.x-2.70 | No | In Development | Y | 2018-02-23 | 2018-10-04 | |||||
| Image Link Formatter | image_link_formatter | Fields | 7.x-1.1 | No | No | Y | 2016-05-26 | 2018-10-05 | ||||
| Image resize filter | image_resize_filter | Input filters | 7.x-1.16 | No | In Development | Y | 2015-08-01 | PHP Fatal error: Call to a member function getDirectoryPath() on a non-object image_resize_filter/image_resize_filter.module on line 334 all other issues are more than a year old. |
2018-10-03 | |||
| Image URL Formatter | image_url_formatter | Other (Content, Fields) | 7.x-1.4 | No | No | Y | 2013-09-10 | No major or critical issues | ||||
| IMCE | imce | Media | 7.x-1.11 | No | Yes | Y | 2017-05-27 | No major or critical issues | 2018-10-05 | IMCE may have problem working with Google Analytics and Secure pages modules. Just make sure to add *imce* path to the exceptions list of these modules. If IMCE has issues with your custom theme, try enabling admin theme under Common Settings of IMCE admin page or use ThemeKey Module | ||
| IMCE Mkdir | imce_mkdir | Media | 7.x-1.0 | No | No | Y | 2011-10-20 | No major or critical issues | 2018-10-05 | This module has not been ported to Drupal 8. Refer to this issue to find out its progress. | ||
| Inline Entity Form | inline_entity_form | Fields | 7.x-1.8 | No | In Release Candidate | Y | 2016-04-16 | 2018-10-05 | ||||
| Insert | insert | Other ( Content Display, Fields, Filters/Editors, JavaScript Utilities, Media) | 7.x-1.4 | No | Yes | Y | 2017-09-17 | No unresolved issues Warning: A non-numeric value encountered in aggregateVariables(), https://www.drupal.org/project/insert/issues/2861946 |
||||
| Job Scheduler | job_scheduler | Other | 7.x-2.0 | Yes | In Development | N | 2018-02-13 | scheduler does not sometimes run | 2018-10-03 | Bug - 7.x-2.0-alpha3 |
||
| jQuery Update | jquery_update | User interface | 7.x-2.7 | No | In Core | Y | 2015-10-20 | 7.x-3.0-alpha5 - updated on 29 March 20177.x-3.0-alpha5 - updated on 29 March 2017 |
||||
| Libraries | libraries | Other | 7.x-2.5 | No | In Development | Y | 2018-09-10 | Version Callback functions that pass parameters by reference not permitted in PHP 7 [7.x-2.x-dev] - https://www.drupal.org/project/libraries/issues/2779591 Upgrade to 7.x-2.3 breaks WSIWYG editor - https://www.drupal.org/project/libraries/issues/2725769 Finds no library after update [7.x-2.4] - https://www.drupal.org/project/libraries/issues/2999116 Warning after updating [7.x-2.4] - https://www.drupal.org/project/libraries/issues/2998821 |
Upgrade to latest version in PHP5, as the upgrade process will break in PHP7, but the already-upgraded module should work okay. | |||
| Lightweight Directory Access Protocol - LDAP | ldap | Lightweight Directory Access Protocol | 7.x-2.4 | No | In Development | 2013-08-13 | No major or critical issues | 2018-10-04 | ||||
| Link | link | Fields | 7.x-1.5 | No | In Core | Y | 2018-05-13 | 2018-10-05 | Included in D8 core. | |||
| Linkit | linkit | Other | 7.x-3.5 | No | Yes | Y | 2016-01-10 | 2018-10-04 | ||||
| Mailchimp | mailchimp | 7.x-4.x | https://www.drupal.org/project/mailchimp/issues/2998627 if private fields are being used. | |||||||||
| Mail System | mailsystem | 7.x-2.35 | No | Yes | Y | 2016-07-12 | https://www.drupal.org/project/mailsystem/issues/2770619 | 2018-10-04 | ||||
| Markdown filter | markdown | Input filters | 7.x-1.5 | No | Yes | Y | 2016-05-31 | No major or critical issues | currently being refactored. #2952435: Merge in the CommonMark project | |||
| Masquerade | masquerade | Other | 7.x-1.0-rc7 | Yes | In Development | N | 2014-03-09 | Your not allowed to masquerade as the selected user - https://www.drupal.org/project/masquerade/issues/2269927 | 7.x-1.x-dev - updated on 11/2/167.x-1.x-de |
|||
| Media | media | Media | 7.x-2.21 | No | In Core | Y | 2018-08-17 | No major or critical issues | 2018-10-05 | This module has been included with Drupal 8 core. Refer to this issue for more information. Known Issues Accessibility: Media 1.x does not have an out-of-the-box solution for handling HTML attributes, including alt. Audio/Video: Media 1.x does not include any way to 'display' audio and video media files out of the box. The use of MediaElement or MediaFront is recommended. Non images and WYSIWYG: There are several known issues in both Media 1.x and 2.x when embedding non-image media via the WYSWIYG. The use of Entity Embed is recommended. |
||
| Media Field | mediafield | Media | Yes | No | N | 2018-10-05 | obsolete and unsupported. | |||||
| Media: oEmbed | media_oembed | Media | 7.x-2.7 | No | No | Y | 2016-06-28 | 2018-10-05 | ||||
| Menu attributes | menu_attributes | Other | 7.x-1.0 | No | No | Y | 2016-02-15 | |||||
| Menu Block | menu_block | Other | 7.x-2.7 | No | Yes | Y | 2015-06-30 | Fatal Error: Call to undefined function menu_block_configure_form_follow_validate() https://www.drupal.org/project/menu_block/issues/2574457 Menu block templates doesn't applies - https://www.drupal.org/project/menu_block/issues/2950339 |
7.x-2.x-dev - updated on 7/8/17 | |||
| Menu CSS Names | menu_css_names | Other | 7.x-1.0-beta2 | Yes | No | N | 2016-01-07 | |||||
| Mercury Reader | hg_reader | GT | 7.x-2.7 | |||||||||
| Module filter | module_filter | Administration | 7.x-2.1 | No | Yes | Y | 2017-06-09 | 2018-10-05 | ||||
| Name Field | name | Fields | 7.x-1.10 | No | In Development (also see Webform) | Y | 2015-11-25 | 2018-10-05 | used? Do we need this much name detail? | |||
| Node clone | node_clone (clone) | Other (Content Utility) | 7.x-1.0 | No | No | Y | 2015-11-19 | No major or critical issues | /This module is currently being ported to Drupal 8, but is not usable yet. Help us by following this issue. | |||
| Node Convert | node_convert | Other | 7.x-1.2 | No | No | Y | 2014-06-12 | |||||
| Nodeaccess | nodeaccess | Access control | 7.x-1.4 | No | In Development | Y | 2014-10-06 | 2018-10-05 | Don't know that we use this much. | |||
| Nodeblock | nodeblock | Other | 7.x-1.7 | No | Functionality In Core (also see EntityBlock) | Y | 2015-12-02 | Required by GT Content types and GT Super Block | 2018-10-05 | Other node block modules: http://groups.drupal.org/node/93499 7.x-1.x-dev - updated on 4/14/17 |
||
| Options element | options_element | User interface | 7.x-1.12 | No | No | Y | 2014-04-17 | PHP 7.1: A non well formed numeric value encountered in _form_options_from_text() line 404 | 2018-10-08 | |||
| Organic groups | og | Organic groups | 7.x-2.10 | No | In Development | Y | 2018-06-28 | 2018-10-05 | ||||
| Override node options | override_node_options | Permissions | 7.x-1.14 | No | Yes | Y | 2018-03-31 | |||||
| Pathauto | pathauto | Other | 7.x-1.3 | No | Yes | Y | 2015-10-07 | PHP Fatal error: Class 'MigrateDestinationHandler' not found - [7.x-1.x-dev] - https://www.drupal.org/project/pathauto/issues/2609618PHP Fatal error: Class 'MigrateDestinationHandler' not found - [7.x-1.x-dev] - https://www.drupal.org/project/pathauto/issues/2609618 |
7.x-1.x-dev - updated on 8/16/17 | |||
| Pathologic | pathologic | Input filters | 7.x-3.1 | No | In Development | Y | 2015-11-23 | mulitlingual links with Pathologic https://www.drupal.org/project/pathologic/issues/348421. Pathologic rewrites + to %2b in url Detection of HTTPS status for protocol-relative URLs doesn't work | 2018-10-03 | |||
| Phone | phone | Fields | 7.x-1.0-beta1 | Yes | In Core | N | 2014-01-14 | 2018-10-05 | duplicate field to telephone; will not migrate as well to D8 | |||
| Plupload integration module | plupload | Media | 7.x-1.7 | No | No | Y | 2014-11-07 | 2018-10-05 | Drupal 7 version provides integration between Drupal and Plupload library via form element. You only need the 7.x version if another module tells you to download it. This module has a pre-release version for Drupal 8. To find out more, follow this issue or download below. | |||
| reCAPTCHA | recaptcha | Spam control | 7.x-2.2 | No | Yes | Y | 2016-07-23 | |||||
| Redirect | redirect | Other | 7.x-1.0-rc3 | No | Yes | Y | 2015-07-08 | PHP Fatal error: Class 'RedirectController' - https://www.drupal.org/project/redirect/issues/2849531PHP Fatal error: Class 'RedirectController' - https://www.drupal.org/project/redirect/issues/2849531 |
7.x-2.x-dev - updated on 10/5/18 | |||
| Redirect UUID | uuid_redirect | Other | 7.x-1.0-alpha1 | Yes | No | N | 2012-04-26 | 7.x-1.x-dev - updated on 5/10/12 | ||||
| References | references | Fields | 7.x-2.2 | No | In Core | Y | 2017-04-18 | 7 patch available (https://www.drupal.org/project/references/issues/2923099) | 2018-10-05 | used? Poorly-integrated (entityreference is more future-proof) | ||
| Revisioning | revisioning | Other | 7.x-1.9 | No | In Core | Y | 2014-06-26 | 7.x-1.x-dev - updated on 5/3/18 This module has been included with Drupal 8 core7.x-1.x-dev - updated on 5/3/18 This module has been included with Drupal 8 core |
||||
| Rules | rules | Rules | 7.x-2.11 | No | In Development | Y | 2018-05-18 | Remove usage of deprecrated each() function for PHP 7.2+ future proofing | This issue is closed (duplicate) - [7.x-2.x-dev] | |||
| Search Restrict | search_restrict | Other | 7.x-1.0 | No | No | Y | 2011-07-09 | Alternative: search_config 7.x-1.x-dev - updated on 7/10/11 |
||||
| Select (or other) | select_or_other | Fields | 7.x-2.24 | No | In Development | Y | 2018-07-25 | 2018-10-05 | active 3.x alpha version. Likely used with webform module | |||
| Simplified formats | simplified_formats | Other | 7.x-1.0-beta1 | Yes | No | N | 2013-10-08 | |||||
| Social Share | social_share | Social media | 7.x-2.5 | No | In Development | Y | 2017-01-24 | |||||
| Special menu items | special_menu_items | Other | 7.x-2.0 | No | In Core | Y | 2012-09-04 | 7.x-2.x-dev - updated on 5/12/15 | ||||
| Strongarm | strongarm | Other | 7.x-2.0 | No | In Core | Y | 2012-06-13 | 7.x-2.x-dev - updated on 6/7/11 | ||||
| Superfish | superfish | User interface | 7.x-2.0 | No | Yes | Y | 2015-11-25 | |||||
| Table of Contents | tableofcontents | Input filters | 7.x-2.x-dev | Yes | No | N | 2018-03-19 | Critical Issue: PHP Fatal error: Unsupported operand types in ${drupalroot}/includes/theme.inc on line 1074 ,https://www.drupal.org/project/tableofcontents/issues/1955448 | 2018-10-03 | |||
| Telephone | telephone | Fields | 7.x-1.0-alpha1 | Yes | In Core | N | 2014-01-14 | 2018-10-05 | duplicate field to phone; backport of D8 core module | |||
| Token | token | Other | 7.x-1.7 | No | Yes | Y | 2017-01-25 | Tokens Missing (No tokens available - admin/help/token) - upgrade of PHP 5.3.3 to PHP 7.0.10 https://www.drupal.org/project/token/issues/2822160 Error : Cannot use string offset as an array in _token_token_tree_format_row() [7.x-1.x-dev] - https://www.drupal.org/project/token/issues/2825841 |
||||
| Token tweaks | token_tweaks | Other | 7.x-1.x-dev | Yes | No | N | 2014-01-27 | |||||
| Transliteration | transliteration | Other | 7.x-3.2 | No | No, but Planned to Go Into Core | Y | 2014-03-17 | Possible regression: WSOD and PHP Fatal Error when transliterating files [2015] - https://www.drupal.org/project/transliteration/issues/161516 |
||||
| Twitter Block | twitter_block | Other | 7.x-2.3 | No | In Development | Y | 2015-09-15 | |||||
| Universally Unique ID | uuid | UUID | 7.x-1.2 | No | In Core | Y | 2018-07-19 | PHP7 compatibility | This issue has been Closed(works as designed) - [7.x-1.x-dev] This module doesn't need to be ported to Drupal 8. All core entities in D8 support UUIDs. The UUID URL is currently under development for a future release of Drupal 8 core. |
|||
| Video Embed Field | video_embed_field | Media | 7.x-2.0-beta11 | Yes | Yes | N | 2015-09-07 | 2018-10-05 | ||||
| View Unpublished | view_unpublished | Permissions | 7.x-1.2 | No | In Development | Y | 2014-10-30 | |||||
| Views | views | Views | 7.x-3.20 | No | In Core | Y | 2018-04-14 | Parameter 3 to views_ui_build_form_state() expected to be a reference, value given in views_ui_ajax_form() [7.x-3.x-dev] - https://www.drupal.org/project/views/issues/2810431 PHP 7 incompatibility in views_plugin_style_mapping [7.x-3.x-dev] - https://www.drupal.org/project/views/issues/2850719 |
Reviewed & tested by the community | |||
| Views Accordian | views accordian | Views Accordian | 7.x-1.1 | No | In Core | Y | 2018-11-05 | Reviewed & tested by the community | ||||
| Views Bulk Operations | views_bulk_operations | Views | 7.x-3.5 | No | Yes | Y | 2018-05-09 | PHP 7.1 upgrade fail - https://www.drupal.org/project/views_bulk_operations/issues/2953645 PHP 7.2+ future proofing, remove usage of deprecated ""create_function()"" - https://www.drupal.org/project/views_bulk_operations/issues/2946220 |
||||
| Views Data Export | views_data_export | Views | 7.x-3.2 | No | In Development | Y | 2017-04-05 | |||||
| Views Field View | views_field_view | Views | 7.x-1.2 | No | No | Y | 2015-09-18 | PHP 7.1 Warning non-numeric value | 7.x-1.x-dev | |||
| Views Responsive Grid | views_responsive_grid | Views | 7.x-1.3 | No | In Core | Y | 2013-04-05 | 7.x-1.x-dev - updated on 2/13/17 | ||||
| Views Slideshow | views_slideshow | Views | 7.x-3.9 | No | Yes | Y | 2017-06-08 | PHP 7.1 causes error [8.x-4.x-dev] - https://www.drupal.org/project/views_slideshow/issues/2834156 Fatal error when using top / bottom widgets with PHP 7.1 [7.x-3.x-dev] - https://www.drupal.org/project/views_slideshow/issues/2835052 |
These issues have been closed(fixed). | |||
| Views Slideshow: Cycle | views_slideshow_cycle; views_slideshow_cycle2 | Views | Yes | In Development | N | Drupal 8 only | ||||||
| Void Menu | void_menu | Menu (Path Management) | 7.x-1.9 | No | No | Y | 2014-05-30 | 2018-10-05 | no major or critical issues, https://www.drupal.org/project/issues/void_menu?categories=All | |||
| Webform | webform | Webform | 7.x-4.18 | No | Yes (Full rewrite - read docs for details) | Y | 2018-10-01 | Fatal error: Cannot use lexical variable $value as a parameter name in components/select.inc on line 765 | [7.x-4.x-dev] This issue has been closed(fixed).[7.x-4.x-dev] This issue has been closed(fixed).[7.x-4.x-dev] This issue has been closed(fixed).[7.x-4.x-dev] This issue has been closed(fixed). |
|||
| Webform Rules | webform_rules | Webform | 7.x-1.6 | No | No | 2013-03-16 | ||||||
| Webform Term Options | webform_term_opts | Webform | 7.x-4.0 | No | No | Y | 2014-05-02 | Using this module might not be your best option. Consider using Entityform with a Term Reference field instead. | ||||
| Webform Validation | webform_validation | Webform | 7.x-1.15 | No | No | Y | 2018-10-01 | |||||
| WYSIWYG Filter | wysiwyg_filter | Input filters | 7.x-1.6-rc9 | Yes | In Core | N | 2017-10-24 | No major or critical issues | 2018-10-04 | minimally maintained, maintenance fixes only (This module has been included with Drupal 8 core)" |
Drupal Throws SimpleXMLElement Errors After Upgrading to 7.61 (or Later)
Drupal Throws SimpleXMLElement Errors After Upgrading to 7.61 (or Later)Per Kevin Pittman's insight posted on the GTDUG Team:
With Drupal 7.61, be aware that you're now likely to see a bunch of "SimpleXMLElement" errors on the Modules Update screen. This is caused whenever a module's project status data can't be retrieved.
Causes
There are two cases that will have to be addressed:
-
If you (or someone else) built a custom module and included a "project=" line in the .info file without also including a proper "project status url=" line as well (or, you have that line, but it doesn't point to a valid XML file)
-
You are running any GT modules from Institute Communications (GT Tools, etc). Most instances of these are looking for the "project status url" at http://drupal.gatech.edu/, which we been redirecting to the new location of the repo, http://repo.drupal.gatech.edu/ ever since we upgraded the GT Drupal Users group site a couple years ago. Unfortunately, the updated code in Drupal 7.61 doesn't handle the redirect correctly any more.
Fixes
There is a quick, but behind-the-scenes fix for both problems:
-
Edge case fix: For custom modules, remove the line "project=" and "project status url=" entries from the module's .info file unless you actually have a valid Drupal style repo set up with a valid project status XML file.
- Common fix: for all of the GT modules you are running (including Mercury Reader [hg_reader]), edit the .info file and change the "project status url" server from drupal.gatech.edu to repo.drupal.gatech.edu and save. Don't change anything else on that line -- just the server.
The upside is that the errors shouldn't interfere with running updates of regular third-party modules, but should any updates be pushed out for GT modules, you won't get them on your site until you manually patch your existing module as described above.
Embedding Live Streaming Video from OIT
Embedding Live Streaming Video from OITEditor's Note: The following instructions may be out-of-date now, but are left here for future educational reference.
Below is sample code for embedding a live stream from OIT's JW Player and Wowza server onto your Georgia Tech Drupal site, and includes sample code to embed live captions, which are required for accessibility compliance. For more information, visit the test live stream site.
Overview
The safest way to include this code on a page on a Drupal site is to not use an unfiltered text format, but instead to use a block template file within your subtheme. Below is sample embed code for a live stream video and live captioning of an event. NOTE: a certificate has been added to the streaming server and the code below has been modified to allow embedded secure streaming on a secure page. This code will also work on an insecure page.
The following words will need replaced with real values in the below code. Contact the IT person controlling the streaming to find out what those values should be.
[[EXAMPLE-STREAMING-SERVER]][[EXAMPLE-PLAYER-SERVER]][[STREAM-NAME]]
- Streaming Sample Code
        <!-- START Live streaming video code: OIT JWPlayer and OIT Wowza server -->

        <h3 id="live-video">Live Video</h3>
        <script type="text/javascript" src="https://[[EXAMPLE-PLAYER-SERVER]].gatech.edu/player/jwplayer.js"></script>

        <style>

            /* This is just to overwrite styling on the theme that resizes the object to be so small. It should be inserted directly before the standard embed code. If you have more than one video embed on a page, you'd need to add this for each one, incrementing the '0' after player_swf_ accordingly.

            */

            <!-- #player_swf_0 { height: 100% !important; } -->

        </style>
        <p id="alternate-video">

        <ul>

            <li><a href="https://support.jwplayer.com/customer/portal/articles/1597259-keyboard-shortcuts">Keyboard controls ('c' toggles captions)</a></li>

            <li>If having difficulties with the video, try the <a href="https://www.google.com/chrome/browser" title="Download Chrome">Chrome web browser</a>.</li>

            <li>To access captions on Android, download the <a href="https://www.videolan.org/vlc">VLC Player app</a>, open <a href="https://[[EXAMPLE-STREAMING-SERVER]].gatech.edu:/live/[[STREAM-NAME]]/playlist.m3u8?DVR">this stream link</a>, and then choose "Closed captions 1" as the Subtitle track.</li>

        </ul>

    </p>
<div id="player">
        <script type="text/javascript">

            var player = jwplayer("player");

            player.setup({

                file: "https://[[EXAMPLE-STREAMING-SERVER]].gatech.edu:/live/[[STREAM-NAME]]/playlist.m3u8",

                image: "https://[[EXAMPLE-PLAYER-SERVER]].gatech.edu/assets/small_bling_desktop_2560x1440.jpg",

                hlshtml: true,

                width: "100%",

                aspectratio: "16:9",

                autostart: true,

                stretching: "uniform",

            });
            player.on("captionsList", function () {

                player.setCurrentCaptions(1);

            });

        </script>
    </div>

    <!-- END Live streaming video code -->
Deprecated Captioning Sample Code
Please note that the code below is no longer recommended - please use the code above instead.
The code is available in cases of live captioning an event on a budget. As an example, you could display your stenographer's live captions during a presentation, using only a web browser and a large-screened monitor.
At the bottom of a template file, you would include embed code for live captioning:
<!-- START Live caption code: Feed from your Caption Company based on instructions at https://streamtext.zendesk.com/entries/21705252-embedding-streaming-text-with-streamtext-into-your-web-pages -->
<h3>Live Captions</h3>

    <div class="live-caption">

    <iframe id="stFrame" title="Live Caption iframe" src="http://www.streamtext.net/text.aspx?event=[[CAPTION-ID]]&chat=false&header=false&indicator=false&footer=false&fs=30&spacing=1.75&bgc=262626&fgc=ffe08b&ff=Roboto,Verdana,serif" style="width:100%;min-height:400px">

    </iframe>

   </div>
<!-- END Live caption code -->
Read more about easy control options for this captioning embed at the Streamtext site.
Installing Drupal 7 to OIT Web Hosting
Installing Drupal 7 to OIT Web Hosting
The following sections describe options for setting up Drupal 7 on OIT Web Hosting. These steps will give you a generic Drupal 7 installation – if you'd rather start with a more turnkey configuration, you may want to look at Drupal Express.
Installing Drupal Using Installatron
The quickest way to get Drupal setup is to use the Installatron Applications Installer, which will download and setup Drupal for you.
- From the front page of the Plesk control panel, look for the Installatron Applications Installer link on the right-hand side of the page.
- Under the heading "Apps for Content Management", look for and select the Drupal blue water drop icon (the text underneath reads 'Drupal cms'.
- You can read about Drupal on the next page and view the live demo if you like. When you are ready to install, look for the drop-down in the top right section of the page with a big blue plus symbol and the words "install this application"
- On the next page answer all of the questions about your installation. Details on some of the more notable settings are given below:
- Version: You should install the latest 7.x version, as it the only version currently supported by the Georgia Tech Drupal Theme and other GT Drupal modules. Do not under any circumstances select a version earlier than 7.65, and only select an 8.x version if you are setting up a site that doesn't have to have full Georgia Tech branding and you are already familiar with and comfortable with supporting the 8.x version of Drupal.
- Automatic Update and Automatic Update Backup: You can leave these settings at their defaults unless you have a good reason for changing them.
- Administrator Username and Administrator Password: These have been randomly generated, but you can change them if you prefer. Avoid using 'admin' or 'administrator' for the username - something more unique provides a little better security.
- Administrator Email: Set this to an email address that someone will be watching (ideally yourself). The default will be for the mailing list that sends to everyone who is an owner or administrator for your OIT Web Hosting account.
- Advanced: Most of these can be left alone. However, you may wish to select Let me manage these settings and then under Email Notification choose Let me choose which notifications are sent and uncheck some of the options. Otherwise, you may get quite a bit of email from Installatron about your application. For example, you may prefer to uncheck all of the "*Something* Complete" options so that you only get emails when an operation fails or when updates come available.
- Select the Install button at the bottom of the page to complete your installation.
- Once installation is complete, you can visit your site's URL to log into your Drupal installation and start configuring it and adding content.
Installing Drupal Manually From a Downloaded Archive File
Another way to install Drupal is to download the installer and copy it to your hosting account.
- Visit the Drupal.org website and download the latest version of the Drupal 7.x series for any site that needs to have standard Georgia Tech branding.
- Do not under any circumstances select a version earlier than 7.65, and only select an 8.x version if you are setting up a site that doesn't have to have full Georgia Tech branding and you are already familiar with and comfortable with supporting the 8.x version of Drupal.
- If your are comfortable with using SSH to connect to your Web Hosting account, you can select either download format (.tar.gz or .zip). If you prefer to upload the archive file to your Web Hosting account via the Plesk control panel, you must download the ZIP format file.
- Upload the archive file to your OIT Web Hosting Account and unpack it where you want your Drupal installation to live. From within the Plesk control panel, you can upload the archive file via the File Manager. Once the file is uploaded, just select it in the File Manager to unpack it. After the archive file has been unpacked, move it to your hosting account's "/private/" folder.
- In the Plesk control panel, go to the Databases manager and create a new database. Copy down the database name, the database user name, and the password, as you will need them later.
- Navigate to your Web Hosting site's URL and you should get an installation screen for Drupal. Follow the prompts and answer the questions - they should mostly be straightforward. Refer to the Drupal Installation Guide if you need any help.
- IMPORTANT NOTE: When entering your database information you must enter "mysql.localhost" as the server name. This in an artifact of the way that the OIT Web Hosting Servers are set up.
On a Site's Status Report, Drupal Complains About a Missing Profile
On a Site's Status Report, Drupal Complains About a Missing ProfileIssue
You are seeing a red error message in Drupal stating that a Drupal profile is missing from the file system. Common examples are "gt_profile" and "gt_install", but the issue could happen with any profile.
Much like with the more common missing theme or module file issue, it is possible that a previous Drupal site administrator deleted the directory for the Drupal profile used to install your Drupal site from the filesystem. S/he may have thought that the profile was not needed after site installation, but Drupal does actually expect it to be there, and will throw error messages on some of the administration pages if those files are missing. More often than not, the issue is just that someone simply forget to copy a custom profile directory over when applying a Drupal core update.
Compounding the issue is that Drupal behaves a bit poorly when it can't find the assigned custom profile directory, and partially disables the profile in the database. This prevents you from correcting the problem by just replacing the missing files (which is the simple solution for missing modules and themes).
Solution
If you have a copy of the missing profile, copy the files back into the right place in the filesystem, then try running the following against your Drupal database (be sure to make a database backup first) from your preferred MySQL administration tool (e.g. phpMyAdmin), replacing 'XXXX' with the path under the 'profiles' directory to your custom profile:
UPDATE `system` SET status=1 WHERE filename like 'profiles/XXXX';
If you do not have a copy of the missing profile, you can reset the site to the default profile:
UPDATE `system` SET status=1 WHERE filename like 'profiles/standard/standard.profile';
REPLACE `variable` SET `value`='s:8:"standard";' WHERE `name`='install_profile';
If you still see error messages about your old custom profile, try running the following SQL command, replacing 'XXXX' with the path under the 'profiles' directory to your custom profile:
DELETE FROM `system` WHERE filename like 'profiles/XXXX';
Recovering a Dead Drupal 8/9/10 Site
Recovering a Dead Drupal 8/9/10 SiteKevin Pittman has written a blog post called "So, You Blew Up Your Drupal 8 Site - Now What?" that covers multiple methods for recovering a dead Drupal 8 (or later) website (on the assumption you hadn't made a backup right before it died).
Editor's Note: In spite of the title, the blog post applies to all recent versions of Drupal: 8, 9, and 10.
Use GTED to Automatically Add Users to Roles or Organic Groups [Drupal 7]
Use GTED to Automatically Add Users to Roles or Organic Groups [Drupal 7]On campus we have GTED, the Georgia Tech Enterprise Directory, an LDAP server that stores lots of information about people. Some is public, but a lot of it is private. With a departmental account, you can get a lot of information and feed it into Drupal to automatically set up groups of users.
Requirements
- Drupal 7
- A departmental GTED account
- Installing the following modules (in dependency order). Note: All of the "LDAP *" modules are part of the LDAP module package.
- CTools (ctools)
- Entity API (entity)
- Number - Drupal Core Module
- LDAP Servers (ldap_servers)
- LDAP User Module (ldap_user)
- LDAP Query (ldap_query)
- LDAP Authorization (ldap_authorization)
- LDAP Authorization - Drupal Roles (ldap_authorization_drupal_role)
- Organic Groups - optional, but we will include setup instructions; adding Organic Groups requires the following modules:
- List - Drupal Core Module
- Text - Drupal Core Module
- Entity API (entity)
- Entity reference (entityreference) - required for Organic Groups https://drupal.org/project/Entityreference
- Organic groups UI - Sub-module of Organic Groups
- Organic groups access control - Sub-module of Organic Groups
- LDAP Authorization - OG (organic Groups) (ldap_authorization_og)
Setup
Create your Roles
Go to /admin/people/permissions/roles or People -> Permissions -> Roles and create the roles you are going to populate. For this demo, we will create three: Employees, Faculty and Staff.
Create your Organic Groups (Optional)
Organic Groups requires a content type and a bit of setup. We will assume that this has been done already. For this demo, we will create three: OGEmployees, OGFaculty and OGStaff.
Set Up LDAP
Head to /admin/config/people/ldap or Configuration -> People -> LDAP Configuration
Settings
You can leave everything the same here, though you may want to check "Enabled Detailed Watchdog Logging" for testing.
Servers
Select the Add LDAP Server Configuration button.
Connection Settings
- Machine name and name can be whatever you want.
- Check Enabled
- Server Type is default
- LDAP server is
ldaps://r.gted.gatech.eduThe ldaps:// in front is important! - LDAP Port is 636. This is the secure LDAP port.
Binding Method
- Binding Method for Searches should be Service Account Bind
- DN for non-anonymous search is:
uid=XXXXXX,ou=Local Accounts,dc=gted,dc=gatech,dc=eduwith XXXXXX replaced by your departmental GTED login account
LDAP User to Drupal User Relationship
- The Base DNs for LDAP users, groups, and other entries will be
ou=accounts,ou=gtaccounts,ou=departments,dc=gted,dc=gatech,dc=edu - AuthName attribute is uid. In GTED, your uid is your gt account.
- Not including for now - Email Attribute is gtprimaryemailaddress
LDAP Group Configuration
This is where things get funky.
The quick version:
- Check A user LDAP attribute such as memberOf exists that contains a list of their groups.
- Enter
edupersonscopedaffiliationfor Attribute in User Entry Containing Groups
Save!
Testing
You should now have a GTED server set up. If it is not enabled, do that now.
Now let's ake sure you can connect and read a record. Click test. Under "Testing Drupal Username" enter a GT account that is an active user in Drupal (preferrably your own) and click the "Test"
You may see a bunch of error messages, but you should also see a lot of info about yourself.
More Details
LDAP supports groups, but GTED doesn't use them. What we do use is a field in the eduPerson schema named eduPersonScopedAffiliation. This can have multiple entries. Here's mine as an example:
- member@gtaccounts
- employee@gt
- member@gt
- credit-alum@gt
- former-credit-student@gt
- employee@psdept 490:arch-admin:college of arch adm & schools
- member@psdept 490:arch-admin:college of arch adm & schools
- employee@coa
- member@coa
- faculty@gt
- faculty@coa
- faculty@psdept 490:arch-admin:college of arch adm & schools
Any of these can be used to sort people into a group. There are a lot more. Here's some examples from a grad student who is part of the HCI program, so they are a member of the College of Computing, College of Architecture, and Psychology departments.
- credit-student@gt
- student@gt
- graduate-student@gt
- masters-student@gt
- student-employee@coa
- student-employee@gt
- member@coa
- student@coc
- member@coc
- student@psych
- student@coa
- member@psych
There's plenty of things that we can do with all this. My goal was to set up automatic grouping for our Intranet, so we could have things only visible to faculty, or staff, or students.
User
Leave this alone for now. We could use LDAP to behave like CAS and handle authentication and have users auto-created when verified by LDAP. CAS works fine, so let's not mess with it.
Authorization - Roles
Add a Drupal Role Configuration.
Make sure the GTED server is selected
Check "Enable this Configuration"
Uncheck "Only apply the following LDAP to drupal role configuration to users authenticated via LDAP." The basic GT Drupal install is using CAS for authentication.
Enter your LDAP to Drupal in the "Mapping of LDAP to drupal role" box. The basic form for GTED will be the edupersonscopedaffiliation value, then the drupal group.
So for our three Roles, the entries should be:
employee@gt|Employees
faculty@gt|Faculty
staff@gt|Staff
Click Add
Back on the Authorization screen. First, make sure your config is enabled. Frequently it won't be if it was just created. If you need to, just edit and Enable it. Click test on the entry you just created.
Enter your own GT Account, and a few others then test. If everything works, you should see entries in the "Authorization IDs" column for anyone who was filtered into a group.
Authorization - Organic Groups
This is very similar to the way that Roles are configured, except that the mappings correspond to the Organic Group name and role. For this demo we use:
employee@gt|node:OGEmployees:2
faculty@gt|node:OGFaculty:2
staff@gt|node:OGStaff:2
Note: As of 4/16/2014 there is a bug in LDAP Authorization of Organic Groups. If a user has the "Administer Organic groups permissions" which GT Super Administrators do, then they will not be added to the Organic Groups on login. It seems to work fine for users without OG Admin rights. https://drupal.org/node/2064319
GT Editor Paragraph Image Wrapping Problem [Drupal 7]
GT Editor Paragraph Image Wrapping Problem [Drupal 7]Some Georgia Tech Drupal users have encountered a bug where CKEditor/WYSIWYG settings were wrapping standalone images in paragraph tags. To fix this problem, follow the two steps below.
Step 1. Adjust Your Theme's template.php.
In your theme’s template.php file, add:
/**

* Implements hook_wysiwyg_editor_settings_alter()

*/
function THEMENAME_wysiwyg_editor_settings_alter(&$settings, $context) {

  if ($context['profile']->editor == 'ckeditor') {

    $settings['autoParagraph'] = FALSE;

  }

}
Be sure to replace "THEMENAME" with the actual machine name of your theme. For the standard GT theme, the function name would be gt_wysiwyg_editor_settings_alter
Step 2. Adjust Your Text Format.
In your browser, go to {domain}/admin/config/content/formats and modify each text format that your site is actively using. F or your specified text formats (here I’m listing the Advanced one), located at , make sure that the option "Convert line breaks into HTML (i.e. <br> and <p> )" is turned off.