Resources for Drupal Developers and Site Administrators
Resources for Drupal Developers and Site AdministratorsLearn how to administer or build Drupal sites at Georgia Tech. Read on for knowledge, tools, and best practices shared by Drupal developers from across campus.
We have a mix of content for both Drupal 7 and Drupal 10 — please check the "Drupal Version" tag on a page to see the version(s) for which it is applicable.
Get involved: consider joining our helpful Microsoft Teams Channel and attending our fascinating monthly meetings.
Sections
Where Do I Begin?
Where Do I Begin?Whether you are an experienced Drupal developer / site administrator who has come to Georgia Tech, or an existing staff member asked to venture into the world of Drupal, you may be wondering how you should get started with using Drupal for a Georgia Tech website.
Should I Use Drupal for my Website Project?
It depends. If you only need a simple site - in particular, one without integration to Mercury News and Events - then Sites @ Georgia Tech, a WordPress multisite system, may be a better choice for you. Sites @ Georgia Tech does not require any technical knowledge and does not require regular patching or upgrades (that's all done for you by the service administrators). You can even get the Georgia Tech branding theme on Sites @ Georgia Tech.
On the other hand, if you need to do a lot of customization and/or really want access to the back end of your site and you have strong technical knowledge for supporting a web application (i.e. knowledge in using Composer), then Drupal might be right for you. In short, many larger units continue to use Drupal for their websites, but many smaller units have switched to Sites at Georgia Tech.
What Version of Drupal Does Georgia Tech Use (and What Should I Use)?
All new Drupal sites should be built in Drupal 10. You can install Drupal 10 from scratch and customize it as you wish, but if you are building a site that needs the official Georgia Tech web theme, it is best to just use the Drupal 10 version of Drupal Express. When requesting a new Web Hosting Account from OIT, simply request the Drupal Express option, which will automatically install everything you need to get started. Please note that in spite of the similar names, there is little in common between the Drupal 7 Drupal Express and Drupal 10 Drupal Express. In particular, you cannot directly upgrade from Drupal 7 Drupal Express to the Drupal 10 version.
If you are building a site to be hosted on one of your department's web servers, but want to use the official distribution of Drupal 10, just download the GT Installer and use it to set up your site.
Important Note: At this time, a small portion of campus still uses Drupal 7. If you own one of those sites, be aware that Drupal 7 support is waning and anyone still on Drupal 7 should be actively working on a migration to Drupal 10 or another content management system. Our article "What is the Future of Drupal 7?" provides more information about the sunsetting of Drupal 7 on campus. All Drupal 7 support will end in January of 2025!!!
Important Note: If you're still on Drupal 8 or 9, you should upgrade immediately to Drupal 10, as both Drupal 8 and 9 are past their end of life and no longer receive security updates. Upgrading is very straightforward and far easier than upgrading from anything earlier than Drupal 8.
Sounds Good, How Do I Get Started?
The Installing Drupal section of this handbook offers advice on selecting a place to host your site and getting through the initial Drupal installation and configuration. Some people like to set up a development site on their own local computer, and that topic is covered in the Installing Drupal section as well. If you choose to develop in a hosting area separate from where your final site will be hosted, the Moving a Site to OIT Web Hosting section may be helpful, even if you're not actually moving the site to OIT Web Hosting.
Before and after you deploy your new site, be sure to review our Best Practices Checklist to make sure your site is secure and streamlined.
As you continue developing and maintaining your site, the rest of this developer's handbook can provide useful insights, helpful tips and troubleshooting guides, and pointers to additional information. You can also join the Georgia Tech Drupal Team in Microsoft Teams and/or the Georgia Tech Drupal Mailing List, or join us at our regular meetings and drop-in help sessions for assistance.
What is the Future of Drupal 7?
What is the Future of Drupal 7?Updated April 2024
Synopsis
If you currently have a Drupal 7 site that you do not plan to shut down by November 2023, you should already be in the process of migrating it to Drupal 9 or another content management system, with an ideal goal of completing migration by the end of summer 2023 (if not sooner).
Note: While support for Drupal 7 was extended by the Drupal organization, all support for Drupal 7 will end in January of 2025 without exception!!! If you have a Drupal 7 site and have not started migrating it to Drupal 10 or another content management system, you should begin immediately or plan for completely shutting down your site by the end of this year.
Background
Drupal 7 was originally released on January 11, 2011 and became a standard in website management over the next decade. But, as with all good things, Drupal 7's time has passed, and most support for Drupal 7 and its third-party modules and themes has ended. The Drupal organization had planned to end all support back in 2021, but due to the COVID pandemic they extended security support until the end of 2022. Upon further evaluation, they have extended security support once more until January of 2025, but this was the final extension.
This does not mean that it is okay to continue on and ignore your Drupal 7 sites — with each passing month, there is a greater chance of problems developing that may not easily be fixed. The only support being offered now is for security issues, so if anything breaks due to server upgrades, you will pretty much be out-of-luck.
Why is this important? All websites on OIT Web Hosting are now forced to run on a minimum of PHP 8.2, but Drupal 7 was never designed to run on PHP 8. There is every likelihood that Drupal 7 sites will now fail to function as expected, and fixes/patches are unlikely to be available.
Also bear in mind that once security support for Drupal 7 does end, any critical security vulnerability later identified in Drupal 7 code could lead to OIT Cyber Security having to completely block access to all remaining Drupal 7 sites. Thus, it is imperative that you give yourself ample time to migrate to a new content management system before Drupal 7 support ends.
Options
Drupal 10
The current release of Drupal is version 10 (versions 8 and 9 have already come and gone, and no one should be running Drupal 8 or 9 at this time). Please be aware that there is no direct upgrade path from Drupa 7 to Drupal 10! To move your Drupal 7 site to Drupal 10, you will have to set up a brand new site and migrate your content. This will definitely take longer than a traditional upgrade where you can just drop the new program code in, run an update script, and be done. The upside is that this migration provides the perfect opportunity to revamp your website, but you have to start soon to give yourself the time to coordinate those changes with your stakeholders, communicators, etc.
The Georgia Tech Drupal Users Group can try to answer questions about Drupal 10 and recommend best practices for implementation, but we cannot migrate your site for you. You must either find the resources to do this in-house, or the funds to pay an outside development company. If this is proving to be problematic, then Sites @ Georgia Tech may be a better option for your unit.
Sites @ Georgia Tech
For those who may not need all of the features of Drupal and do not want to deal with day-to-day technical maintenance of a website, Sites @ Georgia Tech, which is a large multi-site WordPress instance, may be a better fit than Drupal. Sites @ Georgia Tech does not let you do as much customization as with Drupal, but the trade-off is that you also do not need a developer skilled in programming to build your site — just about anyone can set up a site on Sites @ Georgia Tech in a matter of minutes and all software upgrades are handled transparently by the software vendor. (It will take more than a few minutes to copy-and-paste your existing content into a new WordPress site, but that does not require any high-level technical skill and could be assigned to student assistants.)
Other Options
You are not limited to just Drupal or Sites @ Georgia Tech, but bear in mind that for sites that are expected to use the Georgia Tech web theme, those are the only two platforms for which implementations of the Georgia Tech theme are actively maintained. For other sites, you could explore options, but be sure to factor in the time necessary to maintain and support any non-standard option, and keep in mind that all sites connected with Georgia Tech entities should be hosted on-campus, either via an OIT supported web hosting service, or on a departmental web server.
Summary
If you are currently running Drupal 7 and have not begun the process of migrating to something else, now is the time to start planning. Even though you may have made it past the PHP 8 upgrade, you still need to fully prioritize migrating or replacing all Drupal 7 sites by the end of 2024.
Installing, Upgrading (and Migrating) Drupal Sites
Installing, Upgrading (and Migrating) Drupal SitesThis section contains tips on how to install Drupal from scratch, how to apply routine point release updates, and how to migrate between major version of Drupal. There is also a guide to moving sites from development (either on your local computer, or on a development server) to a production environment (e.g. OIT Web Hosting). For more generic but also more official guidance, the official Drupal website has a Guide to Migrating a Drupal Site.
Please be cautious in using any of the information provided here in conjunction with upgrading or migrating a production Drupal site: always make backups of your live production site first, so that if anything goes wrong, you can revert back to the old version of the site.
Installing Drupal
Installing DrupalThis section contains guides to help you with installing a new copy of Drupal. Information on updating and upgrading existing Drupal sites can be found elsewhere in the handbook.
Where to Host Your Drupal Site?
Where to Host Your Drupal Site?There are a number of ways you can host your Drupal site on campus, which is strongly recommended for any unit-level website.
All units can take advantage of the central OIT Web Hosting service. This service can host many popular PHP based content management systems, including Drupal and WordPress. For those looking to quickly setup a unit-level website, OIT Web Hosting supports Drupal Express, which will give you a jump start on building a Drupal based website by installing Drupal plus a number of standard add-on components, such as the official Georgia Tech website theme and page layout system.
Should you choose not to use OIT's services, some Schools, Colleges, and other units have their own externally hosted or internally housed servers for web hosting. You should consult with your local IT representatives to see what is available. You can still make use of the official Georgia Tech website theme and page layout system by installing them from their GitHub repositories.
Installing Drupal to an OIT Web Hosting Account
Installing Drupal to an OIT Web Hosting AccountThe following steps should guide you in getting a Drupal installation set up in an OIT Web Hosting account.
Should I Use Drupal on OIT Web Hosting?
Drupal 10 is now fully supported on OIT Web Hosting. However, this does not mean that it is the right choice for everyone. For smaller, simpler sites, a WordPress site on Sites @ Georgia Tech might be a good option to consider. Please see the OIT FAQ guide, Is Drupal the right choice of CMS for my site?, for further discussion of web hosting options.
Regardless, it is strongly recommended that no new sites be built on Drupal 7, as version 7 is reaching the end of its life on November 28, 2022. After that date, it will no longer receive any security support from its developers.
A Turnkey Drupal 10 Website on OIT Web Hosting
OIT is now offering an updated version of Drupal Express for Drupal 9 based websites. When requesting a new Web Hosting account, you can mark this option on the request form and your account will be pre-loaded with a ready-to-use version of Drupal 9 complete with the official Georgia Tech web theme and page layout system.
Other Options for Drupal 10
Before you Begin: If you haven't done so already, you'll need to request a hosting account from OIT. You will also need to know how to access the Plesk control panel for your account in order to complete the rest of these steps, and you may also wish to set an SSH password or SSH key so that you can SSH into your web hosting space.
If you decided to set up Drupal somewhere else to build your site, and now want to move that site to OIT Web Hosting, you should see our separate Site Migration Guide.
Installing Drupal 10 Using GitHub and Composer
If you prefer to manually install Drupal 8 with the official Georgia Tech components, there is a GT Installer script available to guide you through the process. Please also see the following OIT FAQ guides:
Installing Drupal 10 Manually From a Downloaded Archive File
Another way to install Drupal is to download the installer and copy it to your hosting account. Please note that this method is not compatible with the official Georgia Tech web theme, so it is only suitable for sites that do not need this theme (e.g. student organization sites, research project sites, etc.)
- Visit the Drupal.org website and download the latest version of the Drupal 9.x series for any site that needs to have standard Georgia Tech branding.
- Use the latest stable release of Drupal
- If your are comfortable with using SSH to connect to your Web Hosting account, you can select either download format (.tar.gz or .zip). If you prefer to upload the archive file to your Web Hosting account via the Plesk control panel, you must download the ZIP format file.
- Upload the archive file to your OIT Web Hosting Account and unpack it where you want your Drupal installation to live. From within the Plesk control panel, you can upload the archive file via the File Manager. Once the file is uploaded, just select it in the File Manager to unpack it. After the archive file has been unpacked, move it to your hosting account's "/private/" folder.
- In the Plesk control panel, go to the Databases manager and create a new database. Copy down the database name, the database user name, and the password, as you will need them later.
- Navigate to your Web Hosting site's URL and you should get an installation screen for Drupal. Follow the prompts and answer the questions - they should mostly be straightforward. Refer to the Drupal Installation Guide if you need any help.
Installing Drupal on Your Own Computer
Installing Drupal on Your Own ComputerPurpose
A development copy of Drupal on your local computer lets you design and build a site with a few fewer hassles. It is an excellent place to do testing and code development, but does not support collaboration very well. For collaborating with stakeholders, you may want to have both a development site on your local computer and a test site on a regular internet connected web hosting solution (e.g. OIT Web Hosting or a departmentally run server).
Potential Uses
- Testing new patches or major upgrades.
- Testing out new themes or modules.
- Module or theme development.
- Stress-testing a site.
- Getting familiar with Drupal.
Expert Local Development Guides
How to Set Up a Mac OS X / macOS System for Local Development
How to Set Up a Mac OS X / macOS System for Local DevelopmentThis process allows you to set up your Mac as a faux-server for local development.
- Download Xcode from the App Store: https://developer.apple.com/xcode/
- Install command line tools: http://osxdaily.com/2014/02/12/install-command-line-tools-mac-os-x/
- Install and configure wget: http://coolestguidesontheplanet.com/install-and-configure-wget-on-os-x/
Do note that Drupal 8 requires PHP 7, and only MacOS 10.14+ (Mojave or later) come with PHP 7 – all earlier versions have some form of PHP 5. If you are running and older version of MacOS, you can either use HomeBrew to try to upgrade PHP, or look at one of the options to install a virtual development environment on your local computer.
How to Use Lando as a Drupal Development Environment
How to Use Lando as a Drupal Development EnvironmentWhat is Lando? From the Lando documentation:
It's a free, open source, cross-platform, local development environment and DevOps tool built on Docker container technology and developed by Tandem. Designed to work with most major languages, frameworks and services, Lando provides an easy way for developers of all skill levels to specify simple or complex requirements for their projects, and then quickly get to work on them.
In simpler terms, it is a container system built on Docker that runs on Windows, MacOS, and Linux, letting you spin up development websites with a minimum technical hassles. It is just one of many ways to easily set up a Drupal 10 development site for either building a complete new website, doing module development work, or testing third-party modules in a safe "sandbox" environment.
Enabling a Mail Server in Lando
Enabling a Mail Server in LandoThe Lando Drupal 7 recipe does not come with mail functionality out-of-the-box. However, DrupalEasy has written straight-forward documentation on how to enable server mail functionality.
This is helpful for enabling mail notifications for password resets, trigger/Rules configuration.
Process
- Add the following configuration to your
.lando.ymlrecipe:proxy: mailhog: - mail.lemp.lndo.site services: mailhog: type: mailhog hogfrom: - appserver -
Edit
mail.lemp.lndo.siteto better match, mirror, or apply to your local Lando website. -
Run "
lando rebuild". Caution should be used when using using the 'rebuild' command, as while most services retain their data during a rebuild, some may not. -
Running "
lando start" will now initialize a Mailhog server, which will siphon all Drupal-generated mail into that inbox.
Lando and Mercury Reader
Lando and Mercury ReaderMercury Reader requires an extra php extension outside of what lando's drupal10 recipe typically provides.
Process
Adjust your lando.yml Landofile to include the following:
services:
  appserver:
    build_as_root:
      - apt-get update -y
      - apt-get install libxslt1-dev -y
      - docker-php-ext-install xsl
      - docker-php-ext-enable xsl
Rebuild your lando environment to install the libraries:
lando rebuild -y
Set up lando on Windows 10 for an easy local development environment
Set up lando on Windows 10 for an easy local development environment- First install WSL version 2. You do not need VSCode or Hyper-V and may not even need to install a specific version of Ubuntu (20.04 at the time of writing), as it usually defaults to the latest version.
- Next, install Docker Desktop for Windows (on Windows, NOT within the Ubuntu VM).
- Then, install lando's .exe from github (on Windows, NOT within the Ubuntu VM).
Starting a Drupal 10 Website with Lando
Starting a Drupal 10 Website with LandoThe below scenario assumes you have Lando installed on your own machine for local development.
Kickstarting a Drupal 9 website
Install Drupal via composer:
composer create-project drupal-composer/drupal-project:10.x-dev SITENAME --no-interactionEnter SITENAME and init lando.
cd SITENAME
lando init
During the lando init process:
- Select the appropriate recipe (drupal9) for lando.
- Provide the webroot directory (web).
- Provide a shortcut name for the lando app (your choice and preference).
Once completed, now start up your virtual environment with:
lando startLando will kickstart the virtual filesystems in your specified root directory and initialize a locally-hosted database and web server (using Docker).
When you see BOOMSHAKALAKA!, Lando has configured all the environment configurations and is ready to party.
Using Drupal 10 with Lando
Using Drupal 10 with LandoDrupal Console, Drush and Lando
Lando provides scaffolding for tools like Drupal Console and Drush.
To use these tools within Lando, just pre-empt your command with lando to make sure it's running within the Lando interface.
For example, to install a new module in Drupal 8 using Drupal Console, use:
lando drupal moi module_name
Or, to clear all caches using Drupal Console, use:
lando drupal cc all
Please see the Lando Drupal 8 documentation for a full list of tools.
Example .lando.yml files for different environments
Example .lando.yml files for different environmentsHere are some example .lando.yml files (and associated settings.php files for drupal) of commonly-used configurations.
Drupal 7: Single site
Database code in settings.php
$databases = array (
  'default' =>
  array (
    'default' =>
    array (
      'database' => 'myd7sitedb',
      'username' => 'database',
      'password' => 'database',
      'host' => 'database',
      'port' => '3306',
      'driver' => 'mysql',
      'prefix' => '',
    ),
  ),
);
.lando.yml Code
name: myd7site
recipe: drupal7
config:
  php: '7.3'
  composer_version: 2
  via: 'apache:2.4'
  webroot: .
  database: 'mysql:5.7'
  # note this is just for lando/docker as 'global' install--drush is installed via drupal composer for local site use
  drush: ^8
  xdebug: false
services:
  database:
    creds:
      user: database
      password: database
      database: myd7sitedb
  appserver:
    overrides:
      environment:
        DRUSH_OPTIONS_URI: "https://local.myd7site.gatech.edu"
tooling:
  'lint:php:themes':
    service: appserver
    cmd: /app/vendor/bin/phpcs --standard=phpcs-themes.xml
    description: 'Runs php linter against your custom code. Ex: lando lint:php'
proxy:
  appserver:
    - myd7site.lndo.site
    - local.myd7site.gatech.edu //set in local hosts file
Drupal 7: Multi site
Database code in settings.php
$databases = array (
  'default' =>
    array (
      'default' =>
        array (
          'database' => 'database',
          'username' => 'mysql',
          'password' => 'mysql',
          'host' => 'ic',
          'port' => '3306',
          'driver' => 'mysql',
          'prefix' => '',
        ),
    ),
);
.lando.yml Code
name: multid7
recipe: drupal7
config:
  php: '7.3'
  composer_version: 2
  via: 'apache:2.4'
  webroot: .
  database: 'mysql:5.7'
  # note this is just for lando/docker as 'global' install--drush is installed via drupal composer for local site use
  drush: ^8
  xdebug: false
proxy:
  appserver:
    - cse.lndo.site
    - local.cse.gatech.edu //set in local hosts file
    - ic.lndo.site
    - local.ic.gatech.edu //set in local hosts file
    - scs.lndo.site
    - local.scs.gatech.edu //set in local hosts file
services:
  cse:
    type: mysql:5.7
    appserver:
      overrides:
        environment:
          DRUSH_OPTIONS_URI: "https://local.cse.gatech.edu"
  ic:
    type: mysql:5.7
    appserver:
      overrides:
        environment:
          DRUSH_OPTIONS_URI: "https://local.ic.gatech.edu"
  scs:
    type: mysql:5.7
    appserver:
      overrides:
        environment:
          DRUSH_OPTIONS_URI: "https://local.scs.gatech.edu"
Drupal 9: Single site
Database code in settings.php
$databases['default']['default'] = array (
  'database' => 'myd9db',
  'username' => 'database',
  'password' => 'database',
  'prefix' => '',
  'host' => 'database',
  'port' => '3306',
  'namespace' => 'Drupal\\Core\\Database\\Driver\\mysql',
  'driver' => 'mysql',
);
.lando.yml Code
name: myd9
recipe: drupal9
config:
  php: '7.3'
  composer_version: 2
  via: 'apache:2.4'
  webroot: .
  database: 'mysql:5.7'
  drush: true
  xdebug: false
tooling:
  'lint:php:themes':
    service: appserver
    cmd: /app/vendor/bin/phpcs --standard=phpcs-themes.xml
    description: 'Runs php linter against your custom code. Ex: lando lint:php'
  drush:
    service: appserver
    env:
     DRUSH_OPTIONS_URI: "https://local.myd9.gatech.edu"
proxy:
  appserver:
    - myd9.lndo.site
    - local.myd9.gatech.edu // set in local hosts file
services:
  database:
    creds:
      user: database
      password: database
      database: myd9db
Symfony 4
.lando.yml Code
name: samplesymfony4app
recipe: symfony
config:
  symfony: '4'
  php: '7.3'
  via: 'apache:2.4'
  webroot: public
  database: mysql:5.7
  services:
    database:
        creds:
            user: database
            password: database
            database: gradcc
Symfony 5
.lando.yml Code
name: samplesymfony5app
recipe: symfony
config:
  php: '7.3'
  via: 'apache:2.4'
  webroot: public
  database: mysql:5.7
  services:
    database:
        creds:
            user: database
            password: database
            database: symfony5db
Simple LAMP stack for PHP
.lando.yml Code
name: myphp
recipe: lamp
config:
  php: '7.4'
  via: 'apache:2.4'
  composer_version: '2'
  webroot: public
  database: mysql:5.7
  services:
    database:
        creds:
            user: database
            password: database
            database: myphpdb
  proxy:
    appserver:
      - myphp.lndo.site
      - local.myphp.gatech.edu // set in local hosts file
File or Directory Permissions Errors
File or Directory Permissions ErrorsGeneral Permissions Errors
Note: If you are running in a shared hosting environment, like OIT Web Hosting, then you are not likely to get many if any general permission errors, as each website runs under its own hosting account in these environments. Thus, it is nearly impossible to mess up file and directory ownership in these environments. However, it is worth checking the file and directory permissions, as they are often changeable, and if the owner-write permission is removed from a file or directory then the web server will not be able to modify that file or directory.
If you see any kind of general file or directory permissions errors, the first thing to check is that your sites "sites/default/files" directory and all of its subdirectories are writable by account that your web server runs under. On stand-alone web servers, these directories and their files don't necessarily have to be owned by this account, but the account still has to have permission to access them. Consult with your server administrator if you need help in determining the right user and group ownerships for your website's files and directories.
Temporary Directory Permissions Errors
Sometimes after moving a Drupal site to a new web server, you may see an error message that looks something like this:
The specified file temporary://fileX could not be copied,
because the destination directory is not properly configured.
This may be caused by a problem with file or directory permissions.
More information is available in the system log.
Often this is accompanied by the site looking strange and not having much theming or design. This happens because your site's file system needs permissions to access the Temporary directory. Usually this directory is located at "/tmp", but sometimes the person who built the Drupal site configured it to use a special directory, and then when you copied the site to the new web server, either that special directory was not created or its permissions were not set correctly.
To fix this, try to log into the site as an administrative user and then navigate to the Media section of the Configuration administration page, and go into the File system sub-section. If you have trouble navigating through the site, you might try going directly to that page:
http://your-site-host-name/admin/config/media/file-system
On the File system page, make a note of the path set for Temporary directory and then check to make sure it exists on your server and that it is writable by the account that your web server runs under. Alternatively, you may want to just change the value of Temporary directory to "/tmp" and see if that works. For websites on OIT Web Hosting, the path "/tmp" should always work, and it's a good starting point for many other web servers out there as well. If you still run into problems then you may need to contact your server administrator to find out what temporary directory path you should use with Drupal for that server.
Installing Drupal 10 Using the GT Installer Script
Installing Drupal 10 Using the GT Installer ScriptFor most general use cases, we recommend the OIT Web Hosting turnkey install option of Drupal 10: when requesting a new Web Hosting account, you can mark the Drupal Express option on the request form and your account will be pre-loaded with a ready-to-use version of Drupal 10 complete with the official Georgia Tech web theme and page layout system.
Some users may wish to manually set up Drupal 10 with Georgia Tech components. A Drupal 10 GT Installer script is available to install Drupal Core, the GT Theme, the GT Tools module, and the Curie profile.
NOTE: If you want to have the Georgia Tech theme blocks for Layout Builder in your site, you should install the site either through the GT Installer script or the turnkey option mentioned above. While not impossible, it is difficult to properly install these components into an already existing Drupal 10 website.
Pre-Installation Note
- Download the installer script to a directory outside of the project path. Otherwise, you will receive a “$PROJECTPATH is not empty” error.
- If you have receive a memory limit error, you can set the composer memory limit with the following command:
export COMPOSER_MEMORY_LIMIT=-1
Installation process
- Download and unzip the gt_installer project.
- At the command line, navigate to the gt_installer directory.
- Make sure the file 'install.sh' is executable.
- Run ./install.sh and follow the prompts:
$ ./install.sh

Enter the full path to your project directory: /c/path/to/your/installation-folder

Enter your database username: database_username

Enter your database password: database_password

Enter your database host (probably localhost): localhost

Enter the database port: 3306

Enter the name of the database: database_name

Enter the site name: Site Name

Enter the site email: email@gatech.edu
Attribution
Instructions courtesy of Veronique Topping.
Moving an Existing Drupal Site to OIT Web Hosting
Moving an Existing Drupal Site to OIT Web HostingMoving an existing Drupal site (either a production site or one built on a development server) to an OIT Web Hosting account is not terribly difficult, but it is important to make sure you follow all of the right steps.
Skills Required for Migrating a Drupal Site
- You will need to know how to access the Plesk control panel for your account in order to complete the rest of these steps you may also wish to set an SSH password or SSH key so that you can SSH into your web hosting space.
- You should have a basic understanding of filesystems and mySQL databases, as well as phpMyAdmin
- If you need assistance with some of these steps, check with your local unit's IT support staff
Before You Begin
If you haven't done so already, you'll need to request a hosting account from OIT. If you are moving a live site, you should ask for the account to be set up as the hostname of your live site, but ask that DNS not be updated yet, since that would disrupt your existing site. Once the account is set up, you can do one of two things to access it while you are working on migrating your existing site:
- You can edit your local computer's hosts list (on Linux and Macintosh computers, this is /etc/hosts) to locally map your live site's hostname to your OIT hosting account. This is the quickest method, but while you have this mapping in place you won't be able access your existing live site from that computer.
- You can create a DNS alias for your new site. You or someone in your IT staff will have to create the alias in DNS, and then you'll have to go into the Plesk control panel for your new OIT Web Hosting site and add the alias there (via the Add New Domain Alias button on the main page) so that the Plesk server knows that your DNS alias goes with your OIT Web Hosting account. This method takes a little more effort to set up, but with it you can access your new site from anywhere while you are testing it, and you can access your existing live site from the same computer at the same time.
- You could actually mix these two methods for perhaps the most versatile option: you can define an alias for your new site in your local computer's host file, and then add that alias to your Web Hosting account via the Plesk control panel, but without adding the alias to DNS. This will let you access both the old and new sites from your local computer, but you still won't be able to access your new site from anywhere else.
When your new site is ready to go live and replace your existing live site, you can have DNS updated (see below) and remove any unneeded aliases that you have created.
Moving Any Drupal Site to an OIT Web Hosting Account
- You will need to create an archive of the filesystem of your existing site, and an archive (often called an SQL dump) of your existing site's database. How you do this will depend on where your existing site is located. Please note that if you are comfortable with using SSH, you can archive your site's filesystem as either a GZipped Tar archive (.tar.gz extension) or a Windows style ZIP archive (.zip extension). If you are not comofrtable with SSH and prefer to upload your archive to your Web Hosting account via the Plesk control panel, your archive must be in Windows style ZIP format.
- Upload the archive file to your OIT Web Hosting Account and unpack it where you want your Drupal installation to live. From within the Plesk control panel, you can upload the archive file via the File Manager. Once the file is uploaded, just select it in the File Manager to unpack it. After the archive file has been unpacked, move it to your hosting account's "/private/" folder.
- In the Plesk control panel, go to the Databases manager and create a new database. Copy down the database name, the database user name, and the password, as you will need them later.
- While still in the Databases manager, on its main page select the phpMyAdmin link for the database you just created. This will open phpMyAdmin for this database in a new browser window or tab. On the Import tab of phpMyAdmin, import the SQL dump of your existing site's database.
- Either via SSH or the Plesk control panel's File Manager, modify your Drupal site's sites/default/settings.php file and update the database information in it to match what you copied down in step three above.
- Navigate to your Web Hosting account's main URL, and you should hopefully see the front page of your Drupal site. Try logging into it and check the Drupal status page and error logs to see if there are any problems with the site.
Updating DNS When Moving a Live Site
If your site is already live in another location, then you will need to update DNS to point your site's hostname to your new OIT Web Hosting account. You will need to know your hosting account's server name - to get this, just look in your browser's address bar while logged into your Web Hosting account's Plesk control panel. The server will be web-plesk##.oit.gatech.edu, where # is a number. Either update your existing site's hostname to point to this Plesk server, or if you don't have that kind of access, ask your local IT support staff to make the change for you. If you don't have anyone in your unit who can update DNS, you can always open a support request with OIT.
A Word on Migrating a Development Site to Live Production
If you are developing your site somewhere else and then moving it to an OIT Web Hosting account (or any other server where the DNS hostname for the site will be different from what it was in development), then you need to take special care to make sure that your internal links do not break.
When setting the URL paths for page links, inline images, attachment files, etc., make sure to enter those URLs as relative paths. A regular (called 'absolute') URL looks like this:
http://your-site-host-name/path/to/my/file.xyz
The relative version of that path looks like this:
/path/to/my/file.xyz
Relative paths will continue to work even after you change the hostname of the website. Absolute paths will cause the user's web browser to try to follow the link back to the development site. This can cause all kinds of problems, ranging from links not working and images not showing as soon as the new site goes live, to problems that aren't detected until someone shuts down the development site months after the production site went live.
The command line savvy developer may want to search through his/her SQL database dump for the hostname of the development server before uploading that dump file to the new OIT Web Hosting account. This is a great way of catching any absolute URL links that are still lingering about somewhere in the site.
Importing a Migrated Site into Installatron
Installatron is a service available in OIT Web Hosting that (among other things) can keep the core of your Drupal site automatically updated with security patches. To import a migrated Drupal site into Installatron, please refer to the Installatron documentation provided by OIT's Web Hosting team and watch the video tutorial on this page.
Please note that by default, Installatron does not enable automatic updating of Drupal core when importing a Drupal website into Installatron. To turn on automatic update:
- From the front page of the Plesk control panel, look for the Installatron Applications Installer link on the right-hand side of the page.
- In the section that gives details about your Drupal installation, select the blue wrench icon button.
- Under Automatic Update, select 'Create a backup and update to new minor versions and security releases. (Recommended)'.
- Select Save All.
Best Practices for Configuring and Managing Drupal
Best Practices for Configuring and Managing DrupalBefore you take a Georgia Tech Drupal site live, it is a good idea to go through the following checklist of best practices to make sure your site is secure and streamlined for production use. This checklist is designed for Drupal 7 sites on OIT's Web Hosting, but will generally apply to other environments and later versions of Drupal as well.
Within the Drupal Application
Helpful Tip: The admin interface can be accessed via the black admin toolbar at the top of any page when logged in with administrator rights.
Make Sure Core, Module, and Theme Updates Get Applied When Needed
Enable the Update manager using the following settings so that you and your team will be notified of important available updates. Then, make sure those updates get applied in a timely fashion (but be sure to back up your site before doing so: more information on backup is below, in case anything goes wrong).
If you are using Drupal 8 or higher (considered modern Drupal), the site now needs the Composer CLI tool to manage installation and updates for Drupal core and any modules, due to more complex project dependencies.
Recommended "Available updates" Settings
Located at: Reports -> Available Updates -> Settings (admin/reports/updates/settings)
- Check for updates: Weekly
- Check for updates of disabled modules and themes: Yes (unless on a multi-site, where only 1 site should check this)
- E-mail addresses to notify when updates are available: At least TWO (2) email addresses (preferably some office-wide emails).
- E-mail notification threshold: Only security updates
Limit Access to Your Site
Avoid giving out any more access than necessary
- Make sure you have a suitable user account role for content managers that does not let them install modules, change themes, adjust low-level Drupal settings, etc.
- Ideally, only trained IT and/or web development staff should have administrator or super administrator privileges
Review your User Account List Regularly
Remove (or block) accounts of users no longer working in your unit; blocking is often the better option, as that maintains tracking of what those users did. Removing the account will require all content changes to be attributed to the "anonymous" user.
Review your Role Permissions Regularly
Roles are what map Drupal access permissions to individual users. Review the list (found at People -> Permissions) to make sure roles do not have unnecessary permissions that put your site at risk.
Recommended "Account settings" Settings
Located at: Configuration -> People -> Account settings (admin/config/people/accounts)
- Anonymous users - Name: Visitor
- Administrator role: Super Administrator (for Drupal Express sites only; for all other sites: Administrator)
- Who can register accounts?: Administrators only
- Require e-mail verification when a visitor creates an account: Yes.
- When cancelling a user account: Disable the account and keep its content.
- Personalization
- Enable signatures: No
- Enable user pictures: No
Enable GT Account Authentication
- Most Georgia Tech Sites should use GT Account Authentication, which is provided by the CAS (cas) module
- Drupal Express has the CAS module already installed
- For all other sites, see the Installing CAS section for installation and configuration instructions
Recommended "Text formats" Settings
Located at: Configuration -> Content authoring -> Text formats (admin/config/content/formats)
- Order matters: place "basic text editor" at the top/first, then "minimal HTML", etc.
- "Plain text" is the only format to which Anonymous users should have access.
- If "PHP code" is present, DO NOT allow anyone to use it!
Configure Error Logging Securely
Drupal and PHP error messages shown to regular users could reveal sensitive details about your site, and just look unprofessional as well. Use the following settings to hide error and warning messages from site visitors and keep them from overflowing your site's database.
Note: Do not enable the core syslog module if you are using OIT Web Hosting. According to the syslog module documentation, it is not appropriate for shared hosting. You should be able to find most useful debugging information by going to the Logs section in the OIT Web Hosting Control Panel and looking at the error logs.
Recommended "Logging and errors" Settings
Located at: Configuration -> Development -> Logging and errors (admin/config/development/logging)
- Error messages to display: None.
- Database log messages to keep: 100
Enable Caching to Improve Site Performance
Recommended "Performance " Settings
Located at: Configuration -> Development -> Performance (admin/config/development/performance)
- Caching
- Cache pages for anonymous users: Yes.
- Cache blocks: (Depends on how often your blocks change)
- Minimum cache lifetime: (Depends on how much dynamic content you have)
- Expiration of cached pages: (Only matters if you are using an external cache like Varnish)
- Bandwidth optimization
- Aggregate and compress CSS files: Yes
- Aggregate JavaScript files: Yes
Protect Web Forms and Collected Data
Note: You should try using non-Drupal solutions for forms, such as Qualtrics, whenever possible. Keeping forms and general data out of Drupal is more secure and makes it easier to manage and later upgrade your Drupal site.
In general, do not use Drupal to store sensitive data of any kind: FERPA protected, HIPAA protected, DoD protected, or personal identity information (SSNs, birthdates, etc.)! The exception to this rule is if your Drupal site is for internal use only and is firewalled properly to prevent access from off-campus. Even then, you should apply all possible security protections to prevent internal hacking of your sensitive data.
If you still need to have a form on a Drupal site, use the latest version of WebForm, and install some type of anti-spam / anti-bot protection, as forms get hit by bots quickly and regularly once they are made public.
- Look at modules like Honeypot, Spamicide and BOTCHA to fend off bots
- Avoid CAPTCHA (especially the early versions) if at all possible, as it will greatly irritate your users; the latest version is more acceptable, as it does not "quiz" the site visitor as strongly as the earlier versions
- If you're resorting to CAPTCHA, consider whether or not the form can instead be locked down to just the Georgia Tech Campus only
Recommended "Site information" Settings
Located at: Configuration -> System -> Site information
"E-mail address" is the address from which emails are sent by the site, so it should be generic, rather than the address of a real person. Note: this must be an @gatech.edu email address for the campus email servers to accept messages from your website!
Note that the Georgia Tech web theme does not display the "Site name" set here, but rather has it's own site title fields on the theme configuration page. However, "Site name" is used for the name shown in a web browser tab and any page bookmarks in a browser, so it needs to be set to something meaningful, and ideally identical to what you set on the theme configuration page.
Module and Library Safety Tips
- Where possible, sign up for alerts about updates to libraries being used (such as CKEditor, phpCAS, Flexslider, etc), especially security vulnerability alerts. Drupal does not give any notifications about out-of-date libraries!
- Always turn off the following (unless you really need them):
- PHP filter
- Tracker
- Comments
- Review your modules regularly and disable any that are not being used
- Disabled modules should be uninstalled and then removed from the Drupal filesystem (move them to the
/privatefolder if you are on OIT Web Hosting) - If Drupal reports that a module has been removed from its repository on the Drupal.org website, there's usually a good reason. Remove any such modules from your site ASAP!
- Disabled modules should be uninstalled and then removed from the Drupal filesystem (move them to the
- Avoid keeping development-only modules on live sites. If you really need any, keep them turned off when not in use.
- Avoid alpha/beta release modules and anything that is poorly supported or not supported at all.
- When evaluating new modules, look at the last date of a release (be wary if more than a year ago), number of sites reporting usage of the module, reputation of the module's maintainer(s), and the number of open issues in the development queue.
Check Your Site's Health
- Check the Status report (found at Reports -> Status report) and correct any problems listed
- Use the Security Review module to scan your installation for common security problems
Custom Code and the Drupal Filesystem
General Rules of Thumb
- Always write secure code!
- Never hack the core Drupal code or any third party modules!
- Hacks will likely get overwritten when updates are applied later on.
- Instead, look for ways to extend or adjust the code through a custom module.
- Avoid using unsupported modules, libraries or themes.
- Test anything new or uncertain in a separate instance of Drupal. Never develop on your live site!
- Don't bother trying to hide the fact that you're running Drupal - it's really not worth the time and effort.
Drupal Filesystem Maintenance
- Avoid putting anything but Drupal related code in or under the main Drupal directory
- Adding other files or applications complicates the upgrade process, which can result in those other files or applications disappearing unexpectedly.
- Drupal version 8 and beyond does not support running any other applications from within or under the main Drupal directory.
- If you manually install modules or themes, don't leave their archive files within the Drupal directory tree. Move them to the
/privatedirectory if you want to keep them around.
- Adding other files or applications complicates the upgrade process, which can result in those other files or applications disappearing unexpectedly.
OIT Plesk Web Hosting Control Panel
General Hosting Account Configuration
Owner/Administrator
- Avoid giving out hosting account access unless it is absolutely needed; only those who need to perform Drupal code upgrades should have hosting account access - content managers should never be given access to the hosting account.
- Regularly check that the administrators of a site are correct (and remove any former maintainers).
Notification Email Address for Website
Only one email address is allowed, so set to the address of a mailing list or alias that forwards to all of your site administrators.
Installatron Applications Installer
- If you are using Drupal 8 or higher (considered modern Drupal), the site now needs the Composer CLI tool to manage installation and updates for Drupal core and any modules, due to more complex project dependencies.
The Installatron tool on Plesk does not support Composer-managed updates, and is not recommended for managing a modern Drupal site. Installatron will update Drupal core without checking dependencies, and there is a high risk of updates eventually breaking any site that includes additional modules, as most Drupal sites do.
Plesk now offers the PHP Composer UI tool to provide limited Composer support via a site's control panel. However, updates have to be manually prompted, and the tool is limited use.
- How do I get started with Drupal on Plesk?
- Is Drupal the right choice of CMS for my site?
PHP Composer UI Tool
- While it's strongly recommended to use Composer CLI to develop and manage your site projects locally, the PHP Composer tool on Plesk provides some helpful options for managing Composer applications from your site control panel.
- How do I use the Plesk PHP Composer extension?
SSL Configuration
Follow the guide to SSL configuration to run your site with SSL encryption (via an https:// URL).
Plesk Backup / Restoration Manager
- Before any major update or smaller update, it is recommended that you create a full backup of your site following the instructions before performing any changes/upgrade on your site.
- In case that you need to restore the site back from unsuccessful change/upgrade:
Please note that Drupal upgrade process tends to add new files to the system.
Restoring from backup will not delete files that were added after the backup was created. Therefore, it is suggested to do a "clean" restore to avoid new files created during the unsuccessful upgrade interfering the configuration of your site before the backup.
How to do a "clean" restore with Plesk Backup Manager (under About Restoration Behavior section)
Scheduled Tasks (cron)
- Follow the guide to setting up cron so that your Drupal site will refresh content and check for security updates.
Directory structure (multi-site vs. solo site, single system per virtual host, etc.)
- This will vary depending on your site setup, but we no longer recommend using "contrib" and "custom" subfolders in the sites/all/modules folder.
URL Redirects
- These are usually created in your
.htaccessfile (always keep a copy of the latest in your/privatedirectory). - Check that your redirects did not get overwritten when your site's Core code was late updated.
Additional ideas can be found in the following:
- Securing Your Drupal Site (Last updated in 2016)
- List of security-related contrib modules (Last updated in 2016)
- Supporting Drupal Over the Long Run (BadCamp 2012)
- Performance for Site Builders (2012)
Updating Drupal
Updating DrupalUpdates patch Drupal to add new features and protect against discovered vulnerabilities, keeping your sites working optimally. Always test new updates on a development site before applying them to your live, production site.
Drupal 9 has a different method of doing updates. Please see the soon-to-be-added pages for Drupal 9 update instructions.
Drupal Updates Sub-Topics
Configuring the Drupal Update Manager
Configuring the Drupal Update ManagerThe Update Manager, if used properly, can provide you an easily-accessible location to view what modules and themes need updating.
The settings for the Update Manager ( admin/reports/updates/settings ) provide a few key settings:
- E-mail addresses to notify when updates are available - A list of emails to be notified when Drupal finds a new release of a module.
- Check for updates of disabled modules and themes - To ensure all modules are kept up to date, this should be checked (on multi-sites, you only need to check disabled modules and themes for ONE of the multisites).
Updating Drupal 7 Core Via Installatron
Updating Drupal 7 Core Via InstallatronBefore You Begin
- To be able to use this method of upgrading, your Drupal site must have been created via Installatron or imported into Installatron.
- Please note that if you installed the Drupal application via Installatron with the update automatically setting, you will not need to go through these steps, as Installat ron will update the site as soon as the new release is posted.
- Important!!! Installatron will overwrite your .htaccess and robots.txt files. If you have made any changes to them, be sure to back the m up before upgrading so that you can restore your custom changes after the upgrade is done.
- Be sure that your Drupal website is configured in Installatron.
Upgrade Process
- Open a web browser and navigate to OIT Web Hosting [https://hosting.gatech.edu/]
- Log in using your GT Account Username and password, and then select the appropriate site from the list.
- From the left-hand menu, select Installatron Applications Installer.
- An entry describing your Drupal site should appear. Select the Upgrade button.
- Installatron will guide you through the upgrade process of the site.
- Follow the directions on the page and select Upgrade to complete the process.
Drupal 7 Installatron Updating Tips
Drupal 7 Installatron Updating TipsRunning updates on OIT Web Hosting is essential to ensuring that your site remains safe and responsive to every user. The preferred method of running updates is through Installatron, a server application which manages installed web applications on a hosting account.
Update Check
By default, Installatron will check for core updates in one of two ways:
- For new Installatron Drupal websites, Installatron checks every 6 hours for Drupal security updates.
- For imported Installatron Drupal websites, Installatron does not check for Drupal core updates.
Installatron keeps track of each site's app separately, so there is not a way to determine exactly when an update is going to apply for a site. The documentation for Installation say that a site's web app will update between 12am and 6am server time.
Similarly, when Installatron checks for web app updates from the mothership, it's independent (e.g., the updates do not happen at 12 pm, 6 pm, 12 am, 6 am). This makes sense since the increased load of websites all applying updates concurrently would heavily degrade the hosting service.
Configuring Installatron Updates
To configure your Drupal site on Installatron to automatically update, follow the directions below:
- Log in to your website from OIT Web Hosting.
- Select Installatron Applications Installer.
- For the Drupal site in question, select the wrench to view/edit details.
- Under Automatic Update, select "Create a backup and update to new minor versions and security releases. (Recommended)".
- Select Save All.
Updating from Installatron
Please see Updating Drupal Core (Installatron).
False Flag on Latest Version
As Doug Curtis from OIT Web Hosting notes, there is a current bug in detecting the latest release of Drupal from within Installatron.
- There is an open issue where Installatron shows a green check mark indicating it has the latest version but if you check the version number next to the check mark, it is not [current]. I have a ticket open with the vendor about this. This is a good reminder that you should always manually check your versions and not rely 100% on automatic systems.
Backup Directory
The default backup directory for Installatron is:
- /application-backups
You can set custom backup locations through Installatron by editing your Drupal installation via the Applications Installer, and looking under "Default Backup Location".
Updating Drupal 7 Core Manually
Updating Drupal 7 Core ManuallyBefore You Begin
-
The instructions below are for moving between different releases of the same major version of Drupal (e.g. 7.x, 8.x. etc.) Please see our Site Migrations section for more details on moving to the next major version of Drupal, which is a much more involved process.
-
If you are managing a Drupal 8 or later site via Composer, you do not want to use the following instructions, as all updates will be handled through composer.
-
The instructions below assume your site is on a UNIX style web server and regularly reference the OIT Web Hosting environment. If your site is hosted on a different kind of web server, then these instructions may have to be modified to work correctly for you.
- Additional information can be found on the Drupal.org page about minor version updates.
Drupal Core Upgrade Process
- Open up a web browser and navigate to your Drupal site.
- Log into the site as an Administrator.
- Navigate to the Maintenance subsection of the Development section of your site's Configuration administration area (Configuration -> Development -> Maintenance) and enable the "Put site into maintenance mode" checkbox. (Don't forget to save your change!)
- Either via SSH/SFTP or (for sites on OIT Web Hosting) the Plesk Control Panel, make a backup of your site's filesystem.
- If you are using SSH, you can navigate to your site's base directory and issue the following command:
-
tar czf ~/drupalbackup.tgz *
-
- If you are on OIT Web Hosting, you should store your backup in the "private" folder like so:
-
tar czf ~/private/drupalbackup.tgz *
-
- If you are using SSH, you can navigate to your site's base directory and issue the following command:
- Backup your MySQL database. On OIT Web Hosting, the easiest way to do this is to log into the Plesk Control Panel for you site and access phpMyAdmin via the Webadmin link in the Databases management section. On the other hand, if you are on a stand-alone web server where you have direct access to mySQL commands, you can run a command like the following (be sure to insert the correct username, password, and database name for your particular website):
-
mysqldump -u USERNAME -p DATABASENAME > ~/backups/database-backup.sql
-
- Rename the directory containing your Drupal installation or move the contents of the directory to another location. With many shared hosting services, you won't be able to rename this directory, so your only choice will be to move its contents. When moving the contents, be sure to get the .htaccess file from this directory so that you'll have it for reference later on.
- If you were able to rename the directory containing your Drupal installation, then from that same parent directory, download and unpack the latest version of Drupal core (be sure to replace 'x' and 'y' with the right major and minor version numbers) and rename the new drupal-x.y directory to match the orignal name of your Drupal installation directory.
-
wget https://drupal.org/files/projects/drupal-x.y.tar.gz
-
tar -xzvf drupal-x.y.tar.gz
-
mv drupal-x.y orignalDirectoryName
-
- If you had to move the contents of your Drupal directory somewhere else, then make sure you are in that now empty directory and do the following:
-
wget https://drupal.org/files/projects/drupal-x.y.tar.gz
-
tar -xzvf drupal-x.y.tar.gz
-
mv drupal-x.y/* drupal-x.y/.???* .
-
rmdir drupal-x.y
-
- Move the following folders to your old Drupal directory to your new Drupal directory:
-
sites/
-
- Return to your web browser and navigate to https://yourSiteHostName/update.php. Follow the prompts to apply any database table updates that are needed.
- Check the administrative Status report to verify that everything is working as expected.
- Navigate to the Maintenance subsection of the Development section of your site's Configuration administration area (Configuration -> Development -> Maintenance) and disable the "Put site into maintenance mode" checkbox. (Don't forget to save your change!)
Updating Drupal 7 Modules
Updating Drupal 7 ModulesBefore You Begin
-
Installatron does not upgrade modules, so even if you use Installatron to manage your Drupal core upgrades, module updates must still be done manually.
-
If you are managing a Drupal 8 or later site via Composer, you do not want to use the following instructions, as all updates will be handled through composer.
-
The instructions below assume your site is on a UNIX style web server and regularly reference the OIT Web Hosting environment. If your site is hosted on a different kind of web server, then these instructions may have to be modified to work correctly for you.
- Additional information can be found on the Drupal.org page about module updates.
Drupal Module Update Process
- Open up a web browser and navigate to your Drupal site.
- Login to the site as an Administrator.
- Put the site into maintenance mode (Configuration -> Development -> Maintenance) by enabling the "Put site into maintenance mode" checkbox and saving the configuration.
- Either via SSH/SFTP or (for sites on OIT Web Hosting) the Plesk Control Panel, make a backup of your site's filesystem.
- If you are using SSH, you can navigate to your site's base directory and issue the following command:
-
tar czf ~/drupalbackup.tgz *
-
- If you are on OIT Web Hosting, you should store your backup in the "private" folder like so:
-
tar czf ~/private/drupalbackup.tgz *
-
- If you are using SSH, you can navigate to your site's base directory and issue the following command:
- Backup your MySQL database. On OIT Web Hosting, the easiest way to do this is to log into the Plesk Control Panel for you site and access phpMyAdmin via the Webadmin link in the Databases management section. On the other hand, if you are on a stand-alone web server where you have direct access to mySQL commands, you can run a command like the following (be sure to insert the correct username, password, and database name for your particular website):
-
mysqldump -u USERNAME -p DATABASENAME > ~/backups/database-backup.sql
-
- Either via SSH/SFTP or (for sites on OIT Web Hosting) the Plesk Control Panel File Manager, locate the existing installation of the module and either delete it or move it somewhere outside your Drupal installation's base directory.
- Download the archive file for the new version of the module and unpack it into the same location where the module had previously been installed
- Via SSH, a typical set of commands for steps #6 and #7 might look like this:
-
cd /path-to-your-drupal-site/sites/all/modules
-
rm -r modulename
-
wget https://drupal.org/files/projects/module-x.y.tar.gz
-
tar -xzvf module-x.y.tar.gz
-
- Return to your web browser and navigate to https://yourSiteHostName/update.php. Follow the prompts to apply any database table updates that are needed.
- Check the administrative Status report to verify that everything is working as expected.
- Navigate to the Maintenance subsection of the Development section of your site's Configuration administration area (Configuration -> Development -> Maintenance) and disable the "Put site into maintenance mode" checkbox. (Don't forget to save your change!)
Updating Drupal 10 Core and Modules
Updating Drupal 10 Core and ModulesMost Drupal 10 installations on campus will be hosted on OIT Web Hosting and managed through composer (not Installatron as was used for Drupal 7 and earlier). Updating Drupal 10 under composer is relatively straightforward, but does involve several steps:
- For good measure, open the site in a web browser window, log in, and put the site in maintenance mode. Leave this window open so that you can return to it as needed.
- In a separate browser tab/window, log into the site's Plesk Control Panel through OIT Web Hosting.
- While all OIT Hosting Accounts now have automatic updates enabled, it doesn't hurt to run a full manual backup to capture the most recent changes, just in case something goes wrong while updating.
- Go to the Backup & Restore button in the right-hand sidebar on your site's Plesk control panel
- Select the Backup button and follow the prompts
- With your backup complete, go to the PHP Composer tool in your site's Plesk Control Panel
- Under Package Dependencies you should see an Update button. Select this button.
- You should get a pop-up modal showing the update progress. This may take a little while, so please be patient.
- When the updates are finished, return to your first browser window (the one that is logged into your Drupal site) and select the Drupal icon in the administrative toolbar for your site, then select Run updates to run database schema updates.
- If you have any trouble here, you can try going to the URL path of your site's home page with "/updates.php" added to the end of the URL.
- When the database schema updates are complete, test your site and make sure it still functions as expected.
- Disable maintenance mode to make the site open to the public again.
Upgrading to Drupal 10 from Drupal 9
Upgrading to Drupal 10 from Drupal 9The following information is currently targeted to those site admins who have a site built on a custom theme implementation or have written custom modules for Drupal 9.
If you are using the standard Drupal 9 Drupal Express provided by Institute Communications, you should wait until they release a new version of the Georgia Tech theme package before trying to upgrade to Drupal 10.
A list of things to be watchful for when upgrading to Drupal 10 (to be expanded in the near future):
-
There's a new 2.x version CAS module and 2.x version External Auth module that must be installed before upgrading.
-
For that matter, use the Available Updates report to scrutinize all of your modules, even the ones that show up in green. A module with a major version update can still render in green if you have the last release of the previous major version.
-
If you are running a Composer manged site, install the Upgrade Status module to check your site for upgrade issues that need to be corrected.
-
If you have your own custom modules, you'll need to go through all of them and check for Drupal 10 compatibility issues:
-
drupal_get_path() and drupal_get_filename() are removed from Drupal 10
-
\Drupal::entityQuery now requires an accessCheck() parameter to work
-
The themes Seven, Classy and Stable have been removed from Drupal 10 and need to be disabled before upgrading, unless you plan to use the contrib versions, in which case you must install those versions before upgrading.
-
The administration theme of choice is now 'Claro' - you should switch to Claro and uninstall Seven before trying to do an upgrade to Drupal 10.
-
NOTE: If a theme you are using has enabled Classy or Stable, you must use a hack to disable them, as they are hidden in the admin GUI by default. See Drupal Issue #3328016 for more details.
-
Short summary: If a theme uses another theme as a base theme, the other theme gets enabled at install time. However, Classy and Stable are hidden themes, so they don't show up in the admin GUI, thus you can't uninstall them through the GUI. Unfortunately, Drupal 10's update.php script expects them to be uninstalled. The hack involves modifying both theme's
.info.yamlfiles to unhide them, allowing you to uninstall them. Take note that even after unhiding a theme, you still won't be able to uninstall it if an active theme refers to it as a base theme. Deal with those active themes first (uninstall them or update them to not rely on Classy or Stable), then flush caches and you should be able to uninstall Classy and Stable after unhiding them.
-
-
If you are using a theme based on Classy, you have two choices: install the contrib version of Classy, or merge everything from Classy into your theme. Do note that Classy uses Stable as a base, and Stable has also been removed from Drupal 10, replaced with Stable9. Stable9 does exist in Drupal 9.5.0, so you can port your theme over while still running under Drupal 9. However, you'll have to use the hack in the previous bullet point to enable Stable9 before you can get another theme to use it as a base theme. This is because Stable9 is also hidden, like Stable and Classy
-
-
Last but certainly not least, update the core_version_requirement setting in each custom theme and module's
.info.ymlfile to include ^10
-
-
Deprecated Modules: The following need to be fully uninstalled before upgrading, unless you are choosing to use the new contrib versions, in which case you need to install the corresponding contrib version before upgrading:
- CKEditor 4 (if you're removing it, don't forget to remove all CKEditor 4 add-on modules as well)
- Color
- Quickedit
- RDF
- Aggregator
- Hal
Migrating to Drupal 10 from Drupal 7
Migrating to Drupal 10 from Drupal 7Migration, not upgrade
Drupal 8, released in November of 2015, was a major rewrite of the underlying Drupal code (Drupal's core engine and APIs). Because of the multitude of changes, there is no direct in-place upgrade path to go from any earlier version of Drupal to Drupal 8 or later. Instead, Drupal 7 and earlier sites must be migrated to Drupal 8 or later, which involves setting up a whole new Drupal 8 website and copying into it (manually or automatically) the content of the older website.
All Drupal 7 sites that are to remain on Drupal should be migrated to Drupal 10, the latest version of Drupal.
Requirements and Web Hosting Support
Drupal 10 requires a hosting environment running at least PHP 7.4 or later, which is available on OIT Web Hosting. OIT does not currently support the use of Drush or command line access to Composer. However, the Plesk control panel GUI allows for composer set up and management.
The easiest way to get started with the Georgia Tech branded version of Drupal 10 is to request an installation from OIT. You can select this option when requesting a new OIT Web Hosting account, which is usually the best way to go. In short, you would set up a new site in a new hosting account using a temporary domain name, and then once you have copied over all of your existing content, you would shut down your old site and repoint your real domain name to the new hosting account.
Note
If this sounds a little too technical for you, you should consult with your local IT support staff, who should be able to help you through anything concerning domain names and repointing them.
Georgia Tech Migration Roadmap
Beyond PHP support, each Georgia Tech unit website will need several extra components to be fully usable. The following table is an attempt to start tracking the status of the components needed for Georgia Tech Drupal 9 sites, and it will be updated as releases and additional information come available.
| Component Name | Available for Drupal 10? | Comments? |
|---|---|---|
| Georgia Tech Web Theme | Yes | An official Institute Communications Drupal 9 theme is available. Please see the Georgia Tech Web Theme section for more information on the status of Drupal 10 theme development. |
| GT Account Authentication | Yes | CAS module v1.0 is fully usable and CAS configuration instructions are available. |
| Mercury News and Events | Yes | An official port of the official Hg Mercury is available. It uses a feeds approach (creating nodes for each news or event item) that is different from the Drupal 7 module approach. Testing in a development environment is recommended to gain familiarity with how to configure and manage the Drupal 10 module. |
| GT Content Types | No | Vertical, Horizontal, and Multipurpose page types are not going to be ported to Drupal 8. Such pages will have to be rebuilt in Drupal 8+. Alternative page layout systems include:
|
| GT Drupal Express (DX) | No | A Drupal 10 installation is available for Drupal 10 websites installed through OIT Web Hosting - GT Drupal Express (DX) for Drupal 9. Please note that this is not be a direct replacement (or direct upgrade path) for existing Drupal 7 DX sites. Drupal 7 DX developers should plan for a manual content migration to Drupal 10, as it is unlikely that a script will be developed to aid DX migrations to Drupal 10. A Drupal Express migration strategy guide is under development. |
| Web Forms | Yes | The traditional Webform module was been completely rewritten for Drupal 8 and is much more capable (and more complex) than the old version. Existing users should treat it like a new product and go through all available getting started and training guides and videos before trying to build a form with Drupal 10. Drupal 9 itself comes with a limited Contact Form functionality and a handful of contrib modules (such as Contact Storage) are available to extend that functionality, though not to the level found in the traditional Webform module. Contact forms are recommended for simple RSVP and feedback forms. |
Complete Migration Process
Kevin Pittman has posted a guide to migrating from Drupal 7 to Drupal 10 that includes a lot of planning tips and technical details.
Drupal Express (DX) to Drupal 10 Upgrade/Migration Strategies
Drupal Express (DX) to Drupal 10 Upgrade/Migration StrategiesMany Georgia Tech websites have been built using Drupal Express (DX), which is a custom version of Drupal that allows you to create a website with little technical or design expertise. The ready-made site comes with built in features and tools like news and events listings, and mobile optimization. The Office of Information Technology offers Drupal Express as an option when requesting a new web hosting account. Selecting this option causes Drupal Express to be pre-installed in the account so that the unit can start using the site almost immediately without having to do any technical work on the back end of the site.
In spite of the continued use of the name, there is very little technical similarity between Drupal Express for Drupal 7 (we'll call this Drupal 7 Express) and the current Drupal Express for Drupal 10 (we'll call this Drupal 10 Express). If you are running a Drupal 7 Express site, you will need to completely rebuild your site in Drupal 10 or another content management system. This is a good time to assess your site and determine if it might be a better fit for something like Sites@Georgia Tech - OIT's article "Is Drupal the right choice of CMS for my site?" goes into some of the pros and cons of both Drupal 10 and Sites@Georgia Tech.
If you choose to move forward to Drupal 10, the following guidelines and tips will help you plan for a manual site migration from Drupal 7 Express to Drupal 10 Express:
- Vertical, Horizontal, and Multipurpose page types are not going to be ported to Drupal 10 and will not be copied over by the Drupal Migrate tool. Such pages will have to be completely rebuilt in Drupal 10 using the new layout system called Layout Builder.
- Drupal 7 Express sites may still benefit from using the Drupal Migrate tool to at least bring over their Basic Page content. Bear in mind that some amount of clean-up will be necessary after using Migrate, but the clean-up may be easier than cutting and pasting a lot of Basic pages into your new site.
Kevin Pittman has posted a detailed Drupal Migration guide that describes how to use the Migrate tool. (The guide is labeled for migrating to Drupal 8, but the concepts still apply when migrating from Drupal 7 to Drupal 10.)
- Other components included in Drupal Express may not be available for Drupal 10 or may have been superseded by new components. A breakdown of known Drupal Express components and their status is posted below.
In case you are enlisting the help of someone with technical developer skills who would like to know more about the make-up of Drupal Express and what to expect when migrating a Drupal Express site to Drupal 10, below is the full list of components included in Drupal Express (excluding minor ones no longer needed in Drupal 8+) and their known Drupal 10 status.
Please note that just because a module has a production version, this does not mean that it works the same as it did in Drupal 7 or that it supports all of the features in the Drupal 7 version. Please read the documentation for each module to see what has changed.
| Component Name | Available for Drupal 10? | Comments? |
|---|---|---|
| Georgia Tech Web Theme | Yes | An official Institute Communications Drupal 10 theme is available. |
| GT Superblocks | No | No port planned or expected of this custom module |
| GT Editor | No | No port planned or expected of this custom module, but the built-in CKEditor provides much of the same functionality and can be customized as needed |
| GT Login | No | No port planned or expected of this custom module, but the CAS module is part of Drupal 10 Express and provides GT Account Username based authentication. CAS configuration instructions are available. |
| GT Tools | Yes | The official Drupal 10 Georgia Tech theme has it's own required "GT Tools" module that provides support for some of the theme's features. |
| HG Reader | Yes | An official port of the official Hg Mercury is available. It uses a feeds approach (creating nodes for each news or event item) that is different from the Drupal 7 module approach. Testing in a development environment is recommended to gain familiarity with how to configure and manage the Drupal 10 module. |
| JWFilter | Superseded | JWFilter was for the old OIT DMI media repository that is no longer available. Please use the Ivan Allen College's Support for oEmbed module for embedding videos from the new Georgia Tech MediaSpace repository |
| Component Name | Available for Drupal 10? | Comments? |
|---|---|---|
| Admin Menu | Superseded | Use Admin Toolbar |
| Admin Views | In Drupal 8+ Core | |
| Block Reference | Superseded | Use the built in Entity Reference field |
| CKEditor | In Drupal 8+ Core | |
| CTools | Production | Not required by any previous Drupal Express modules in Drupal 8 |
| Custom Search | Beta | From the Custom Search project page: "The 8.x-1.0-beta branch is usable, and instead of overriding the default search block like it did with D6/7, it provides its own block(s)". Not recommended for use (not being updated by maintainer) |
| Date | In Drupal 8+ Core | |
| Diff | Production | See the Diff project page |
| Field Group | Production | See the Field Group project page |
| Google Analytics | Production | See the Google Analytics project page |
| IMCE | Production | See the IMCE project page |
| IMCE MkDir | Superseded | Now part of the main IMCE module |
| Libraries | Development | Not required by any Drupal 10 Express modules |
| Link | In Drupal 8+ Core | |
| LinkIt | Production | See the LinkIt project page |
| Menu Block | Production | See the Menu Block project page |
| Module Filter | Production | See the Module Filter project page |
| Nodeblock | Superseded | "Node" blocks can be created in Drupal 8+ by creating a custom block type and adding an Entity Reference field configured to reference node content |
| Override Node Options | Production | See the Override Node Options project page |
| Pathauto | Production | See the Pathauto project page |
| Pathologic | No | |
| Revisioning | In Drupal 8+ Core | Replaced by the combination of Workflows and Content Moderation. |
| Token | Production | See the Token project page |
| Transliteration | No | A filename transliteration patch for Drupal 8+ core is available if you want to have filenames transliterated, but that patch hasn't been committed to production core yet. It has been rolled into a Transliteration Filenames module. |
| Video Embed Field | Production | See the Video Embed Field project page |
| View Unpublished | Production | See the View Unpublished project page |
| Views | In Drupal 8+ Core | Existing views do not migrate to Drupal 8+, but can be recreated by hand |
| Views Bulk Operations | Production | See the Views Bulk Operations project page |
| WYSIWYG Filter | In Drupal 8+ Core |
Upgrading to Drupal 9 from Drupal 8
Upgrading to Drupal 9 from Drupal 8Notes, tips, and tricks for upgrading a Drupal 8 site to Drupal 9
Moving to Drupal 9 from Drupal 8 does not involve near as much planning and preparation work as previous major version upgrades thanks to changes the Drupal organization has made to the development process. Instead of Drupal 9 introducing a new batch of features, new features have been added gradually over the major point releases of Drupal 8. The key changes with the first release of Drupal 9 will be to remove deprecated (old and no longer used) code, and to upgrade the underlying Symfony framework. On the surface, though, you should not see any notable differences between Drupal 8.9 and Drupal 9.0, assuming you have prepared your site properly.
Preparation
Basic Requirements
-
Drupal 9 requires PHP 7.3 or higher (7.4 is preferred). If you are on OIT Web Hosting, you should be able to set your PHP version now via your site's Plesk Control Panel.
- Drupal 9 requires a settings.php change:
- The line beginning with "
$config_directories['sync'] =" has to be changed to "$settings['config_sync_directory'] =" -
Note: You can do this before upgrading, as Drupal 8.9 will work with either version of the setting.
- The line beginning with "
- To upgrade to Drupal 9, you must be on Drupal 8.9.0 or higher.
- If you are already on 8.9, make sure you have the latest patch release to get the smoothest transition
-
If you are on anything earlier, upgrade to the latest patch release of 8.9 first, then upgrade to the latest 9.0 release.
- Drupal 9 requires all active themes and modules to declare Drupal 9 compatibility:
- Compatibility is indicated by a line in the theme or module's .info.yml file that starts with "
core_version_requirement:" - Check and update all custom and contrib modules.
- Compatibility is indicated by a line in the theme or module's .info.yml file that starts with "
- Drupal 9 (as did Drupal 8.9) uses CKEditor 4.14.0, but Drupal 9 seems to be stricter about CKEditor plugins. If you are using any add-on CKEditor plugins, check each one to see if there's a 4.14 specific version and upgrade as needed. Composer should maintain the compatible plugin version with a Drupal 9-compatible release.
As an example, Balloon Panel, used by Accessibility Checker, was one that needs to be up-to-date to work in Drupal 9.
Checking Module / Theme Compatibility
There are several tools available that are supposed to check your site's modules and themes for Drupal 9 compatibility. The present options either require the ability to run PHP at the command line or require your site to be managed through Composer (such as Drupal Express websites).
Upgrade Status Module
The Upgrade Status module can perform a website audit to determine which modules, themes, and add-ons are Drupal 9 compatible.
Command Line
If you are comfortable with running simple commands at the Linux command line, you can get a quick overview of your modules declared compatibility by going to the main modules directory and running the following command:
grep "core" */*info*
For any module where you do not see a line with "^9" near the end, you'll need to do some testing and research to see if the module will work with Drupal 9. Check first for a new major version release, and if there is none, you could try the instructions given below for testing a previously Untested Release to see if it causes any problems.
Process
Once you've completed all of the preparatory steps, upgrading is the same as if you were upgrading to another point release of Drupal 8.
As with any major update, make a full backup (filesystem and database) before you begin, just to be safe.
Afterward, test major website capabilities thoroughly, since a lot of old code has been removed and the underlying Symfony engine has received a major upgrade.
Institute Communications update process
Refer to Institute Communications' gt_installer Drupal 8 to Drupal 9 update process to update GT Theme, GT Tools, and GT Profile to their latest versions.
Issues
Semantic Numbering - New Major Releases
As more time goes by, more module developers will move to the new semantic numbering system that is not tied to a Drupal version number (e.g. 7.x-1.0). Typically, if a module was at say version "8.x-3.5" then the next major release done under the new numbering system would be "4.0.0". You'll have to check carefully for this change, as Drupal alerts major version releases (8.x-3.5 to 4.0, for example) as "Other versions available".
However, in the case of modules like Webform, you may find you are expected to upgrade to the next major version when you upgrade your site to Drupal 9. Module version updates to the next major version can be done easily if you manage your site with Composer. Otherwise, you'll have to do this by hand at the filesystem level (Drupal won't upgrade to a new major version via the GUI).
As with most major version upgrades, manually run schema updates (go to update.php after updating).
Known Problem Modules
-
Devel has a new 4.0.0 release just for Drupal 9, but the popular Kint debugger sub-module is gone from 4.0.x. To get that functionality you have to use composer to install a Kint plugin for Devel 4.0.x or use the devel_kint_extras module. That's a big complication if your site is not set up to be managed by composer. As a workaround, you can download the PHAR version of Kint and manually include it in your site to get its functionality. Please note that the manual library process is not as streamlined an install as a prepackaged module.
-
Webform 8.x-5 is not compatible with Drupal 9 at all and will actually break the update.php process. If you use Webform, do not attempt to upgrade to Drupal 9 until you have upgraded Webform to its new 6.0 release.
Using composer to upgrade to Drupal 9
Using composer to upgrade to Drupal 9Drupal 8.9.x websites managed with Composer can be updated to Drupal 9.x by following the steps below.
Before updating
Follow the directives on the Upgrading to Drupal 9 page:
- Drupal 9 requires a settings.php change.
As with any major update, make a full backup (filesystem and database) before you begin.
Institute Communications update process
Institute Communications has provided an update script to assist with this upgrade. Refer to Institute Communications' gt_installer Drupal 8 to Drupal 9 update process to update GT Theme, GT Tools, and GT Profile to their latest versions.
Upgrade Process
1. Install Upgrade Status and read the report
Install Upgrade Status like you would any other module:
composer require drupal/upgrade_status
drush en upgrade_status
drush cr
After enabling the module and clearing caches, navigate to Reports > Upgrade Status (admin/reports/upgrade-status). On the Upgrade Status page, make a note of the Remove and Update sections.
Remove shows uninstalled modules and themes that are not compatible. You can remove each project using:
composer remove drupal/PROJECTNAME
Update shows each project which needs a Drupal 9-compatible release. For each project, go to the Issues (or the associated Drupal.org module page) and make a note of what version is required for Drupal 9 compatibility.
2. Upgrade Drupal modules/themes to 9.x-compatible releases
Using the knowledge from Upgrade Status' Update list above, upgrade each module to its recommended Drupal 8 and Drupal 9 release:
composer require drupal/imageapi_optimize:^4.0
If you are unsure of how to write the composer require statement, each project release (e.g. drupal/imageapi_optimize:^4.0) has an Install with Composer text snippet to copy and paste.
Repeat this for each project that needs a new version for Drupal 9 support. Then, upgrade the database on your Drupal website by going to {website}/update.php.
Note for Drupal 9-only releases
Most modules, including all dependencies of the Drupal 8 Drupal Express install, have releases that are compatible with both Drupal 8 and Drupal 9:
- Drupal.org module project download pages (e.g. faqfield:7.0) show compatibility with both versions with
Requires Drupal: ^8 || ^9
However, there are release that require just Drupal 9. For those modules (such as permissions_by_term:3.0), you will need to upgrade them while upgrading to Drupal 9.x.
3. Upgrade Drupal core to 9.x
From the drupal.org docs:
composer require drupal/core-recommended:^9.0.0 drupal/core-composer-scaffold:^9.0.0 drupal/core-project-message:^9.0.0 --update-with-dependencies --no-update
Please note the argument --no-update, which:
We use --no-update to avoid a chicken-and-egg problem with mutual dependencies.
--no-update
4. Commence upgrade!
Think you've updated all your modules and themes, and can begin the Drupal Core update to Drupal 9? Begin the update:
composer update
Make a note of any composer error message during this process.
5. Update Drupal
Now, run the database updates.
If things broke
If composer goes haywire and you find yourself in purgatory, replace the composer.json with your pre-upgrade backup version, and delete the composer.lock file. Then, force composer to recheck and reinstall modules back to their old versions with:
composer install
Version Agnostic Migration Resources
Version Agnostic Migration ResourcesDownloading a Site Backup File From OIT Web Hosting
Downloading a Site Backup File From OIT Web HostingDownload an OIT Web Hosting Backup File
Log into your Web Hosting account's Plesk Control Panel and select the Backup Manager option on the right-hand side of the main page.
On the Backup Manager page, you will see all of your existing site backups. If you have not configured automatic backups and have never run a manual backup, then you won't have anything to download. In this case, you can select the Back Up option and follow the prompt to initial a backup of your site. Do note that this is done in the background and may take a while on bigger sites, so start it before you go to lunch, and hopefully it will be done by the time you get back to your office.
Locate the backup that you want to down load and select the green down arrow icon on the far right of the backup's entry (see screenshot below).
![]()
Your backup will download to your computer, and have a name similar to this:
backup_mysite.gatech.edu_info_1503101033.xml.tar
Uncompress a Downloaded Backup File
You will need a special program to unarchive a backup file, as backups are provided in the TAR format.
- On a Macintosh, you may be able to double-click the file and get Mac OS X to unpack it for you - your mileage may vary depending on your version of Mac OS X and how large the backup file is. You can always go to the command line and unpack the file as well (see the Linux option below for instructions)
- If you prefer to not use the command line and Mac OS X is giving you trouble, you can try the open-source Unarchiver App
- On Linux or FreeBSD (or Mac OS X), you can unarchive the backup file from the command line like so:
-
tar -xf backup_mysite.gatech.edu_info_1503101033.xml.tar
-
- On Windows, you'll need a utility app that can unarchive a TAR file, such as 7-zip.
What is In a Backup Archive File?
Once you uncompress your backup file, you will have a directory with the same name as your file, but without the ".xml.tar" at the end. Inside this directory, there are two files you will be working with:
- The SQL backup of your site's database
- The file system of your Drupal site
File System
The files for your site will be within a compressed file that has "user-data" in its name, like this:
backup_mysite.gatech.edu_user-data_1503101033.tgz
Uncompress this file into a folder of the same name (without .tgz on the end), then look inside it for a folder named "httpdocs", like this:
backup_mysite.gatech.edu_user-data_1503101033/httpdocs
This folder is where your Drupal site files live. You can review them, copy them to a development web server on your local computer, or archive just that section of the file system in order to transport them to another computer.
Change settings.php Immediately
If you are going to try to use this backup to create a development copy of your live website, immediately change the database connection information so that you don't accidentally connect to your live site. Look for your Drupal settings file at:
backup_mysite.gatech.edu_user-data_1503101033/httpdocs/sites/default/settings.php
Database
The SQL for your database will be under a folder called "databases" and then another folder with the same name as your database, like this:
databases/database-name/backup_database-name_1_1503101033.tgz
Rename Your Database in SQL
First, uncompress this file.
If you want to edit the SQL, you should use a very basic text editor (such as Notepad on Windows or TextEdit on mac) because it is a LARGE file and may overwhelm fancier programs.
The main recommended edit is to remove the actual name of the database from the line near the top. This prevents conflicts when importing your SQL into an empty database with a different name.
Redirection and Checking for Broken Links
Redirection and Checking for Broken LinksA Redirect module is available for Drupal to help manage link redirects and locate problem areas on your site post-migration.
Installation
To install, follow the directions below:
- Download the Redirect module
- Upload the module to your /sites/all/modules/ folder, or use the Upload New Module administration page.
- Install and enable the module.
Usage
The interface for the Redirect can be found under Configuration -> Search and Metadata -> URL redirects, or by navigating to /admin/config/search/redirect.
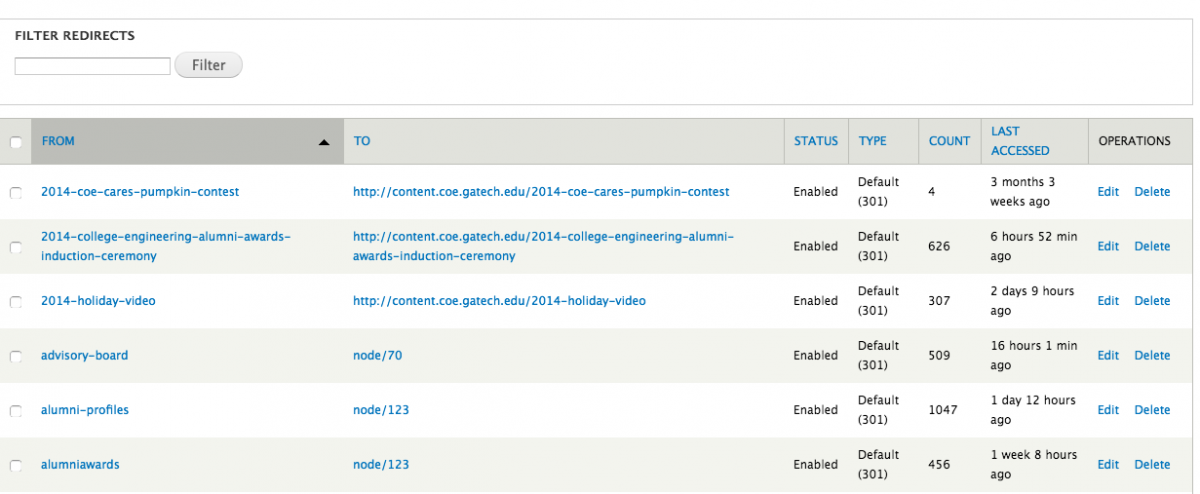
On the overview page, a listing of your existing redirects are in place. Drupal tracks each redirect, their status, the type of redirect, and how often they're accessed.
Finding and Fixing Dead Links
You can also use the Fix 404 Pages, located at /admin/config/search/redirect/404 or as a sub-tab off of the URL Redirects page.
This page allows you to identify currently-broken links on your site and a quick way to create a redirect.
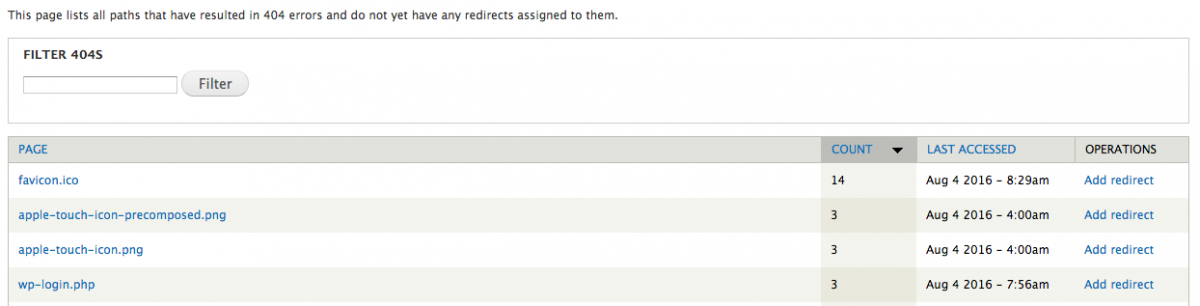
Leverage your local web developer (or contact the Georgia Tech Drupal mailing list) to see if a page or link needs to be redirected.
In the example above, wp-admin.php is a WordPress (another content management system) login page and is routinely used by bots and hackers to attempt to infiltrate your website. Because we're running Drupal, we can ignore most all of those pages.
To add a redirect to one of these 404'd pages, select the Add Redirect link to the right.
Redirect Options
When creating a redirect, the form should look similar to below.
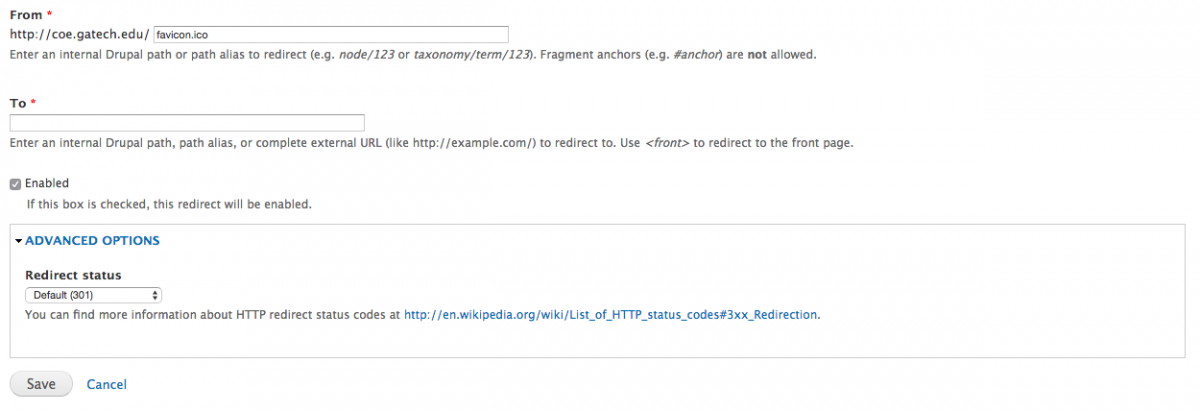
All that is needed to complete a redirect is completing the To, or where the page needs to go when redirected.
Under Advanced Options, the redirect status can help search engines and browsers interpret the link. The Redirect module provides some short description by each one to give an idea of what each does.
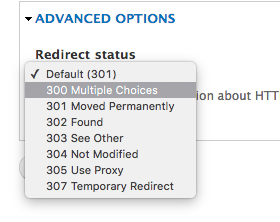
Unless otherwise noted, 301 Moved Permanently or Default (301) should always be used.
If you think you have a use case for any of the other redirect types, please contact a web developer on-campus. Improper usage of the redirect type may hurt access to your redirected page by search engines.
Getting Started as a Developer With Drupal 10
Getting Started as a Developer With Drupal 10Please note that most Drupal 9 documentation applies to Drupal 10 as well. We are currently working to review the documentation and get update it as needed.
- Getting Started Guide to Writing Drupal 9 Modules (also for migrating Drupal 7 modules to Drupal 9)
- Drupal 9 Developers Cookbook - provides templates and quick-reference information for Drupal 9 module developers.
- Drupal 9 Migration Process - Background and instructions for migrating a site from Drupal 7 to Drupal 9
- Drupal 9 Migration Roadmap (GT) - List of commonly used modules and their Drupal 9 status
- Drupal 9 Migration for Drupal Express - Roadmap specifically for Drupal Express based websites
- Drupal 9 Internal Caching for Dummies - Beginner's guide to the Drupal 8 content caching system
- Drupal 9 Site Technical Troubleshooting - Techniques for recovering from a "white screen of death" or worse.
Georgia Tech Drupal Themes
Georgia Tech Drupal ThemesSince September of 2013, Georgia Tech Institute Communications has provided an official Georgia Tech Drupal theme (GT Theme) suitable for all official unit websites, including but not limited to college, school, project center, and administrative units. This theme implements the Georgia Tech Website Visual Style Requirements that all official websites are expected to follow.
Please note that the current version of the GT Theme features the classic "Tech Gold" color and the "interlocking GT" logo. If your site's theme features the yellow-orange "Buzz Gold" color (as seen on our college mascot, Buzz) or still has a logo with the campanile, you should strongly consider upgrading your site to the most recent version of the theme (this is only an issue for sites still running Drupal 7.)
Drupal 10 Georgia Tech Theme
The Drupal 10 theme is best installed when setting up your site. This can be done in one of two ways:
1. If you are requesting a new OIT Web Hosting account for your site, select the option for Drupal 10 Drupal Express, which will automatically install the GT Theme and other useful Georgia Tech specific modules.
2. If you are installing Drupal 10 somewhere other than OIT Web Hosting, or you want to manually set up Drupal in an existing OIT Web Hosting Account, you can follow the instructions for using the GT Installer package.
Please note that in either case, you will be using Composer to manage your Drupal site. If you are not familiar with managing a PHP project via Composer, you should read up on it carefully first.
Drupal Theme Development Contacts
Louise Russo
Director of Institute Digital Strategy
404-385-3658
Email: Louise Russo
Tionna Carthon
Director of Institute Marketing and Communications Consulting
404.894.9793
Email: Tionna Carthon
Drupal 7 Georgia Tech Theme
Editor's Note: The Drupal 7 version of the Georgia Tech theme is no longer supported. Units are strongly advised to begin moving from Drupal 7 to either Drupal 9 or another content management system as soon as possible.
A new version of the Drupal 7 Georgia Tech Theme updated to the new "Tech Gold" color scheme with the "interlocking GT" logo was released in late 2021. Make sure you use the latest version. The previous versions of GT Tools (2.9) and Super Block (2.9) will continue to work with the new theme package, so they do not need to be updated unless they were not already up-to-date on your site.
Drupal 7 Theme Configuration Walk-through Video
If you are new to the Georgia Tech Drupal theme, you can watch the installation and configuration of the Georgia Tech Theme section of the video recording of the November 2013 GT Build Day. This is the first section of the video and runs approximately 45 minutes. Please note this video demonstrates the old pre-2019 theme, but the techniques for installing and configuring the theme remain the same for Drupal 7.
Georgia Tech Theme Sub-Topics
(Please check the "Drupal Version" flag carefully on these sub pages. Most will relate to either Drupal 10 or Drupal 7, but rarely both versions.)
Installing, Extending, and Upgrading the Georgia Tech Drupal 7 Theme
Installing, Extending, and Upgrading the Georgia Tech Drupal 7 ThemeInstalling the Georgia Tech Theme
You will need to download both the current Georgia Tech Drupal Theme package, and the GT Tools module.
- Install the GT Tools module into your sites/all/modules directory, and the Georgia Tech Drupal Theme package into your sites/all/themes directory.
- Log into your site with administrative privileges and enable the GT Tools module. Please note that you do not have to enable the GT Content Types or GT Directory sub modules that come with GT Tools.
- Go to the Appearance administration page and enable the "Georgia Tech - Drupal 7 Theme" and make it the default theme.
- After enabling the new theme, follow the Settings link shown below its name to configure the theme's settings, using our GT Theme Settings Guide as a reference as needed.
Extending the Georgia Tech Theme
The recommended way of extending the Georgia Tech Theme to meet your unit's special needs is to create a sub-theme instead of modifying any of the files in the Georgia Tech Theme. This way, when new versions of the official theme are released, you can just drop them into place and not have to figure out all the different things that you customized.
As a way to get started quickly, there is an unofficial GT Sub-theme package that you can use as a base for your own custom sub-theme.
An important hint for those new to sub-themes: on your Appearance administration page, you set your sub-theme to be your enabled and default theme. It will then include everything that it needs from your base theme (the official Georgia Tech Drupal Theme). For this reason, you must leave the Georgia Tech Drupal Theme installed on your site, and it's a good idea to leave it enabled as well.
For advanced developers, there is also a Sass based version of the official Georgia Tech Drupal Theme.
Upgrading the Georgia Tech Theme
It is highly recommended that you first test any new version of the official Georgia Tech Drupal Theme against a copy of your website to make sure you fully understand the effect it will have on your pages and content.
If you have done all of your customizations in a sub-theme, then upgrading the official Georgia Tech Drupal Theme is very easy:
- Download the latest version of the Georgia Tech Drupal Theme
- Backup the existing files in your sites/all/themes/gt directory and then remove the directory.
- Remove the sites/all/themes/gt directory.
- Install the Georgia Tech Drupal Theme package into your sites/all/themes directory.
- Log into your site with administrative privileges and flush all of the caches. This can be done on the Configuration -> Development -> Performance administration page, or via the 'Home' menu if you have the Admin Menu third-party module installed.
- Go to the Georgia Tech Drupal Theme settings page and verify that all of the available settings are correct. Note: it has been observed that sometimes after upgrading the theme, you will find all of the settings fields blank the first time you visit the settings page. If this happens, simply switch to the global theme settings page and the go back to the GT theme settings page, and your old settings should be restored.
Please note that a new version of the Georgia Tech Drupal Theme could cause conflicts with custom CSS and template code in a sub-theme, so you'll have to watch for these issues and update any custom CSS/template files accordingly.
GT Theme Settings Guide [Drupal 7]
GT Theme Settings Guide [Drupal 7]The GT theme version 2.x offers a variety of settings options.
How to Manage Theme Settings
To manage these options:
- Go to:
yoursite.gatech.edu/admin/appearance/settings/gt_subtheme - Use the Appearance link if using the Administration Menu module
Description of Theme Settings
These include:
Georgia Tech Logo Options
Select the default GT logo, or go with one of the college logos. You can also upload a file to use, but it must be a transparent .png, and be within the specified dimensions -- plus be an official logo approved by Institute Communications! Contact Institute Communications if you need assistance getting a logo generated in the proper format.
Styling Version
This setting (only available in versions 2.5 through 2.7) configures which CSS/styling is applied to the GT website. It allows you to switch to the new layout/style treatment (2.5) or stay backwards-compatible with previous styling. This is to help avoid "breaking" any styling folks may have done via a custom subtheme. The version 2.5 styling option also includes support for a couple of block classes that are added through the GT Tools module (/admin/config/system/gt):
New CSS styles for adding icons to block titles:
- icon-institution (displays: http://fontawesome.io/icon/university/)
- icon-mortar-board (http://fontawesome.io/icon/graduation-cap/)
New CSS styles for adding colored backgrounds to block titles:
- block-title-bg-gt-blue - GT Navy blue background w/ white text
- block-title-bg-gt-gold - GT "Buzz" gold background w/ white text
- block-title-bg-gray - "Dark" gray background (#646464) w/ white text
Site Header
These settings configure site header actions.
- Site Header Title: Same as the previous theme. The text provided here will appear in the site header, to the right of the main logo. The text will be set in "Buzz" Gold.
- Hide Home Page Title: Check this box if you want the default page title text to NOT appear on your home page. Note that this is NOT the Site Header Title (as mentioned above,) but the node title of your home page for your site.
- Search Options: (Removed in version 2.7) Select to have your search be the built-in Drupal search, the campus Google appliance, or user choice.
- Breadcrumb Options: By default the breadcrumb will list a link back to the main Georgia Tech site homepage first. If you'd like to have another default link always appear after the Georgia Tech link use these fields.
Super Footer
These settings relate to the superfooter at the bottom of each page.
- Remove Superfooter: (Added in version 2.7): completely hide the superfooter
- Super Footer Menus Setup: The Full Georgia Tech Default option will give you the exact same set of super footer menus that appear on the home page of www.gatech.edu. The Georgia Tech Minimum option will give you just the menu from the left column in the super footer of the home page at www.gatech.edu, but the menu will be broken up into two shorter menus. The Configurable option allows you to have three fully configurable menus in your site's super footer.
- Collapsed Super Footer: Check this option if you would like to have the super footer collapsed by default. If this option is checked a "Resources" tab will appear above the lower footer, which serves as an open/close trigger for the super footer.
- Campus Map Image and Custom Street Address: By default the site super footer area will show an image of the campus map plus link to the map site, and the official GT mailing address. You can opt to upload your own map image, and have it link to where ever you'd like, plus enter your address.
Footer Login
These settings configure site footer login actions.
- Show a login link in the footer.
- Redirect to current page: (Added in version 2.7) instead of being redirected to homepage after you log in.
- Alternate Login URL: (Added in version 2.7): If you use a different URL to log in to your site, provide that full URL (i.e., http://editor.mysite.gatech.edu).
GT Tools Module [Drupal 7]
GT Tools Module [Drupal 7]The GT Tools module is required when using the GT Theme and should be installed before the theme on your Drupal 7 site. It provides some additional functionality that Drupal doesn't support directly in a theme package, so this functionality had to be provided in a separate module.
GT Tools includes a sub-module called GT Content Types, which provides three new page layouts via custom content types: "Horizontal Landing Page", "Vertical Landing Page", and "Multipurpose Page". If you want to use this sub-module, you must install the 2.2 version (or newer) of the blockreference module (older versions 2.0 and 2.1 don't work).
Georgia Tech Modules
Georgia Tech ModulesA number of custom modules for Drupal have been created by groups at Georgia Tech to aid campus web developers in building Drupal sites and connecting to Georgia Tech specific data sources. The vast majority of these modules can be found in our central repository, and some of the more notable modules are described below:
Campus Supported Projects
Editor's Note: The following modules are only supported for Drupal 10. The Drupal 7 versions are no longer supported and units are advised to begin moving from Drupal 7 to either Drupal 10 or another content management system as soon as possible.
GT Theme
The GT Theme is the official supported implementation of the website branding theme approved by Georgia Tech Institute Communications. It requires the installation of the GT Tools module first (see below).
GT Tools
The GT Tools module provides some additional functionality that Drupal doesn't support directly in a theme package.
Mercury (Hg) Reader
The Mercury (Hg) Reader module lets you connect your Drupal site to Georgia Tech Mercury News and Events feeds.
Community Supported Projects
Editor's Note: While Super Block, GT Editor and GT Login are still part of the Drupal 7 Drupal Express distribution of Drupal, they are no longer being supported and it is recommended that they not be installed on any non-Drupal Express site.
The following projects are not supported by Georgia Tech Institute Communications or the Office of Information Technology. There is some limited help available from the campus web development community, but in general you should not install and use these projects unless you are a skilled Drupal developer who can handle advanced support and troubleshooting of Drupal modules.
Super Block Module (Drupal 7)
The Super Block Module provides content blocks preformatted with Georgia Tech design styles and colors. It is installed like any other Drupal module, and will create a new content type called "Super Block". The Drupal Editor's handbook describes how to create and use Super Blocks.GT Editor (Drupal 7)
GT Editor is a Drupal feature package that implements a WYSIWYG text editor with a great deal more control over what content editors can create, preventing them from doing things that might be dangerous (embedding JavaScript, for example.) The WYSIWYG Text Editors section has documentation on configuring GT Editor.
GT Login (Drupal 7)
GT Login is a Drupal feature package that installs the CAS module and configures it to work effectively with the Georgia Tech CAS user authentication server. Some web developers may prefer to just install the CAS module manually and configure it themselves.
GT SubTheme (Drupal 7)
GT SubTheme is a theme for Drupal that extends the GT Theme (see above) and makes it easier to add your own customizations to the theme. Some GT provided modules may expect you to have GT SubTheme installed.
Popular Third-Party (Contrib) Modules
Popular Third-Party (Contrib) ModulesThis section describes third-party (non-Georgia Tech) modules that could be useful for your Drupal site. These are often referred to in Drupal documentation as "contrib" modules.
You should only install modules that you absolutely need, so that your site is easier to maintain and patch. If you decide not to use a module, be sure to both uninstall it and remove the module from your Drupal filesystem. Uninstalling is very important: if you don't uninstall a module before removing it, your Drupal site will throw lots of errors at you.
If you are not sure what a module will do or if it will be useful, install it to a test instance of Drupal first so that you don't accidentally mess up a good site.
Drupal Contrib Module Lists
Popular Drupal 10 Contrib Modules
Popular Drupal 10 Contrib ModulesPlease see the introduction to contrib (third-party) modules before installing anything listed on this page.
The following information is provided as-is with no warranty or guarantees of any kind! While members of the campus community have recommended the following modules for their listed purposes, it's perfectly possible you could blow up your Drupal website if you don't know what you're doing and install them incorrectly or alongside other modules that are incompatible.
Most descriptions are borrowed from the module's home page on the Drupal.org website.
Below is a list of popular contrib modules that have been ported to Drupal 9/8 and appear to work properly. Do note that not all have "production" releases yet.
- Admin Toolbar (admin_toolbar) - Replacement for the Drupal 7 Admin Menu module
- CAS (cas) - For GT Account Username authentication (logins) to sites
- Paragraphs (paragraphs) - API base for creating nested layout designs
- Redirect (redirect) - Add 301 redirects automatically when page URLs change; log and manage 404 errors
- Webform (redirect) - Has been rebuilt from the code base of YAMLForm for Drupal 8. In production release, but very different compared to the Drupal 7 version.
Rich Text (WYSIWYG) Editors
Rich Text (WYSIWYG) EditorsA "rich text" or "WYSIWYG" (What You See is What You Get) text editor gives your content editors a way to create and maintain content using an interface that looks and feels a lot like using a word processor. Formatting is applied using button controls, so the content editor doesn't have to know anything about HTML and can immediately see what the content is going to look like after it has been saved.
Drupal 10
Drupal 10 comes with the CKEditor version 5 text editor built-in, though it is a minimal version, so site administrators may wish to install additional features through CKEditor plugins.
NOTE: CKEditor version 5 is a complete rewrite of the CKEditor application. Older CKEditor 4 plugins are not compatible with CKEditor 5. If you have any custom CKEditor 4 plugins, you will have to rewrite them to work with the CKEditor 5 API.
Drupal 7
Drupal 7 does not come with any kind of rich text editor. There are two popular add-on options commonly used on campus:
- CKEditor Drupal module and CKEditor library: This popular editor is easy to set up and gives you a wide range of flexibility in what your content editors can create.
- Georgia Tech GT Editor module: This module is actually built around CKEditor, but provides a great deal more control over what content editors can create, preventing them from doing things that might be dangerous (embedding JavaScript, for example.)
Rich Text Editor Guides and Resources
CKEditor Companion Modules
CKEditor Companion ModulesThe Drupal community on campus has found a number of modules which help with using CKEditor:
IMCE
Versions: Drupal 10, 7
IMCE can be used for managing images, and you might even use imce for files, as well.
Installation instructions for IMCE:
- Download, install, and configure IMCE.
- Remove the default Image button.
- Add the IMCE button.
- Enable the option "Plugin for inserting files from imce without image dialog".
- Enable the option "Plugin for inserting Drupal embeded media".
LinkIt
Versions: Drupal 10, 7
LinkIt can be used for managing URL links to pages on the site and outside of the site.
Installation instructions for LinkIt:
- Download, install, and configure LinkIt
- Remove the default URL button.
- Add the LinkIt button.
- Check "Support for Linkit module".
Image Resize Filter
Versions: Drupal 10, 7
From the Drupal.org site: Image Resize Filter makes it easy to resize images, especially when combined with a WYSIWYG editor such as tinyMCE, CKeditor etc. Users never have to worry about scaling image sizes again, just insert an image and set it's height and width properties in HTML (this is done automatically by WYSIWYG editors) and the image is resized on output to match the HTML.
Embedding Digital Videos in CKEditor / GT Editor
Embedding Digital Videos in CKEditor / GT EditorEmbedding Georgia Tech MediaSpace Repository Content
A good solution for the Georgia Tech MediaSpace (Kaltura) repository has not been developed yet. In the meantime, an experimental MediaSpace embed module is available for Drupal 7 and Drupal 10 from the developer who created the embed module for the now retired OIT Digital Media Repository. Use at your own risk!
- IAC Support for oEmbed Formats for Drupal 10 (oEmbed support for MediaSpace, YouTube, Vimeo, and Google Maps)
- GT Kaltura Module for Drupal 7
After installing either module, you will have to add the new input filter to your preferred text formats. Make sure to set the ordering so that the filter comes last after all other filters. This ensures that the filter's Javascript code does not get filtered out by any of your other text filters.
There is also a method now for enabling MediaSpace as an oEmbed provider in the Drupal Media library system. The Media Library works outside of CKEditor and would be used in conjunction with custom blocks that contain Media fields (typically used with Layout Builder based page.)
Embedding YouTube and Vimeo Videos
Option #1 - Video Embed Field (Drupal 7 or 10)
- Download, install, and enable the Video Embed Field module.
- Add the new video field type to one or more of your Drupal Content Types.
- Content editors can now add videos to nodes of those content types by inserting the right linking details into the video field.
- WebWash provides a tutorial about video styles you can create with the Video Embed Field module.
Option #2 - Video Filter (Drupal 7)
- Download, install, and enable the Video Filter module.
- In the administrative configuration area of Drupal under Content authoring -> Text formats, configure each text format that you want to be able to use embedded videos.
- Enable the video filter.
- In the Filter processing order section, move the video filter down to the bottom of the list so that it is applied after all other filters.
- Don't forget to save your changes.
- On pages that use one of these configured text formats, you can now insert a video shortcode to create an embed of a supported video type. See the download page at the link above for the full list of supported video services and formats.
- Example shortcode for embedding a video:
[ VIDEO::http://www.youtube.com/watch?v=98nNpzE6gIs::aVideoStyle ]Option #3 - Ivan Allen College oEmbed Support Module (Drupal 10)
- Install the IAC Support for oEmbed Formats for Drupal 10 module
- Add the new "Embed remote content with oEmbed links" input filter to your preferred text formats
- Where you want to place a YouTube video, just paste in the video's oEmbed URL (see the oEmbed module's instructions for full details)
Option #4 - Drupal Media Library and oEmbed
You can use the standard instructions for adding an oEmbed provider to Drupal's Media Library to enable the use of YouTube, Vimeo, and some other video services. In most cases YouTube will be enabled out-of-the-box. The Media Library works outside of CKEditor and would be used in conjunction with custom blocks that contain Media fields (typically used with Layout Builder based page.)
Embedding HTML, JavaScript or PHP Code on a Page
Embedding HTML, JavaScript or PHP Code on a PageThe Easy Way for IFRAME and JavaScript Embeds
The "Full HTML" format in an out-of-the-box installation of Drupal 10, or in Drupal 7 with CKEditor installed without the WYSIWYG plugin should already allow for IFRAME embeds and JavaScript embeds. If you haven't added any tools to restrict this, then you're all set.
For more restrictive CKEditor configurations, such as the GT Editor version of CKEditor for Drupal 7, you'll need to add a new text format (Configuration -> Content authoring -> Text formats and editors) that at a minimum allows IFRAME embeds. If the service you want to embed from also requires you to include a snippet of JavaScript, then you'll need to enable that for your new text format as well. You'll then want to restrict this format to site administrators (which should hopefully be a separate role from that of your site's day-to-date content creators and editors). You can then add blocks where needed and use this new text format so that you can add your embed code to the block.
The Preferred Way for PHP Code
By far, the recommended way of adding custom PHP Code to a page of a Drupal site is by creating a custom module, which is a type of plugin that adds extra functionality to your Drupal site. This does require a reasonable amount of PHP coding experience and time to get familiar with how to code for Drupal. The Drupal organization has made some tutorials available to help get you started:
For a lot of cases, the right approach is to create a module that implements its own dynamic block(s). These will act like a custom block that you create in the Block Layout interface, only the content will be generated by your module instead of being entered through the Drupal user interface. Thus, you could implement a block that has your external embed code or custom PHP code output as its content, then place that block on whichever page you want the output to show.
The Absolutely Wrong Way for PHP Code
Do not try to use the PHP Code Filter module under any circumstances! This module used to let you put PHP Code directly into CKEditor and have it get processed when the page is displayed. It is very unsafe and can't even be turned on in Drupal 7 unless you upgraded to Drupal 7 from an earlier version that had it turned on. In addition, the module has been completely removed from Drupal 8. If you are already using this method for custom PHP, you should look into switching to one of the following methods as soon as possible.
GT Editor Site Administrator Documentation [Drupal 7]
GT Editor Site Administrator Documentation [Drupal 7]The Georgia Tech GT Editor module for Drupal 7 is built around CKEditor, but provides a great deal more control over what content editors can create, preventing them from doing things that might be dangerous (embedding JavaScript, for example.)
This is a community supported project, meaning it is not officially supported by OIT or Institute Communications.
GT Editor Guides and Tutorials
Unhiding the CKEditor Text Format Selector [Drupal 7]
Unhiding the CKEditor Text Format Selector [Drupal 7]CKEditor normally shows a Text format drop-down selector just below the editing window, but the GT Editor hides this selector to streamline the editing experience. However, there can be cases where you want to use other Drupal text formats for special cases (e.g. embedding a Twitter or Facebook feed).
The GT Subtheme has CSS code that hides the drop-down, which you can find at sites/all/themes/gt_subtheme/css/gt_subtheme.css. The lines that hide the text format dropdown box are:
        div.form-item-log,
	.preview h3,
	.preview .node-teaser,
	body.page-admin-structure-block-add .form-item-regions-seven,
	body.page-admin-structure-block-manage-block .form-item-regions-seven,
	fieldset#edit-body-und-0-format,
	fieldset#edit-field-body-1-und-0-format,
	fieldset#edit-field-body-2-und-0-format,
	fieldset#edit-field-body-3-und-0-format
	{
	   display: none;
	}
Changing the Default Format Without Displaying the Text Format Selector
If you have created your own text format and want your editors to use it instead of the "basic text editor" format, you should change the order of the text formats so that yours is first/on top at admin/config/content/formats.
Web Forms on Drupal Sites
Web Forms on Drupal SitesThis section is for guides, tips, and tricks for creating and managing web based submission forms on Drupal sites. The most popular tool for forms is the Webform module, but tips and tricks for other form tools can be provided here as well.
Please note that due to European Union General Data Protection Regulation rules, when collecting personal information it is best to host your form on the campus licensed Qualtrics service, which has been approved for collecting personal data. If you collect personal data on your unit's website, you and your unit are responsible for making sure that you follow all of Georgia Tech's data policy rules and regulations.
If you are not collecting any personally identifiable information that isn't covered by any other privacy or secrecy policy, then you are free to host such a form wherever you like. That said, we'd still strongly recommend not using third-party services that aren't under a Georgia Tech contract. See the Resources for Webmasters page on "outside web hosting solutions" for an explanation of the issues with outside services.
Web Forms Tips and Tricks
Securing Web Forms
Securing Web FormsIf not properly secured, forms can easily be used by hackers and automated "bot" programs to gain access to information within our sites, deface a site, or or even gain access to all the sites on a shared server. The following is a non-exhaustive list of tips for making any web-based form more secure.
Form Safety Tips
- Never ask for sensitive information or information you don't need. Examples include birth date, credit card number, student data (including GTID), and other sensitive data.
- Protect your form with CAS login (for campus) or with CAPTCHA (for people without GT accounts).
- Remove old data and forms.
- Regularly archive and then delete old submissions and forms
- Go in every month or semester and download the old submissions to a spreadsheet, and then delete those submissions from the website.
- Close or remove web forms when they are no longer in use.
- Use SSL / HTTPS for your site.
User Interface/Experience (UI/UX) Tips, Tricks, and Tools
User Interface/Experience (UI/UX) Tips, Tricks, and ToolsUser Interface (UI) design refers to the forward facing look and feel of a website.
User Experience (UX) design refers to how users will interact with and navigate through a website.
This section provides details about useful tips, tricks, and tools relating to both areas of website design. Accessibility is related to UI and UX, but is covered in its own section of the handbook.
Drupal Twig Stubs
Drupal Twig StubsTwig stubs and code-samples to aid your Twig template development.
External Resources
- Twig data stubs (from the Ivan Allen College's web development resources website)
Check for (non-)empty fields
Check for (non-)empty fieldsSatisfies a comment on drupal.org:
Someday I would like to spend the time to make a list of the various field types and the best way to check whether they are empty so I can stop Googling this thread every few months.
Basic field
Expensive (render) check
{% if content.field|render is not empty %}

     {{ content.field }}

{% endif %}
Note that this can be an expensive (resource-wise) check to make.
Basic check
{% if node.field.value %}

  {{ content.field }}

{% endif %}
Entity Reference fields
{% if content.field['#items'].getValue() %}

    {{ content.field }}

{% endif %}
Note
This should be compiled over on drupal.org in the near future, anyways.
Field Boilerplate Help Text
Field Boilerplate Help TextPer Georgia Tech's accessibility requirements, certain fields likely need additional explanatory text accompanying them:
Video Fields (e.g. YouTube)
Any publicly available video must be captioned for end-users. MediaSpace and YouTube automatic captions are not enough to meet full guidance: any automatic captions must be manually reviewed and corrected.
Please see the Video Captioning and Audio Transcripts page of the Resources for Webmasters website for more information.
Image Field
Any non-decorative image must have alternative text describing the visual component of the text.
Please see the Ivan Allen College's Web Accessibility Primer for additional information on alternative text for images.
Font Awesome 5 Campus License
Font Awesome 5 Campus LicenseYou can find Georgia Tech's license for Font Awesome 5 on Github.
Recommended Usage
We strongly recommend utilizing the SVG icons for usage in your Drupal website, due to accessibility and compatibility concerns.
Whitelisting Tags in Module Output
Whitelisting Tags in Module OutputHere's how to whitelist HTML tags in your module output that are normally stripped out by the XSS filter:
    $tagList = array('input');

    return array(
      '#markup' => $buffer,
      '#allowed_tags' => array_merge(\Drupal\Component\Utility\Xss::getAdminTagList(), $tagList),
    );
And here's how to allow data URLs in your module output for displaying images with data that you've already pulled in from a data source (code updated 2017-12-11 to a better format that avoids whitescreening in certain use cases):
  $allowedProtocols = \Drupal\Component\Utility\URLHelper::getAllowedProtocols();
  $allowedProtocols[] = 'data';
  \Drupal\Component\Utility\URLHelper::setAllowedProtocols($allowedProtocols);
Multimedia Tips and Tricks
Multimedia Tips and TricksThis section houses guides, tips, and tricks for working with multimedia (video, audio, etc.) in Drupal, whether through the Drupal 8/9 Media library system, or through other means.
Drupal 10 Layout Builder
Drupal 10 Layout BuilderUseful modules
List of potentially useful Layout Builder Extensions within the Layout Builder Ecosystem:
- Layout Builder Restrictions
Lets you restrict which block types appear in Layout Builder's Add Block panel - very useful - Layout Builder Modal
This module lets you add and configure existing blocks in a modal in the Layout Builder UI. - Layout Builder Styles
This module allow site builders to select from a list of styles to apply to layout builder blocks and layout builder sections. Layout Builder Kit
An assortment of pre-built block types for use with Layout BuilderLayout builder library
Provides a layout library allowing content editors to pick from a list of pre-defined layouts.
Please see the Drupal 8 documentation for a complete list of contributed modules compatible with Layout Builder.
Local modules
Locally written modules:
- Layout Builder Operation Link
Add a 'Layout' link to content entities in the Content listing view
Creating an Accessible Media Library Photo Gallery
Creating an Accessible Media Library Photo GalleryMedia Library in Drupal 10 offers a lot of great functionality for managing and reusing images (and other media types), but out-of-the-box it has a notable accessibility issue.
If you try to configure an image media type so that the user can select the thumbnail image and get the full-size version, the option for this (setting "Link image to" to "File") gives you only a link around the image, with no way to include the media item's built-in Name field. Worse, the link will be presented to screen readers with the image's alternate text, which may not be appropriate for link text, and training content managers on how to handle this special usage of the alternate text field would be an uphill battle.
Correcting this problem requires both changing your media type configuration and adding a custom template:
Media Type Configuration
- Edit your Media type and switch to the Manage display tab
- Move the Thumbnail and Name fields up above the "Disabled" separator, but leave Image enabled as well.
- Configure the Thumbnail settings as desired, then configure Image with the "URL to image" format pointing to the "original image".
- Save your changes.
Custom Template Configuration
First, create a template file named "media--XXXXX--default.html.twig" where "XXXXX" is the machine name of your Media Type. Place the following inside it:
{%
  set classes = [
    'media-library-item',
    'media-library-item--grid',
  ]
%}

<div{{ attributes.addClass(classes) }}>
  <a href="{{ content.field_media_image.0['#markup'] }}">
    {{ content.thumbnail }}
    <span class='visually-hidden'>Full Size Version of Image "</span> {{ content.name }} <span class='visually-hidden'>"</span>
  </a>
</div>
If you put your template into a sub-theme, then just flush your caches and it should take effect. If you put your template into a module, then add the following to your .module file:
function YYYYY_theme($existing, $type, $theme, $path) {
  return [
    'media__XXXXX__default' => [
      'base hook' => 'media',
    ],
  ];
}
Replace "XXXXX" with the machine name of your media type, and replace "YYYYY" with the machine name of your module. Flush your caches, and the template should take effect.
Enabling Georgia Tech MediaSpace as an oEmbed Provider in Media
Enabling Georgia Tech MediaSpace as an oEmbed Provider in MediaScott Jacobson, Desmond Gardfrey, and Eric Sembrat were able to get Georgia Tech's MediaSpace working as an oembed provider for Drupal media. Below is the method they developed.
-
Add the OEmbed Providers module
-
Add a custom provider (
/admin/config/media/oembed-providers/custom-providers). The provider name must be entered as MediaSpace @ Georgia Tech with the '@' symbol in the middle.
Provider Name: MediaSpace @ Georgia Tech
Provider URL: https://mediaspace.gatech.edu
Endpoint #1 - Endpoint schemes: https://mediaspace.gatech.edu/id/*
Endpoint #1 - Endpoint URL: https://mediaspace.gatech.edu/oembed
Endpoint #1 - Discovery: (Select this checkbox)
Endpoint #1 - Available formats: JSON (Select this checkbox)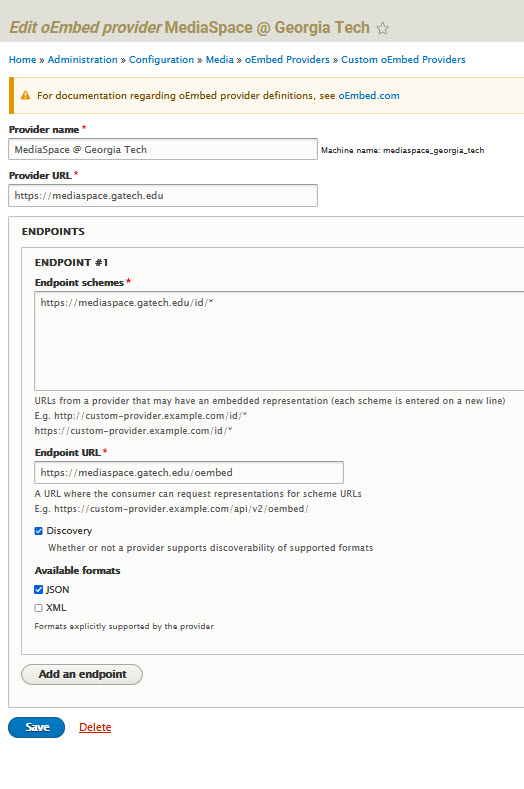
-
Add a provider bucket (
/admin/config/media/oembed-providers/buckets)-
Check the option Allowed Providers "MediaSpace @ Georgia Tech"
-
-
Add a media type of MediaSpace @ Georgia Tech (
/admin/structure/media/add)-
Select Media source MediaSpace @ Georgia Tech and select the Save button. The field mapping is unnecessary unless you want to override something.
-
-
Add your oEmbed media link to a Media type (
/media/add/) -
To add Media within CKEditor:
-
Add the "insert from media library" button to one of the CKEditor toolbar text formats (
/admin/config/content/formats)-
Make sure that the embed code is wrapped in CSS like <div class="video-container"></div> when entered via CKEditor.
-
- Add the following CSS via your custom theme or a custom module:
.video-container { position: relative; overflow: hidden; width: 100%; } .video-container::after { display: block; content: ""; padding-top: 56.25%; } .video-container iframe { position: absolute; top: 0; left: 0; width: 100%; height: 100%; }
-
-
You could also make a custom block type with a TWIG file, wrapping the embed in <div class="video-container"></div> and adding the above CSS to your custom theme or a custom module.
-
To Be Determined: How to add the MediaSpace @ Georgia Tech provider to the custom block types Call to Action and Video Embed. (Editor's note: This should be doable by modifying the existing media types used by those blocks and adding the provider as an Allowed Provider.)
Administrative Tips and Tricks
Administrative Tips and TricksThis section collects useful tips and tricks for administering a Drupal website.
Guides and Resources
Drupal 10 Configuration Management System
Drupal 10 Configuration Management SystemHere's a quick reference guide to working with the new configuration management system. You'll need this if you want to build a module that adds its own configuration to Drupal during its installation process:
Security Tips
Security TipsThe pages in this section provide helpful tips and tricks for improving the security of your Drupal website. In addition to the information here, be sure to look at our Best Practices for Configuring and Managing Drupal page, and browse through the User Authentication section for more security tips, including how to require user login before viewing specific pages.
Security Resources
Setting Up SSL For Drupal Sites on OIT Web Hosting
Setting Up SSL For Drupal Sites on OIT Web HostingEditor's Note: Information on Obtaining and SSL Certificate and Setting Up SSL on OIT Web Hosting with an External Domain Name has been moved to the Georgia Tech Resources for Webmasters website.
Additional details about enabling SSL for Drupal can be found in Jimmy Kriigel's posting in GitHub about SSL and Drupal sites.
Part I: SSL Certificate
See if you need an SSL Certificate, and if so, obtain your SSL Certificate. In short, if your site is a top-level site on OIT Web Hosting, you can use the existing SSL certificate available on your hosting server - no special configuration on the Plesk control panel side is needed - just follow the steps in Part II below. If your site's hostname is a subdomain of a department domain (e.g. something.yourdepartment.gatech.edu), then you will have to see if the Plesk certificate includes your "yourdepartment.gateh.edu" domain name - if so, then you should be good to go - if not, then you'll need to obtain a certificate (see "obtain your SSL Certificate" above).
Part II: Configure Your Drupal Instance
Edit Your Site's .htaccess File
Add the following directly after "RewriteEngine On" in your site's .htaccess file:
RewriteCond %{HTTP_HOST} ^www\.(.+)$ [NC]
RewriteRule ^ https://%1%{REQUEST_URI} [L,R=301]
RewriteCond %{HTTPS} !=on
RewriteRule ^/?(.*) https://%{SERVER_NAME}/$1 [R,L]
What this will do is catch any requests that have "www." before your site's hostname and redirect the user to the non-"www." version of the URL. Then, if the user is not using HTTPS, it will redirect the user to the HTTPS version of the URL to ensure that HTTPS / SSL security is always used.
Edit Your Site's settings.php File (Drupal 7 only)
Find the line for "$base_url" (or add one if this setting is not defined), and set it to the the fully qualified domain name of your site, like so:
$base_url = "https://foobar.gatech.edu/";
Important Note: The settings.php file is usually protected from editing, so you may have to modify its access permissions before you can modify it. Try editing it from the File Manager in your hosting account's Plesk Control Panel, as this may make it easier to override those protections.
Restricting a Website to On-Campus Access Only
Restricting a Website to On-Campus Access OnlyYou can restrict your site so that only people who are on-campus (or using the VPN) can access it. This is a great idea for internal-use-only sites and also for all of your development/test websites if you are not using a local stack.
Using .htaccess Configuration
Here's the code to put into the .htaccess file in the root directory of your site (on OIT Web Hosting, this goes under httpdocs or httpsdocs usually):
RewriteEngine On
RewriteCond %{REMOTE_ADDR} !^130.207.
RewriteCond %{REMOTE_ADDR} !^128.61.
RewriteCond %{REMOTE_ADDR} !^143.215.
RewriteCond %{REMOTE_ADDR} !^192.93.8.
RewriteCond %{REMOTE_ADDR} !^10.
RewriteCond expr "! -R '172.16.0.0/12'"
RewriteCond expr "! -R '100.64.0.0/10'"
RewriteCond %{REQUEST_URI} !/vpn-message.html
RewriteRule ^.* /vpn-message.html [R=303,L]
The first three lines cover the main Atlanta campus, while the fourth line (192.93.8.) covers GT Lorraine in France, and the last 3 private campus IP space. The last RewriteCond line is needed to whitelist your message to off-campus users - otherwise they'll end up in an infinite redirect loop. Also note the 303 redirect status on the last line: this tells the browser to check back with the server and not cache the redirect. If you use 301 instead, then a user who connects from off-campus and gets your message file will continue to get it even if they then connect to the VPN. Using 303 ensures that they'll actually get to your site once they've logged into the VPN.
The method above will direct all outside users to /message.html on your site, where you can post a message about the site being for on-campus use only. An alternate method (shown below) will just give users a 403 Forbidden error, which might be good enough in many cases.
Alternate Method with Basic Apache HTTPD Configuration
The following may be a little easier to maintain than the as the campus network expands and evolves than the version above, but this version will simply give the off-campus user a standard 403 Access Denied error message without any further explanation.
For Apache 2.4 .htaccess
Require all denied
## All Atlanta Campus & VPNs
Require ip 130.207.0.0/16
Require ip 128.61.0.0/16
Require ip 143.215.0.0/16
Require ip 10.0.0.0/8
Require ip 172.16.0.0/12
Require ip 100.64.0.0/10
## GT Lorraine
Require ip 192.93.8.0/24
Using a Firewall
If your website is not on OIT Web Hosting, then you can also limit access through firewalls:
Software Firewall
This kind of firewall you have to set up and maintain yourself, so you need to have some basic networking knowledge to get it configured correctly. On the other hand, you can reconfigure it yourself whenever necessary. On UNIX style systems (Linux, Mac OS X, etc.), you can use either ipfilters or ipfw. On Windows servers, Microsoft provides its own firewalling tools - check your Windows server documentation for more information.
Hardware Firewall
This kind of configuration has to be done via the GT Networking Firewall web application by someone authorized to make changes to the subnet that your server lives on. The upside to this option is that you don't have to know anything about networking, and you don't have to worry about your firewall breaking when you run upgrades on your server's operating system. The downside is that if you don't have access to mange the firewall for your subnet then you'll have to send your requests for changes up to whomever manages your subnet.
User Authentication and Authorization
User Authentication and AuthorizationAuthentication and authorization are often confused with each other.
Authentication is the process of securely identifying a user based on credentials presented (username, password, security token, etc.) For website user authentication, Georgia Tech predominantly uses Central Authentication Service (CAS), often times referred to as the GT Login Service.
Authorization is the process of determining what roles and/or privileges an authenticated user has been granted. For user authorization, there are options available through both CAS SAML attributes and through LDAP queries.
Authentication and Authorization Guides and Resources
CAS Single Sign-On
CAS Single Sign-OnCentral Authentication Service (CAS) based single sign-on is the main method of doing authentication via GT Account Usernames for Drupal website logins. Once users have logged into the GT CAS system, the can access any Georgia Tech website that utilizes CAS without having to enter their GT Account Username again, as long as they don't completely close their browser or clear their browser's cookie cache.
CAS Guides and Resources
Installing CAS
Installing CASEditor's Note: If you are using Drupal Express (Drupal 10 or Drupal 7), then CAS is already installed as part of your Drupal Express installation. You may want to look at the sections here about configuring CAS, should you want to customize your configuration, but you do not need to go through any of the installation processes.
There are two components needed to add CAS support to a Drupal website: the phpCAS Library, and two supporting Drupal modules.
phpCAS Library
This library is only needed for Drupal 7. If you are installing the CAS module for Drupal 10, you can skip this section.
- Download and install the current, stable version of the phpCAS Library. As of 2019, the current version was phpCAS 1.3.8 – if you are using and older version, you should consider upgrading as soon as possible to get the latest security patches.
- Install it under the sites/all/libraries/ directory of your Drupal site. Rename the top level directory to CAS so that you have the CAS.php file inside of sites/all/libraries/CAS/
Drupal Modules
You will need to configure CAS to talk to the Georgia Tech CAS service.
- Log into the special original user account (user #1) that you setup when creating your Drupal site. This is the main administrative account that has full power over everything in your site. If this account is the same as someone's GT Account Username, you should rename the account to something else (good names are "root" or "admin", which make it easy to identify the account later on.
- For Drupal 10, download and install the External Authentication and CAS modules into your Drupal site's
sites/all/modules/directory, or if your site supports it, install them via the Install Module option in the Modules section of your site's administrative controls. - For Drupal 7, download and install the Libraries and CAS modules into your Drupal site's
sites/all/modules/directory, or if your site supports it, install them via the Install Module option in the Modules section of your site's administrative controls. - Go to the Modules page of your site's administrative controls and enable (turn on) both modules. Once you have enabled these modules DO NOT LOG OUT OF THE SITE until you have finished the remaining steps. Otherwise, you will find yourself locked out of your site!
- For Drupal 7 only, go to the Permissions page of your site's administrative controls (found under the People section), and make sure that the following permissions are enabled for the highest level user role in your site (commonly "administrator", or for sites using the GT Profile, "super administrator") (Don't forget to save your changes!) :
- CAS -> Administer CAS
- User -> Administer Permissions
- User -> Administer Users
- Go to the CAS settings page of your site's administrative controls (found under the Configuration -> People section) and configure your CAS settings (see Drupal version specific links below for more details).
- Add a new user to the site with the username and "CAS username" both being the same as your GT Account Username. Set the other fields as needed (enter a random value for the password field) and give the account the highest access level available (usually 'administrator'). Don't forget to save the new account.
- In a different web browser from the one in which you are currently using (or via your browser's private browsing feature), browse to your Drupal site and verify that you can login with your personal GT Account Username and password. You should not see the normal Drupal login prompt - if you are prompted at all, you should be taken to the Georgia Tech Login service and then brought back to the Drupal site after you've successfully logged in to your GT Account.
- Repeat step #7 above for each user who should have access to the site, setting the access level as appropriate for the individual user.
CAS Configuration Guides
Configure CAS (Drupal 10)
Configure CAS (Drupal 10)The following settings should be adequate for most Georgia Tech developers using Drupal version 10.
The CAS configuration page can be found on the black administration toolbar under Configuration -> People -> CAS
Alternatively, you can access the configuration page by adding "/admin/config/people/cas" to the end of your site's front page URL.
CAS Server
- Version — 3.0 or higher
- HTTP Protocol — HTTPS (secure)
- Hostname — sso.gatech.edu
- Port — 443
- URI — /cas
- SSL Verification — Verify using your web server's default certificate authority (CA) chain.
All other sections are optional, but you will want to either:
- Enable Login link enabled under the GENERAL SETTINGS section (to show a CAS login link on the regular Drupal login form/page). This could be combined with the GATEWAY feature to speed up login for users already logged into their GT Account.
- Post a link to
/casloginto your front page - Configure the FORCED LOGIN section, should you want to have visiting a path like
/userautomatically to log the user into CAS
NOTE: The Drupal 8 CAS module originally used a different login path (/caslogin) from what CAS used in Drupal 6 and 7, which was /cas . However, the module now supports both URL paths, though it considers /cas to be a legacy path.
An explanation on GATEWAY: this feature will check to see if the user is already logged into his/her GT Account and if so log him/her into the website. If the user is not already logged in, then the user will simply access the site as a guest (anonymous) user. For this reason, you must also enable the login link setting or post a login link to your front page to allow users to log into the site when they are not already logged into their GT Account. (All GATEWAY does is to save users the trouble of selecting a login link when they've already logged into their GT Account.)
Important: If you turn on both GATEWAY logins and Auto register users, then every Georgia Tech user who visits your site and is already logged into their GT Account will have a Drupal account created for them on your site. This can result in your site ending up with thousands of user accounts, which can be a headache when it comes to managing the accounts of users who actually have special editing privileges on your site. In general, you really don't want to configure a site this way unless you specifically want to allow all Georgia Tech community members to be able to create content and/or post comments to existing content. An example of this kind of usage is this Georgia Tech Drupal community site.
The FORCED LOGIN feature will require every visitor to have a Drupal account on your site and will log the visitor into their account when first accessing the site in a browser session. Visitors who do not have a Drupal account will be denied access to the site. You probably do not want to enable this for the whole site (unless the site is meant to be a private intranet), but it can be useful to enable FORCED LOGIN for subsections of a site (e.g. "/admin/*" to automatically force login when trying to access any administrative page.)
Configure CAS (Drupal 7)
Configure CAS (Drupal 7)The following settings should be adequate for most Georgia Tech developers using Drupal version 7.
The CAS configuration page can be found on the black administration toolbar under Configuration -> People -> CAS Settings
Alternatively, you can access the configuration page by adding "/admin/config/people/cas" to the end of your site's front page URL.
CAS Server
- Version — 3.0 or higher
- Hostname — sso.gatech.edu
- Port — 443
- URI — /cas
- Certificate Authority PEM Certificate — /etc/pki/tls/certs/ca-bundle.crt
Login Form
- Add CAS link to login forms — Make CAS login default on login forms
- CAS login invitation — Log In
- Drupal login invitation — default
- Redirection notification message — You will be redirected to the secure GT login page.
- Successful login message — Logged in via GT as %cas_username.
User Accounts
- Automatically create Drupal accounts — unchecked/checked
(Whether a Drupal account is automatically created the first time a CAS user logs into the site. If disabled, you will need to pre-register Drupal accounts for authorized users.) - Email address: username@ — gatech.edu
- Roles — authenticated user
- Users cannot change email address — checked
- Users cannot change password — checked
Redirection
- Check with the CAS server to see if the user is already logged in? — unchecked
- Require CAS login for — specific pages
(Enter one page per line as Drupal paths. The '*' character is a wildcard. Example paths are 'contact' for the site-wide contact form, 'user' for the sitewide login page, 'forms/*' for every form you create under this fake directory.) - Excluded pages — default
Login/Logout Destinations
- Initial login destination —
https://yoursite.gatech.edu/
(Drupal path or URL. Enter a destination if you want the user to be redirected to this page on their first CAS login. An example path is "<front>" for the front page, or "user" for the user's page.) - Logout destination — <none>
- Change password URL —
https://passport.gatech.edu/ - Registration URL — blank
Miscellaneous & Experimental
- Initialize CAS as proxy — unchecked
- CAS debugging output filename — leave blank
Redirecting Users to the Campus CAS Logout Page
Redirecting Users to the Campus CAS Logout PageDrupal and CAS utilize different logout functions. Sending the user to /logout will log the user out of your site only and just return the user to the front/home page.
Sending the user to /caslogout will log the user out of your site and redirect the user to the logout page for CAS.
One way to send users to the CAS logout page without hunting down and changing every script that calls logout is to set up /logout as an alias for /caslogout.
Setting up the Alias
- While logged in as an administrator, go to Configuration -> Search and metadata -> URL aliases -> Add alias (
/admin/config/search/path/add) - Enter
caslogoutin the Existing system path field - Enter
logoutin the Path alias field - Select the Save button.
Requiring User Login for Specific Pages
Requiring User Login for Specific PagesIf you are using the CAS module for user authentication, you can require users to be logged in to their GT accounts before they can access specific pages on your Drupal site.
Enabling Restrictive Access (Drupal 7)
- Visit the CAS configuration page on your Drupal 7 site, at Configuration -> People -> CAS settings
- Under REDIRECTION, locate Require CAS login for and check the setting for specific pages.
- In the textbox under Specific pages, type in one page path per line (with no starting slashes)
- Select Save configuration at the bottom of the page once completed.
Enabling Restrictive Access (Drupal 10)
- Visit the CAS configuration page on your Drupal 10 site, at Configuration -> People -> CAS
- Under FORCED LOGIN, locate Pages and type in one page path per line (include starting slashes)
- You may need to select the Enabled checkbox - untested and unclear as to whether Enabled has to be on when only forcing logins on specific pages.
- Select Save configuration at the bottom of the page once completed.
Commonly Protected Paths
Commonly protected paths include:
- 'contact' for the site-wide contact form
- 'user' for the site-wide login page
- 'forms/*' for every form you create under this fake directory
CAS Logout Error
CAS Logout ErrorCourtesy of Doug Curtis in OIT:
People are receiving a 500 error when using the "GT Logout" link on a Drupal page. It looks like the problem is that the Drupal CAS module is appending the "service=" query string to the end of the CAS logout URL. The GT CAS server will accept "url=" query string but it doesn't accept the "service=" query string. Previously, the CAS service would quietly ignore appended query strings it didn't recognize but that isn't currently the case.
The way to fix this is to leave the "Logout destination" field blank in the phpCAS module's settings. The "Logout destination" is supposed to be used to specify a URL to redirect the user to after the user has been logged out. It is NOT supposed to be the URL for logging out of CAS. By leaving the field blank, the application will be logged out of your Drupal site, but the user will still be authenticated in CAS.
Updating the CAS Library to the Latest Version [Drupal 7]
Updating the CAS Library to the Latest Version [Drupal 7]While the phpCAS library is pretty stable, its maintainers do still release updates periodically, and every now and then one of those updates is to fix a security issue. Below are step-by-step instructions for how to update your phpCAS library to the most current, secure version.
For this example, we will update from version 1.3.2 to version 1.3.3, but the same steps should apply to updating between any versions of the phpCAS library (which allows logins with GTaccounts to our drupal sites).
- Download the latest version of phpCAS from the phpCAS website.
- If you don't want to use ssh/command line, "extract" the files from this compressed archive on your computer (Windows users can use the free 7-zip program to do so), which will create a folder called
CAS-1.3.3, that has anotherCAS-1.3.3directory and apackage.xmlfile inside it. - Change the name the second
CAS-1.3.3folder (that is inside the other) to CAS. - Zip up that re-named "CAS" folder...usually by right-clicking and choosing either Compress "CAS" (on a Mac OS X computer) or Send to -> Compressed (zipped) folder (on a Windows computer).
- Now that you have a friendly zipped file, named "CAS.zip", find where the CAS library lives on your server. The best practices location on a Drupal site is under the "sites/all/libraries" folder (which often requires you to add the Libraries module to your Drupal site, first).
- Then, turn on your TEST site's maintenance mode (because, of course, you are not trying this out on your live site). For Drupal 7, you can enable this at: admin/config/development/maintenance
- Delete the current version of phpCAS that lives at
sites/all/libraries,so that there is no "CAS" folder anymore. - Upload your new
CAS.zipfile to your Test site's libraries folder, so that it looks like this:sites/all/libraries/CAS.zip. - Check the box next to
CAS.zipin your web hosting panel and then, from the menu of options at the top of your file list, choose More -> Extract Files and then select Okay. - Once you see your new "CAS" folder, you can then delete the "CAS.zip" file from this directory and your library has been updated.
- Remove your Test site from maintenance mode and make sure it works correctly.
- If all goes well, follow the same process on your Live site.
Using CAS to Retrieve GTED User Attributes
Using CAS to Retrieve GTED User AttributesCAS is capable of delivering some GTED attributes for the person logging in to Drupal, as part of the login process. This means you don't have to configure and maintain an LDAP module nor manage an LDAP service account (read: no need to keep up with an expiring service account password).
While Georgia Tech's CAS service will provide authentication for any site within the ".gatech.edu" domain, by default it won't release any attributes. You'll have to request what attributes your application needs by filling out the OIT IAM Data Steward Request Form (this is the same web form that you use to request a GTED LDAP service account.) Make sure you specify CAS authentication and whatever data you need under Data Request.
Once that has been approved and CAS has been set up, configure Drupal to talk to CAS just as it's documented here on previous pages, except for the CAS Server Version, which needs to be set to SAML Version 1.1. If the user's email address is one of the attributes you're requesting from CAS, then you'll want to leave the email address field under User Accounts blank.
Now, under the Attributes tab, select the CAS Attribute Tokens button (not the "LDAP Attribute Tokens" if you have that). It should show you a list of attributes Drupal is getting from CAS. You may have to log out and log back in. If you don't see the list, you may have to work with whoever handled your data steward request, sometimes these things take a bit of tweaking to get right.
Still on the Attributes tab, select the Settings button. You'll want Drupal to Fetch CAS Attributes "everytime a CAS user logs in" because, well, people's data changes all the time. You'll probably also want to always Overwrite existing values from attributes, to make sure Drupal doesn't store any old data. Under CAS ATTRIBUTE MAPPINGS, specify "[cas:name]" for the Username field and "[cas:attribute:email_primary]" (assuming you requested that) as the E-mail address field.
LDAP Directory Information
LDAP Directory InformationLightweight Directory Access Protocol (LDAP) is an open protocol for sharing directory information and can be used as an alternative to CAS to allow users to log in to a web application using their GT Account Username and password. Unless your application doesn't support CAS, it's best to use it instead of LDAP, since LDAP requires obtaining a special GTED LDAP user account for your application.
If you just want basic directory information for users without the ability to do user authentication, there is a public GT LDAP server called 'Whitepages' that can be queried from any server or workstation on-campus.
LDAP Guides and Resources
Whitepages GT Directory Server
Whitepages GT Directory ServerThere is a public-facing LDAP server from which you can pull general directory information from without authentication. This server is only accessible from servers and workstations located on one of the Georgia Tech campus subnets.
Connection Settings
Use the default settings, unless otherwise stated beow:
- LDAP Server Type - Open LDAP
- LDAP Server - ldap://whitepages.gatech.edu
- LDAP Port - 389
- Binding Method - Anonymous Bind
- Base DNs for LDAP users, groups, and other entires this server configuration - dc=whitepages,dc=gatech,dc=edu
- AuthName attribute - uid
- Email attribute - mail
Testing Queries
To test queries, see the OIT article on LDAP.
Specific Clients
- Mac Mail: LDAP Server: whitepages.gatech.edu (adding "ldap://" into the field causes the lookup to fail for me. --Sterling)
Two-Factor Authentication
Two-Factor AuthenticationAll Georgia Tech users who have been enabled for two factor authentication (2FA) are required to log into CAS with their two-factor token via the Duo 2FA service. As of summer 2017, this includes virtually all campus employees, and will soon include all students.
So, long story short, there is no reason to add your own two-factor authentication to your Drupal websites - you would, in effect, just be creating three-factor authentication, which would likely create more headaches than benefits.
More information on the campus program can be found on the OIT Two-Factor Authentication website.
Finding a Person's GT Account Username
Finding a Person's GT Account UsernameThe GT Account Username is the standard computer account for everyone at Georgia Tech. It is used to access a variety of systems including TechWorks, BuzzPort, and Mercury, and can be used to access your Drupal site by installing the CAS module.
You may often find that need to add someone to a group in Mercury or to your Drupal site, and you need to know the person's GT Account Username. Here are several ways that you can look up that information:
Using Office 365
[Instructions courtesy of Noel Moreno]
- Go to the "People" area (click on the "waffle" in the upper left, then select "People").
- In the left column, check the radio button for "Directory".
- Enter the person's name, email address, partial name, etc. in the search box.
- Results are returned on the right. Select the person of interest.
- In the data returned, the GT Account Username will in the person's "IM" value. It will be "sip:[gt account]@gatech.edu".
Using Command Line tools
Note: Any command line tools to query data via the Georgia Tech "White Pages" (which both the Georgia Tech Directory Tools and the 'ldapsearch' examples use) will only work from on-campus or over the campus VPN.
- Georgia Tech Directory Tools [Tip from Shawn Carnley]
- UNIX 'ldapsearch' Command Line Query [Code Included]
Creating a Georgia Tech Guest User Account
Creating a Georgia Tech Guest User AccountIf you have enabled CAS authentication to help keep your site secure, but have a limited number of non-GT users who need access to certain protected features of your Drupal site, you can create guest GT Account Usernames for them.
Creating a New Guest User Account
- Log into PASSPORT (https://passport.gatech.edu)
- Under Sponsored Guests, choose Manage guests.
- Select the Create a new guest button and follow the instructions to create your guest user.
- Only grant LAWN wireless or T-Square access if necessary.
- Only grant permissions for the length of time the guest will need access (1-365 days).
- Write down the Guest's new GT Account Username and Password, so you can communicate it to them over the phone or in person (since it's not very safe to send passwords electronically).
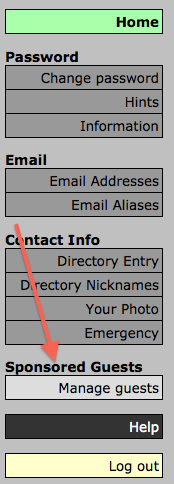
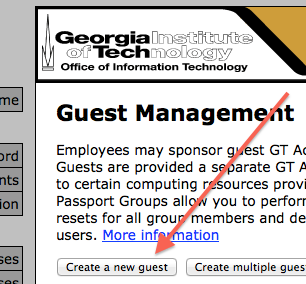
Solving Post-Migration Login Issues
Solving Post-Migration Login IssuesIf you are unable to log in with CAS after migrating a site, make sure you copied the .htaccess file in the root of your site (httpdocs on OIT Web Hosting).
Please note that this file may be hidden to some file browsers. If so, configure your file browser to show hidden files.
Technical Details
CAS requires that Clean URLs be enabled. When Clean URLs is enabled, Drupal edits the .htaccess file to properly handle normal-looking URLs.
When a Drupal website is migrated without the .htaccess file, Drupal reverts to the ugly URL schema (i.e. http://drupal.gatech.edu?q=user/login). This has the side-effect of also disallowing CAS from working properly.
Sharing Files via Drupal: Methods, Pros/Cons, Alternatives
Sharing Files via Drupal: Methods, Pros/Cons, AlternativesFile Management Basics
At some point, you or your content manager will have a need to share files via your unit's Drupal website, but what is the right way to do this?
Cloud Storage Options
In general, Drupal, like any modern content management system (CMS) should not be used as a substitute for a file sharing application. If you need to simply share files with others in your unit (or even others anywhere at Georgia Tech but not publicly), you should use one of OIT's approved file sharing offerings, which include:
- Microsoft OneDrive
- Dropbox
- Box
Please see OIT's Cloud Storage Offerings FAQ for details on each of these services.
Intranets
An intranet is a private website/service where you can store both files and other content solely for the use of your unit. An intranet is an excellent tool for letting members of your unit share with each other while keeping others out.
The quickest way to build an intranet is to use Microsoft Teams / SharePoint. The easy path is to simply create a Team for your unit, which automatically creates much of the SharePoint backend for you. If you need more power than what Teams provides on its own, you can delve into the SharePoint side of the system to see what it offers.
You could build a Drupal site as an intranet, site, but to be secure this should always be a separate site from your unit's public website. This is because configuring a Drupal site for both public and private content is very tricky and not doing it right could expose private information to the world. Plus, the best protection for an Intranet is wrapping the entire site in authentication based security, and possibly also wrapping the entire site in firewall rules to limit access to campus and the Georgia Tech VPN.
File Storage with a Public Drupal Site
There are times when a content manager desires to present public web pages with links to files that support the page content. Drupal, like most content management systems, has support for this, and Drupal built-in mechanisms work well for files that are meant to be accessible to the world. Campus websites installed using Drupal Express offer built-in image file management and provide a file upload field connected with each page for uploading non-image content (PDFs, office documents, etc.)
About the only issue here is with multimedia content (videos), which tend to be so large that they are best housed on a streaming media service, like MediaSpace, which also provides the benefit of letting the user quickly access the parts of the file they want to view instead of having to download the entire media file when they only want to see a small part of it.
Managing Limited Access Files
Somewhere between the intranet option and the fully public option lies the need to offer web pages that are public, but which link to files that should only be available to Georgia Tech community members. This kind of configuration is fraught with challenges and should be approached with great care, so as to avoid creating the unintended illusion of security when there actually is none. Whenever possible, consider the options above first, and try to avoid putting campus-only files onto websites that are otherwise open to the world.
Public versus Private Filesystems
It is important to understand that by default, Drupal does not serve the files that you upload to it - rather, it lets the Apache HTTPD web server deliver those files itself, speeding up the process. Because of this, access limiting modules do nothing to protect these files. Protections applied to normal file paths are simply ignored, because Drupal never handles the processing of those paths.
To have any real security for files uploaded to Drupal, you have to first configure a private filesystem for your Drupal site, then add a new file field to your page content type(s) so that you can make use of that private filesystem. Once this is in place, you can look at methods of securing those files.
Securing a Private Filesystem
A private filesystem by itself is still open to the world, but has the potential to be locked down. Most any path/route based access control module could be applied to the paths of a private filesystem, but which module is the best?
Authentication Based Security (e.g. CAS / GT User Account)
Since all campus Drupal sites built from Drupal Express include CAS based authentication, this is an easy option to use, but it comes with a caveat. You implement CAS protection by defining paths (routes) that require site login for access, then enable the automatic creation of new user accounts. Then, anyone with a GT Account can log into your site in order to access the protected pages or files. Theoretically there is no security issue with doing this, but you have to make certain that there is nothing in your site available to the built-in "Authenticated User" role that you don't want everyone in the Georgia Tech community to be able to see. Thus, you need to scrutinize your site permissions for the "Authenticated User" role on a regular basis.
Another issue is that a large number of people have GT Accounts - many you would not think about: contractors, applicants, affiliates, etc. Even guest user accounts are technically GT Accounts and could access your content. So, if you really only want faculty and students to access certain content, a simple CAS based protection is really not enough.
Finally, be aware that every campus user who accesses one of your CAS protected pages or files will end up with a user account on your Drupal site, and in time this can really clutter up your site's user account list, making it harder to do security audits and manage the real users of your site.
For all of these reasons, consider all other options before simply going with authentication based security.
Firewall / Location Based Security (Campus and VPN Only Access)
A Drupal module like "Access Filter" will allow you to restrict path (route) access to a fixed set of IP addresses. (IP addresses are unique numbers that identify each device connected to the internet anywhere in the world). By configuring Access Filter rules with the campus and VPN IP address ranges of Georgia Tech, you effectively prevent anyone else from being able to access the files or pages protected by those rules.
Please note that since anyone with a GT Account can now use the Georgia Tech VPN, the scope of user access for this option is the same as with authentication based security: people like contractors, applicants, and guests can still get to your protected content. The upside to this approach is that it is mostly a hands-off approach: there is no need to open up your site to forced logins and automatic account creation, and thus your site user account list does not get cluttered with random user accounts.
While configuring Access Filter is more technical in nature than configuring CAS for forced logins, we have put together a step-by-step guide to configuring Access Filter for Campus and VPN Only Access to make it as easy as possible.
Alternatives to a Drupal Filesystem
It may seem attractive to just leave Drupal out of the equation and store your campus-only (or other limited access files) on another service and then link to them from Drupal. This is a good idea in theory, but many of the rules implemented for our approved campus file sharing systems can get in the way:
-
Links generated to files on file sharing services (OneDrive particularly) can expire, and in some cases you cannot disable the expiration; for files you want around indefinitely, this can be problematic
- With some file sharing services, files can disappear if the owner of the file (the person who uploaded the file) leaves Georgia Tech; ideally files should be uploaded in a way where they are attached permanently to a unit (via some kind of "group") rather than to an individual employee
The option with the best longevity seems to be Microsoft Teams / SharePoint, but it is also the most complicated option to learn. It is probably a good idea for an IT Support technician to get such an option set up properly and then train the unit's content manager(s) on how to use it properly.
Creating a Private Filesystem on OIT Web Hosting
Creating a Private Filesystem on OIT Web HostingSetting up a private filesystem requires some under-the-hood configuration, so the following is recommended only for someone who already understands filesystems and editing configuration files.
These instructions are tailored for the OIT Web Hosting Plesk servers, but can be adapted to other configurations. Instructions are based on using the Plesk GUI, but you can also accomplish all of the Plesk related steps from an SSH connection if you are more comfortable in a command line environment.
Configuration
-
Connect to your hosting account's Plesk console.
-
Go to the File Manager
-
Create a new subdirectory for your private files
-
On the first File Manager screen, select Home Directory to move to your hosting account's home directory.
-
Select the blue "+" button to the left of the "Copy", "Move", "Archive", etc. buttons, and select Create Directory.
-
Give your new directory a suitable name (these instructions will call it "files-private").
-
-
Edit your site's settings.php file
-
In File Manager, navigate into
httpdocs/sites/default -
Find "settings.php" and use the drop-down selection at the right end of the line to Change Permissions. Give "Owner" the "Write" permission and save.
-
Use the drop-down on the "settings.php" line to Edit in Code Editor
-
Search for "Private file path" and read the instructions there.
-
Uncomment the line of code that sets the "file_private_path" value, and fill in the value like so: /var/www/vhosts/mysite.gatech.edu/files-private
-
Important: "mysite.gatech.edu" should be replaced with your hosting account ID, which is the domain name shown when you first open your Plesk control panel - this may not always be the domain name you normally use to access your site. Also, "files-private" should be the directory you created in step 3 above.
-
-
-
Save your changes, then open a new browser window, log into your site as an administrator, and clear all of the caches.
-
Go to the site Status Report (administrative toolbar -> Reports -> Status report and make sure there are no errors. Also go to Reports -> Recent log messages and look for any error or warning messages there.
If all looks good, then move on to the next section. Otherwise, troubleshoot any problems first.
Create a Private Attachments Field
-
While logged into your site as an administrator, go to Structure -> Content types -> Basic page -> Manage fields
-
Create a new field of type File and call it something like "Secure Attachments" or "Private Attachments" to distinguish it from the existing "Attachments" field. Specify a subdirectory value like "campusonly" (or perhaps "campusonly/[date:custom:Y]-[date:custom:m]" if you want files organized in further subdirectories based on the month they were uploaded). Configure the rest of the field as you wish, making sure you set the file size limit and allowed file extensions to meet your needs.
-
If you are going to apply any kind of access restrictions to some or all of your private filesystem, then you will need to know the system path you want to protect, which is different from the path you put into the settings.php file earilier.
-
The base system path for the private filesystem in Drupal is "/system/files". Adding any rules for this base path will restrict all private files in all use cases, which may be more than you need.
-
When you created your Secure Attachments field, you specified a subdirectory. To protect just the files connected to that field, add the subdirectory to the base path to get the full system path for that subdirectory (e.g. "/system/files/campusonly") Adding rules for this path will only protect files in the "/campusonly" subdirectory of the private filesystem while ignoring all other private files.
-
Using Access Filter to Limit Files to Campus and the VPN
Using Access Filter to Limit Files to Campus and the VPNA Drupal module called Access Filter combined with a private filesystem can be used to limit file access to campus and VPN IPs only. For most cases, that's just as good as using forced logins via CAS authentication without the headaches of having a user account created on your Drupal site for every person who accesses one of your protected pages or files.
Important: Drupal access control modules will only work with a private filesystem, as Drupal does not actually handle access requests for files uploaded to public file fields (it lets Apache handle those requests for maximum speed). If you do not already have a private filesystem set up, you will need to configure your site to use a private filesystem.
Instructions for Installing and Configuring Access Filter
-
Configure your site with a private filesystem and make sure it is working correctly.
-
Install the Access Filter module like you would any other Drupal module.
-
Once you have the module installed, go to the Administrative Toolbar, to
Configuration -> People -> Access filtersand create a new filter with the following components:Conditions: - { type: path, path: /system/files/campusonly/* } Rules: - { type: ip, action: deny, address: '*' } - { type: ip, action: allow, address: 130.207.0.0/16 } - { type: ip, action: allow, address: 128.161.0.0/16 } - { type: ip, action: allow, address: 143.215.0.0/16 } - { type: ip, action: allow, address: 192.93.8.0/24 } - { type: ip, action: allow, address: 10.0.0.0/8 } - { type: ip, action: allow, address: 172.16.0.0/12 } - { type: ip, action: allow, address: 100.64.0.0/10 } Repsonse Code: 302 Redirect URL: /campusonlyMake sure that path in the condition matches up with the path that your Secure File field is using, so that the rule will apply to all files uploaded to that field.
- Finally, make a generic page at the path "/campusonly" that will tell outside users that the content they're trying to access is available on-campus or via the VPN only.
Now, any regular content manager can simply upload campus-only files to the Secure File field (created when setting up a private filesystem) on the related page and then link to the file like they would do for a normal file attachment. When accessed from on-campus or the VPN, the user simply gets the file. When accessed from off-campus, the user gets redirected to that /campusonly page.
Getting Started with DDEV
Getting Started with DDEVStep 1. https://ddev.readthedocs.io/en/latest/
Install (OSX):
Homebrew
Docker or Colima
Install DDEV
First Project:
user@users-MBP Sites % mkdir gt_test
user@users-MBP Sites % cd gt_test
user@users-MBP gt_test % ddev config
Creating a new ddev project config in the current directory (/Users/user/Sites/gt_test)
Once completed, your configuration will be written to /Users/user/Sites/gt_test/.ddev/config.yaml
Project name (gt_test): gt
The docroot is the directory from which your site is served.
This is a relative path from your project root at /Users/user/Sites/gt_test
You may leave this value blank if your site files are in the project root
Docroot Location (current directory): web
Warning: the provided docroot at /Users/user/Sites/gt_test/web does not currently exist.
Create docroot at /Users/user/Sites/gt_test/web? [Y/n] (yes): y
Created docroot at /Users/user/Sites/gt_test/web.
Found a php codebase at /Users/user/Sites/gt_test/web.
Project Type [backdrop, craftcms, drupal10, drupal6, drupal7, drupal8, drupal9, laravel, magento, magento2, php, shopware6, typo3, wordpress] (php): drupal9
No settings.php file exists, creating one
Configuration complete. You may now run 'ddev start'.
user@users-MBP gt_test %
user@users-MBP gt_test % ddev start
Starting gt...
Network ddev-gt_default Created
Container ddev-gt-dba Started
Container ddev-gt-db Started
Container ddev-gt-web Started
Container ddev-router Running
Successfully started gt
Project can be reached at https://gt.ddev.site https://127.0.0.1:63153
user@users-MBP gt_test %
Edit the DDEV Config: .ddev/config.yaml ()
additional_hostnames: []
additional_fqdns: []
database:
type: mariadb
version: "10.4"
Changes additonal hostnames to allow GT SSO:
additional_hostnames:
- gttest.localhost.gatech.edu
Composer: Install Drupal:
ddev composer install
Copy your existing composer.json to the root folder. ( I found -W and --ignore-platform-reqs fixes my local composer issues)
composer update -W --ignore-platform-reqs
Adding modules with composer: --no-update adds it to composer.json but waits for update command.
composer require 'drupal/ckeditor:^1.0' --no-update
Import a Drupal database:
ddev import-db --src=mypleskdrupal.sql
Updating a database/Drush commands:
ddev drush updatedb -vvv
Export a Drupal Database:
ddev export-db -f mypleskdrupal10.db.sql.gz
Optimization and Performance
Optimization and PerformanceThis section documents ways that you can optimize your Drupal site for better performance.
Guides and Resources
Drupal Core Optimization
Drupal Core OptimizationA number of performance settings are recommended to cache Drupal data objects and speed up your site.
Enable Caching and Aggragation Settings
These settings can be enabled in Drupal 7 via the administrative control panel under Configuration -> Development -> Performance
- Cache pages for anonymous users
- Cache blocks
- Compress cached pages
- Aggregate and compress CSS files
- Aggregate JavaScript files
- Set Minimum cache lifetime = 15 minutes
Disable and Remove Unnecessary Modules
Several key internal functions in Drupal will scan all installed modules, so be sure to not only disable but also uninstall and remove any third-party (contrib) modules that you are not using. This not only improves your site's speed but also helps to keep it better secured.
Core modules should not be removed, since they'll just reappear the next time you do a core upgrade. However, consider turning the following off to help speed up your site:
- Statistics - You can offload this computation to Google Analytics.
- Syslog - We recommend using dblog instead.
- Tracker - This can generate a lot of data, so turn it off unless you have a real need for knowing what individual users are doing.
- Overlay - A potentially useful module, but can generate noticeable frontend lag.
Additional Optimization Techniques
Performance Modules
Performance ModulesThere are also quite a few modules that attempt to cache resource-heavy actions on Drupal.
Getting Started with Performance Module
For most websites, core Drupal caching should be sufficient to keep CPU/memory usage down and keep your website running smoothly. However, for larger and more complex websites, additional caching and optimization will be needed.
For your specific website (and its use cases, structure, and workflows), please browse through the modules below and see which module(s) may work for your website.
Advanced CSS/JS Aggregation
Availability: Drupal 7, Drupal 10
From the module's Drupal.org page: AdvAgg allows you to improve the frontend performance of your site. The performance benefits are achieved by using some of the features found in AdvAgg and its sub modules. Out of the box AdvAgg's frontend performance will be similar to cores.
Boost
Availability: Drupal 7
Boost provides static page caching for Drupal enabling a very significant performance and scalability boost for sites that receive mostly anonymous traffic. For shared hosting this is your best option in terms of improving performance.
- Boost is not recommended for large websites (nodes >= 1000), as the caching process will take up the websites' allotment of CPU cycles. This will slow down the website to be unusable for end-users.
- Boost can be used alongside Memcache API and Integration
- No configuration for Boost is necessary beyond installing and enabling the module.
- Core caching in Drupal must be disabled for Boost to work properly
CDN
Availability: Drupal 7, Drupal 10
CDN provides easy Content Delivery Network integration for Drupal sites. It alters file URLs, so that files are downloaded from a CDN instead of your web server.
Before you begin, you will need to select a CDN provider. CDN have different costs and features depending on your needs.
- These CDNs are currently used on campus:
- Keycdn.com - Used by the Office of International Education (Jimmy Kriigel)
- http://oie.gatech.edu
- http://pacific.gatech.edu
- http://oxford.gatech.edu
- Keycdn.com - Used by the Office of International Education (Jimmy Kriigel)
- This module is best used for websites with lots of traffic and lots of images and/or locally hosted videos.
- KeyCDN has made a CDN Drupal Integration Tutorial available.
- The CDN module has TEST Mode. If you don't want to use the CDN to serve files to your visitors yet, but you do want to see if it's working well for your site, then enable testing mode. Users will only get the files from the CDN if they have the permission to "Access files on CDN when in testing mode".
- The "Far Future expiration" option doesn't work with the IMCE module.
- Update: IMCE has a patch in their dev branch for this issue.
- You can manually flush a CDN cache file by having the Display statistics Shows enabled and scrolling down to the bottom of the page and selecting "Touch" to purge the file.
Entity Cache
Availability: Drupal 7
From the module's Drupal.org page: Entity cache puts core entities into Drupal's cache API. Due to the entity loading changes in Drupal 7, no core patches are required.
Don't bother using this module if you're not also going to use Memcache API and Integration or Redis – the purpose of Entity Cache is to allow queries to be offloaded from the database onto alternative storage, and there are minimal, if any, gains from using it with the default database cache.
Memcache API and Integration
Availability: Drupal 7
This module provides integration between Drupal and Memcached with the following features:
- An API for using Memcached and the PECL Memcache or Memcached libraries with Drupal.
- Memcache backends for the following systems (all drop-in):
- Caching (memcache.inc)
- Locking (memcache-lock.inc)
- Sessions (memcache-session.inc) (D6 only)
- A module that provides a comprehensive administrative overview of Drupal's interaction with Memcached and stats.
- A set of tests that can be run to test your memcache setup.
Memcache is ideal when there are lots of database reads and writes, as it is a cache for the data layer (this is also why it can so easily whitescreen your site when things go wrong). This article does a decent job of explaining the "whens" and "whys" of APC, Varnish and Memcached.
Recommended Settings
After enabling the memcache module, add this text to the bottom of your settings.php:
$conf['cache_backends'][] = 'sites/all/modules/memcache/memcache.inc';
$conf['lock_inc'] = 'sites/all/modules/memcache/memcache-lock.inc';
$conf['memcache_stampede_protection'] = TRUE;
$conf['cache_default_class'] = 'MemCacheDrupal';
$conf['cache_class_cache_form'] = 'DrupalDatabaseCache';
$conf['page_cache_without_database'] = TRUE;
$conf['page_cache_invoke_hooks'] = FALSE;
$conf['memcache_servers'] = array('localhost:11211' => 'default');
You will need to adjust the module directories if your module is installed in a different directory.
Troubleshooting
In some cases, Drupal will white-screen after settings.php is edited to reflect the new memcache settings. If this occurs, please check your error log on Web Hosting. If you see a 'Fatal Error', follow the directions below (taken from this Drupal.org thread):
- Backup your website.
- Download registry_rebuild and upload to sites/all/modules.
- Run registry_rebuild by navigating your browser to: [yourdomain]/sites/all/modules/registry_rebuild/registry_rebuild.php
- If no errors show up, your registry has been rebuilt.
- Delete the module from the sites/all/modules directory.
Varnish HTTP Accelerator
Availability: Drupal 7
Varnish HTTP Accelerator provides integration between your Drupal site and the Varnish Cache, an advanced and very fast reverse-proxy system. Basically, Varnish handles serving static files and anonymous page-views for your site much faster and at higher volumes than Apache, in the neighborhood of 3000 requests per second.
Other Ways of Increasing Performance
Other Ways of Increasing PerformanceBesides performance modules, there are several other methods for increasing the performance of your Drupal site.
Disable Modules Only Needed During Development
Only enable these modules while actively developing, and then turn them off the rest of the time.
- Field UI (in core)
- Rules UI/Admin
- Views UI
- Module Filter
- Advanced Help
- Fast Permissions Administration
- Devel
Track Your Site's Performance Baselines
- Drupal's Devel module
- Execution time and memory usage
- Query logging
- Web optimization
- Web testing
- Browser-based
- Saas products
Locate and Fix PHP Errors/Warnings
- Turn on verbose error reporting to find errors and warnings (check Apache error logs as well)
- Perform performance testing of any custom coding.
Optimize Javascript and Other Front-End Features
- Example modules using JavaScript: Views Slideshow and Conditional Fields.
Automating Drupal Cron on OIT Web Hosting
Automating Drupal Cron on OIT Web HostingUnless you manually configure Drupal cron to be run by your web hosting server, it will be automatically run when someone visits a page on your Drupal site after a certain amount of time has passed. This method works perfectly fine, but can slow down the display of the page the user requested since the cron run will block page generation until it has finished. This becomes more noticeable on site visited less frequently as more tasks can accumulate that need to be executed during a cron run.
To keep this from happening, you can schedule Drupal cron to run automatically in the background. On a web server that you fully control, you can use UNIX style cron to run the Drupal cron job. You can also do this on OIT Web Hosting, but you have to configure the job via the Plesk Control Panel.
Step by Step Instructions
- Log into your hosting account's Plesk control panel.
- On the main control panel page, navigate to Schedule Tasks, found in the right-hand sidebar menu.
- On the Scheduled Tasks page, select the Add button
- Fill out the form as follows (the example here will set up Drupal cron to run every eight hours):
- Minute: 0
- Hour: 0,8,16
- Day of the Month / Month / Day of the Week: * (insert an asterisk)
- In the text field, Command, enter the following:
You can find the link to put at the end of this command (curl --silent --compressed http://YOURDRUPALSITE.gatech.edu/cron.php?KEY-FROM-ADMIN-REPORTS-STATUS-PAGEKEY-FROM-ADMIN-REPORTS-STATUS-PAGE) on your Drupal site's status report page at Reports -> Status report (admin/reports/status)

Video Tutorial
Logs and Logging Tools
Logs and Logging ToolsLogging details about your site's usage can be very valuable, but if not configured properly, can also be a huge resource drain. The following articles provide useful best practices for managing your Drupal site's logging functions.
Logs and Logging Guides and Resources
Errors, Warnings, and Log Settings
Errors, Warnings, and Log SettingsFix Errors Whenever Possible
Although hiding error messages is important from a security perspective, errors and warnings mean that something isn't working correctly, and that could likely have a negative effect on your site. It's best to try to fix them to fix them if you can (especially if they are in your own code), or for third-party contrib modules, report them to the module or project owner.
PHP Message Types
PHP, which Drupal runs under, can generate three types of messages:
- Notices - Something to be aware of that you might want to do differently, but probably won't keep your site from working.
- Warnings - More serious issues than Notices, but are not keeping your site from running.
- Errors - A serious issue that has caused the site code to stop running before reaching a normal completion.
In short, errors are problems that have to be fixed, because they are impeding use of your site. Warnings and notices ought to be fixed, but notices may be things that you have a reason for doing in an unusual way.
Drupal 7+ Message Settings
To change the way your Drupal 7 or 8 site shows PHP messages, go to the Configuration -> Development -> Logging and errors (admin/config/development/logging) administrative control page.
The recommended settings for a live, production site are:
- Error messages to display: None.
- Database log messages to keep: 100 (unless you need a longer audit trail)
- Note: Do not enable the core syslog module if you are using OIT hosting. According to the syslog module's documentation, it is not appropriate for shared hosting. You should be able to find most useful debugging information by looking at the error logs, as described below.
Error Logs on OIT Web Hosting
If using OIT Web Hosting, you will find a record (or log) of errors the server is tracking in your Plesk control panel.
From the main panel, go into the Logs section and look for the log file called "error_log". You can either view or download this file, which lists detailed error log messages.
Other forms of web hosting will have their own logging areas where you can look for error logs. Check with your server administrator to find out where the logs are on any non-OIT server that you might be using.
One thing to keep in mind is that server error logs will only contain messages from PHP. Any messages generated by Drupal itself will be found in the Drupal Error log, found in the administrative area of your site under Reports -> Recent log messages.
Sample Error Messages on Web Hosting
Here are some examples of error messages you might find in your hosting log:
[Mon Jun 15 03:01:53 2014] [warn] RSA server certificate CommonName (CN) `hosting.gatech.edu' does NOT match server name!?
[Mon Jun 15 08:52:25 2014] [error] [client 130.207.000.00] File does not exist: /var/www/vhosts/mysite.gatech.edu/httpdocs/favicon.ico, referer: http://mysite.gatech.edu/node/77
[Mon Jun 15 09:03:20 2014] [warn] [client 130.207.000.00] mod_fcgid: stderr: PHP Warning:  chdir(): open_basedir restriction in effect. File() is not within the allowed path(s): (/var/www/vhosts/mysite.gatech.edu/:/tmp/:/usr/share/pear:/var/cache/hg:/opt/atomic/atomic-php55/root/usr/share/pear) in /var/www/vhosts/mysite.gatech.edu/httpdocs/custom-file.php on line 88
Database Logging Configuration
Database Logging ConfigurationIf using the "Database logging" module in core, be sure to keep only a small number of entries (1,000 seems reasonable).
Until we have a solution that can feed syslog information from Drupal into regular system logs on OIT Web Hosting, we use the "Database logging" module in core to track errors, logins, and other system messages. This module stores its logs in the watchdog table.
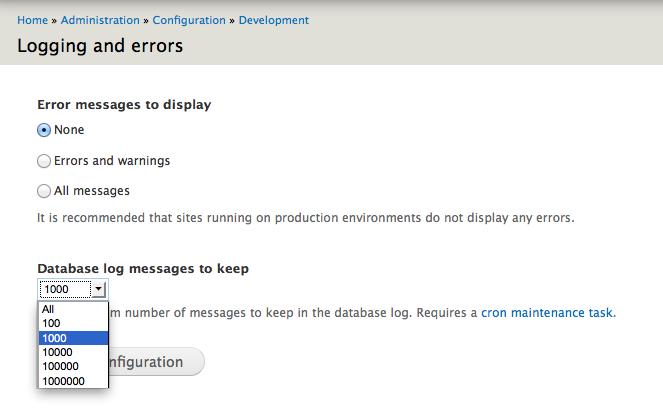
It is important to set this module to only keep a small number of log entries (such as 1,000), so that our database servers don't get overwhelmed. You can change the settings for your Drupal 7 site at: Configuration -> Development -> Logging (admin/config/development/logging).
Making Sure Access Logs Are Tamed
Making Sure Access Logs Are TamedIt looks like there's a bug in Drupal 7 where, if you ever turn on and activate the Statistics module (enabling the logging of accesses to the database), and then decide to turn off the Statistics module, Drupal keeps on logging to the table that it creates (accesslog), and cron never clears anything out of that table, so it can just keep growing indefinitely. On a busy site, this can result in multiple millions of entries in that table.
Here's what you can do to check for this condition:
- If you know how to use something like phpMyAdmin to examine your database, look for an accesslog table (it may have a prefix on it, depending on how your copy of Drupal was set up). If it exists, then your site has Statistics turned on, or did at some point in the past. If the number of rows is huge, then you probably need to do the next step.
- If you know you need to fix this problem, or if you don't know how to use phpMyAdmin, you can do the following:
- Go into your Drupal site and turn on the Statistics core module.
- Next, go to Administration -> Configuration -> System -> Statistics and look at the settings there. Disable Enable access log, set Discard access logs older than to '1 hour', and then save the configuration.
- Finally, go to Administration -> Reports -> Status report, and initiate a manual cron run to clear the accesslog table. Note that this may fail to complete if you have over a million entries in the table. If so, then you'll need to use phpMyAdmin or something similar to clear out the table.
- Once you've gotten past step 2.3, go back to your Modules page and disable Statistics.
Of course, if you actually want to use the Statistics module, then make sure that Discard access logs older than is set to something other than 'never', so that the accesslog table doesn't grow indefinitely.
Automation and Version Control
Automation and Version ControlThis section is for tips and tricks to help automate your Drupal site maintenance tasks, specifically using the Drush command line interface. Also covered is the use of version control systems like GitHub.
GitHub at Georgia Tech
GitHub at Georgia TechGeorgia Tech staff, students, and faculty can now use a Georgia Tech instance of GitHub, a version/revision control system. This service is available thanks to the College of Engineering's brilliant proof of concept with GitHub Enterprise, and the ensuing excited buy-in from the Office of Information Technology.
What is GitHub and Why Should I Use Revision Control?
GitHub is a proprietary hosted extension of the open-source Git version/revision control system commonly used for open-source software projects. It is very useful for multi-developer projects, as it allows coordinating and tracking code changes and the orderly acceptance and integration of those changes into the master project. Version control also makes it much easier to revert back to an earlier version of the software if it is discovered that accepted changes have caused unexpected problems.
Or, to put it short, it'll save your bacon. Figuratively, not literally.
Support Policy
OIT does not offer technical support or training for Git or GitHub usage. If you want to learn how to use git, see below for many educational resources.
Accessing Georgia Tech GitHub Enterprise
Just go to https://github.gatech.edu and log in with your GT Account Username and password.
GitHub User Software
You can access repositories in GitHub using git from the command line of most Unix based operating systems (see GitHub's KB), but you can also use a variety of GUI (graphical user interface) applications, such as:
- For beginners, GitHub's Desktop (for Mac OS X or Windows).
- For something that works on both Windows and Mac, try SourceTree.
- There are also lots more graphical clients to use with git.
Drupal List
We have a Drupal community group in GitHub that allows users to share and collaborate on projects. Please add collaborative projects to the GT Drupal group on GitHub at Georgia Tech.
Learn to Use git with GitHub Resources
You can learn how to use git (and GitHub) with these tools from GitHub Enterprise, such as:
- Guides: Tutorials, tips, and workflows to help you and your team learn about GitHub.
- Reference Sheets: Quick reference guides and manuals for GitHub
Learn to Use git with General Internet Resources
The internet has lots of other great places to teach you about git. Here are a few:
- Lynda.com - GitHub for Web Designers
- Lynda.com - Fundamentals of Software Revision Control
- Learn Git Branching - A good interactive visual guide to Git's concept of version control.
Local GitHub Guides and Resources
Forking a GitHub Repository and Using Pull Requests
Forking a GitHub Repository and Using Pull RequestsForking creates a copy of a repository which you can work on. You can then submit a pull request to have your changes reviewed and integrated with the master repo. This is the order of operations:
FORK > SYNC > BRANCH > COMMIT > PUSH > PULL REQUEST
Download a PDF version of this guide.
Forking a Repository
Reference: https://help.github.com/articles/fork-a-repo/
In Github, navigate to the repository to be forked and select “Fork” on the upper right. Select your own user name when prompted. This creates a copy of the repository for you on Github.
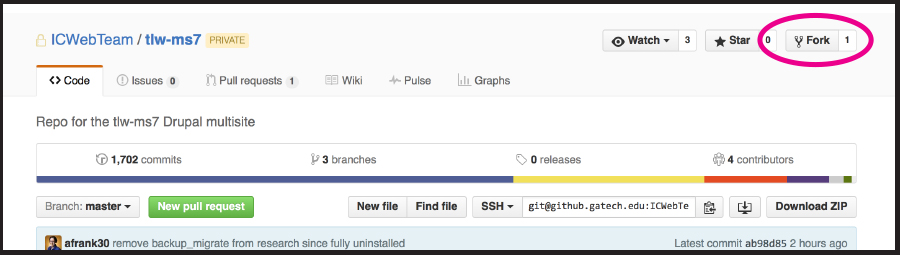
Now you should see your fork. Copy the URL using this button:
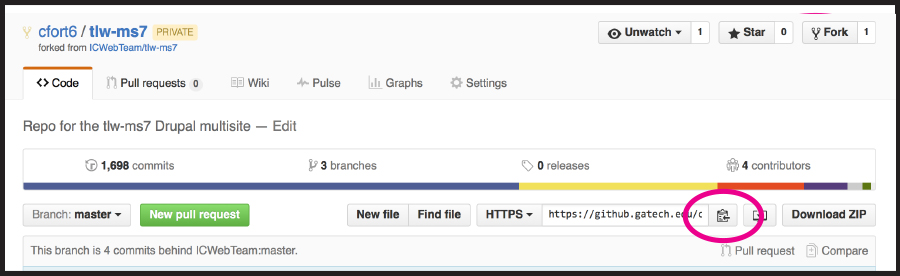
Open Terminal and type:
git clone https://github.gatech.edu/ORG_NAME/Repo-Name
Here (after clone) you should paste the URL you copied at the beginning of this step. This creates a local copy of your clone on your machine under your current directory.
Connect your Fork to the Master
Next, sync your fork with the master to ensure that any changes going on with the master will be reflected in your local fork/clone.
Navigate in Github to the original repository. Copy the URL as shown:
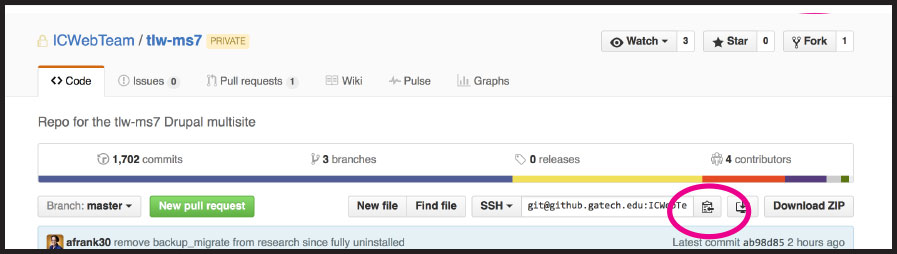
-
Open Terminal and change directories to the fork you cloned.
cd(enter)ls(look for your cloned fork/repository name)cd Fork_Namegit remote -v
git remote add upstream https://github.gatech.edu/ORG_NAME/Repo-Name -
Alternately, you can both add and fetch (sync with) your master by using this instead:
git remote add -f upstream https://github.gatech.edu/ORG_NAME/Repo-Name -
Verify your upstream repository is syncing.
git remote -v
Syncing Your Fork
Reference: https://help.github.com/articles/syncing-a-fork/
You probably want your fork to mirror the latest changes being made to the main repository. If you used “git remote add -f upstream” in the previous step, this is already done. If you used “git remote add upstream” and now you need to fetch upstream to sync your fork, you can use this method.
-
In Terminal, change to the directory of your local clone and fetch upstream to sync with the original master repository.
cd Fork_Namegit fetch upstream -
Check out your fork’s local master branch.
git checkout mastergit merge upstream/master
Branch Your Fork
Now Branch your issue locally.
In Terminal:
git checkout -b name_of_your_new_branch
Committing Changes to Your Fork
-
Change your files as needed.
-
In Terminal,
git statusThis will confirm that git is watching your modifications.
-
Add the files to staging (substitute your file name or names)
git add path/file_name -
Then commit
git commit -m “First commit”
You will get feedback saying how many files were changed and how.
Note for newbies: A branch may contain many commits. Name your branch to reflect what you’re working on and name commits to reflect more specific changes.
Pushing Your Changes to GitHub
In Terminal,
git push origin name_of_your_new_branch
Now you should see your branch show up in Github.
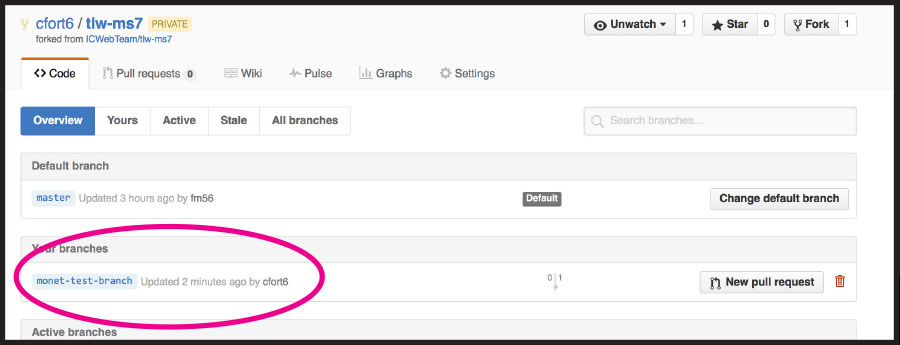
Making a Pull Request
Reference: https://help.github.com/articles/using-pull-requests/
-
Select your branch in Github. Select “New pull request”
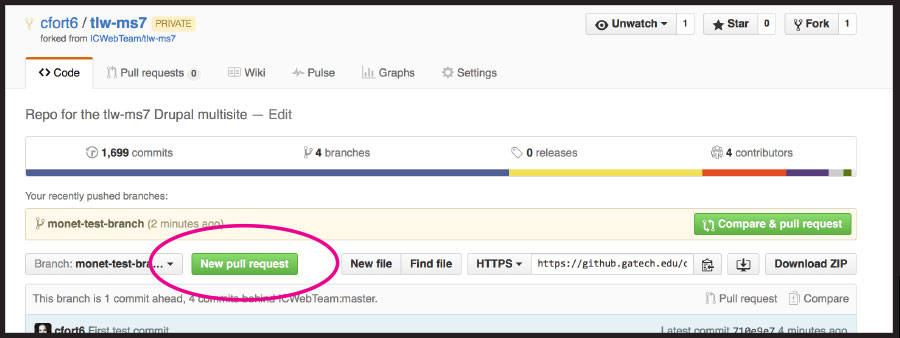
You can enter details about the changes you are suggesting. You can also select a branch to send the request to, if it’s not the master branch.
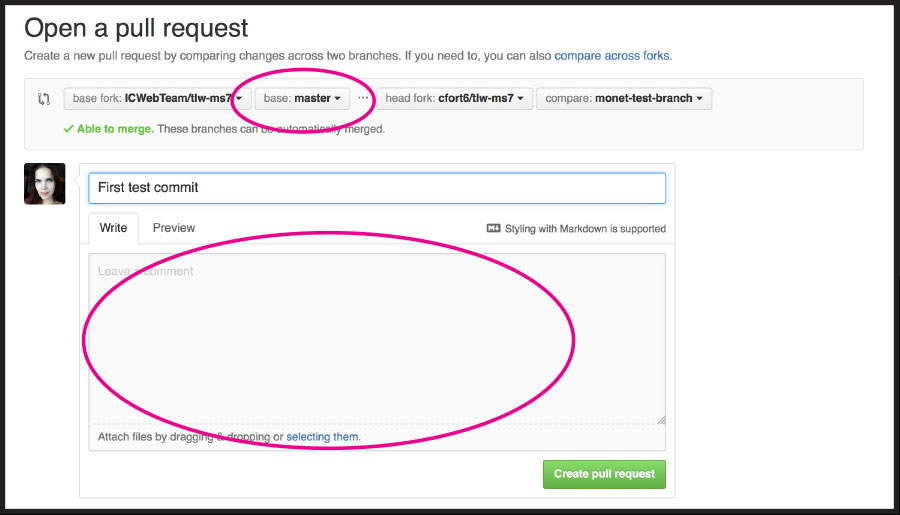
-
When you’re ready, select “Create pull request” at the bottom.
After you send a pull request, any commit that’s pushed to your branch will be automatically added to your pull request, which is useful if you’re making additional changes.
GitHub Submodule Management
GitHub Submodule ManagementSubmodules allow you to keep a Git repository as a subdirectory of another Git repository. This lets you clone another repository into your project and keep your commits separate.
To define the submodules for the various GT Theme components, add the following sections to the .gitmodules file for each repository:
[submodule "gt_tools"]
path = web/modules/contrib/gt_tools
url = https://github.gatech.edu/ICWebTeam/gt_tools-8.x.git
update = checkout
branch = master
ignore = dirty
shallow = TRUE

[submodule "gt_theme"]
path = web/themes/contrib/gt_theme
url = https://github.gatech.edu/ICWebTeam/gt_theme-8.x.git
update = checkout
branch = master
ignore = dirty
shallow = TRUE

[submodule "hg_reader"]
path = web/modules/contrib/hg_reader
url = https://github.gatech.edu/ICWebTeam/hg_reader-8.x.git
update = checkout
branch = master
ignore = dirty
shallow = TRUE

[submodule "gt_profile_curie"]
path = web/profiles/contrib/gt_profile_curie
url = https://github.gatech.edu/ICWebTeam/gt_profile_curie.git
update = checkout
branch = master
ignore = dirty
shallow = TRUE
To initialize your local configuration file and fetch all the data from each project and check out the appropriate commit, run the following command:
git submodule update --init --recursive
To initialize your local configuration file and fetch all the data from each project and check out the appropriate commit, run the following command:
git submodule update --recursive
For more information about submodules, see the Git product documentation on modules: https://www.git-scm.com/docs/gitmodules
Documentation courtesy of Veronique Topping
Drush (Drupal Shell)
Drush (Drupal Shell)Drush (Drupal Shell) is a great Drupal "module" to accomplish many administrative tasks via the command-line. It is not a module in the normal sense, because it's not enabled/disabled from the Drupal admin. Instead, it actually lives anywhere on your local system and is run like any other local executable. Here are some of its key features from the Drush Drupal.org page:
A few core drush features:
- The Drush Package Manager allows you to download, enable, disable, uninstall, update modules/themes/profiles/translations from the command line in a very simple way (apt-get style) - just type e.g. drush dl views and drush enable views in a Drupal directory to install the Views project!
- Additionally, the Drush Package Manager also allows you to update all your modules with just one command - drush update.
- Drush Core: several useful utilities for site administrators and developers (e.g. drush cron or drush cache clear)
- Drupal SQL Commands help you issue queries to any of your databases (i.e. is multi-site aware) and even helps you migrate databases between your environments.
- Drush simpletest commands make it easy to run unit tests from the command line and email results to your dev team.
- Drush now supports aliases which let's you perform actions on separate Drupal installations. This is very useful for multi-site configurations.
Drush Guides and Resources
Updating Modules via Drush
Updating Modules via DrushIf you have to perform module updates on your Drupal site, then Drush is the way to go. Drush will help you to update all modules on your site(s) quickly and painlessly.
Prerequisites
- SSH/shell access
- Somewhat higher than basic Unix/Linux command-line experience
Process
Drush has many commands and options. These commands need to be run from the directory where the settings.php file for your site is, i.e.
/path/to/drupal/sites/default
/path/to/drupal/sites/gpburdell.gatech.edu
For the purpose of updating your modules you will basically use it like below:
drush update
This is interactive and will give you a listing of all the modules that need to be updated for a given site. You can then choose to update them all or continue. Unless you are certain you want to do all of your updates at once, I suggest you use this command to see what updates are needed, then use the below command to update a few of the modules separately at one time. For short you can also use use "drush up".
drush update modulename0 modulename1
This let's you specify a list of modules you want to update.
drush updatedb
This command will perform any updates to the database schema for your modules. This is run automatically after every Drush update. For short you can also use "drush updb".
If you have multi-sites then after you do a Drush update you may have to move to your other multi-site folder to do a drush updatedb to update any changes to the database schema.
Best Practices
- Limit the number of modules you use on your Drupal sites as much as possible.
- Try to keep modules that are shared by more than one multi-site in the
sites/all/modulesfolder. - Always check the release notes for any new modules to see if installing them will require any other changes or dependencies.
Gotchas
- Drush expects a backup directory to be present in the root of your Drupal installation like
/path/to/drupal/backupwhere it backs up the previous version of the module to. Make sure you have write access to this directory. - If you had any modified files in the previous module directory you will need to copy those back to the correct place after the module is updated. Luckily everything will be in the backup directory.
- Depending on permissions you may need to run Drush as the super user. Ask your system administrator for sudo access if needed.
Using Drush on OIT Web Hosting
Using Drush on OIT Web HostingIf you are hosting a Drupal website on OIT Web Hosting, you can SSH into your host, but you cannot run the command-line tool Drush from your SSH session because OIT doesn't allow PHP to be run directly from the SSH command line of Web Hosting accounts. However, this doesn't mean that you cannot use Drush at all with OIT Web Hosting – you just have to work around this limitation.
Disclaimer
THESE INSTRUCTIONS ARE COMPLETELY, 100%, NO, EVEN 1000%, NOT SUPPORTED IN ANY OFFICIAL WAY BY OIT WEB HOSTING. No warranty expressed or implied. Always back up your site and database(s) before trying these instructions. These instructions, though tested on several sites, may break your site, cause data loss, or even make your dog not like you any more. Be careful!
Process
Essentially, you will run Drush locally on your computer, but have it operate on an OIT Web Hosting site. To do this, you will need to:
- Establish an SSH tunnel for the database connection, and
- Mount your site's files over ssh via SSHFS.
Note: The instructions presented below are for using Drush on a Mac. If you want to try this from a Windows computer, both SSH (<) and SSHFS (WebDrive) clients are available for Windows.
Prerequisites
-
Drush, installed locally – Installation instructions are available at the Drush Docs site. If you have the Acquia Dev Deskstop installed, you already have Drush. You can also install it via homebrew.
-
An SSH client – Suggested products are:
-
An SSHFS client to let you mount a remote filesystem over SSH – Suggested products are:
- The commercial Transmit (mac OS / Mac OS X; $34, free 7-day trial available),
- The commercial WebDrive (Windows, mac OS / Mac OS X; free for all Faculty/Staff/Students at software.oit.gatech.edu ), and
- The free fuse4x/sshfs components (Linux, mac OS, / Mac OS X)
-
Access to your site via SSH – You must know the password for your site's (unfortunately named) FTP Login account, which you can set/reset via your web hosting administration panel in the Web Hosting Settings screen. (Note as of the 2015/16 Plesk upgrades, you can now set up and use an SSH key instead of needing the SSH/FTP password.)
-
Be on campus or have access to the campus VPN Service, as OIT Web Hosting does not allow SSH directly from off-campus.
Steps to Drush Bliss
In the instructions below, foo.gatech.edu is a placeholder for your site's actual hostname, and foo is a placeholder for your site's SSH/FTP account. Replace these with your site's hostname and SSH/FTP account where appropriate. Also, these instructions assume you are using Transmit as your SSHFS client. Configuration screens for WebDrive will be similar.
- Install Drupal, if you haven't already... via source, Installatron, etc.
- Edit your httpdocs/sites/default/settings.php file, changing the databases array's host and port entries to read:
 'host' => php_sapi_name() == 'cli' ? '127.0.0.1' : 'mysql.localhost',
 'port' => php_sapi_name() == 'cli' ? '3307' : '3306',
- Create a file named dbip.php in your sites httpdocs directory:
<?php if (array_key_exists('REMOTE_ADDR', $_SERVER) && ((substr($_SERVER['REMOTE_ADDR'], 0,7) == '128.61.') || (substr($_SERVER['REMOTE_ADDR'], 0,8) == '130.207.') || (substr($_SERVER['REMOTE_ADDR'], 0,8) == '143.215.') || (substr($_SERVER['REMOTE_ADDR'], 0,9) == '192.93.8'))) { echo gethostbyname('mysql.localhost'); } ?> - On your local machine, in a terminal window, open up an SSH tunnel through your Web Hosting server to your Web Hosting account's database host:
ssh -N foo@foo.gatech.edu -L 3307/`curl -s http://foo.gatech.edu/dbip.php`/3306
- Use an SSHFS client to mount your site's httpdocs directory. For Transmit, use the SFTP connection and choose Mount as Disk:
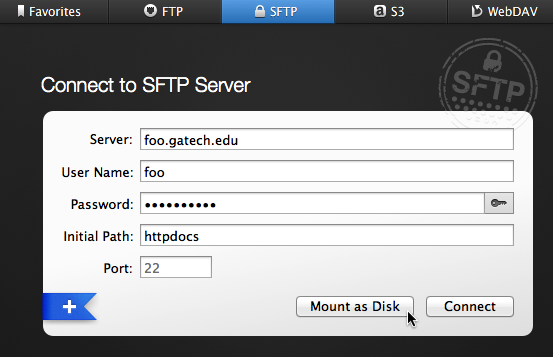
- In a terminal, navigate to the mount point ( /Volumes/foo.gatech.edu/ ) and run drush status to test your configuration. You should see the message "Database : Connected and Drupal bootstrap: Successful."
- When you are finished using Drush on your site, remember to close (control-C) the SSH command doing the tunneling and unmount your site's filesystem (drag it to the Trash).
MySQL Databases for Developers
MySQL Databases for DevelopersThis section contains selected resources and guides for dealing with the MySQL databases that are integral to every Drupal website.
MySQL Resources and Guides
Creating a MySQL Database
Creating a MySQL DatabaseCreating a new MySQL database for a site hosted on OIT Web Hosting can be a little confusing. Below are the steps for getting a database set up and configured properly via the Web Hosting Plesk control panel, as well as generic steps for creating a new database on any MySQL instance that has phpMyAdmin installed.
MySQL Database Creation on OIT Web Hosting
- Visit OIT Web Hosting [https://hosting.gatech.edu/] and select the website you want to work with from the list of sites that you manage.
- Select the Databases management link.
- On the Databases management page, select the Add New Database link.
- Fill in the fields on the Add New Database form, and be sure to copy down everything for future reference. Use the password generate to generate a secure password (select the 'Show' button to see the generated value so that you can copy it down.)
- Select the OK button to create your new database.
- Back on the Databases management page, you should see a listing in the table for your new database. The Webadmin link on that row will let you access your database via phpMyAdmin.
Video Tutorial (1:13)
MySQL Database Creation on a Standard Apache HTTPD Server Via phpMyAdmin
- Log into phpMyAdmin on your server with the master (root) user account for your mySQL instance.
- Select the Databases tab.
- In the box under Create database, enter the name for your new database and select the Create button.
- Select the Users tab and create a new user with a unique name and password. Be sure to write down the name of the database you create, as well as the username and password you make for it. (As always, try to choose a fairly-secure database username and password and do NOT use your GTaccount - jdoe3).
- Once the account is created, grant it access to the database that you created. You'll probably want to give the account all privileges for the database except "grant", as you usually don't want the account to be able to give out access to other accounts.
Video Tutorial (0:39)
MySQL Database Connection Tools
MySQL Database Connection ToolsYou can view any MySQL database on an OIT Web Hosting website using many different GUI based applications. Below are a few implementations that have been used by members of our community:
General Instructions
OIT has an FAQ entry explaining how to connect to your hosting database, which also discusses using phpMyAdmin to view your database(s) from your hosting control panel (which doesn't require any additional software).
Rochester University has a nice tutorial on using phpMyAdmin with MySQL.
Elsewhere in this handbook is a more in-depth post on SSH tunneling.
The general information you'll need, if you choose to connect with a more graphical software application, is:
- the domain name of the site your database uses (example: mydepartment.gatech.edu)
- the SSH or FTP Login account name and password for this site
- the host your database lives on: for OIT Web Hosting, use "mysql.localhost" instead of plain "localhost".
- the database account's username and password (this will be different from the SSH/FTP login account and password)
- the port for your database: 3306
MySQL Workbench
Andrew Dugenskei (a member of the GT Drupal community) has a preference for MySQL Workbench.
Fortunately, MySQL Workbench (available for Mac OSX and Windows) makes it very easy to communicate with OIT web hosted databases and it is free. If you're on campus, no other software is needed. If you're off campus, you just need to first make sure you are connected to the VPN.
Below is a screen capture from the Workbench connection manager with some pseudo values. Once the correct values are entered, connecting to an OIT databases is a just a click away.
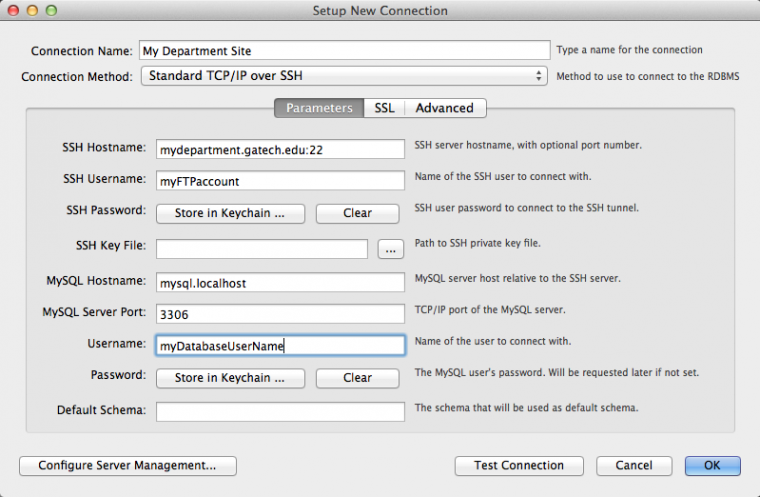
From the above screen capture and based on the Workbench Installation Guide, you can use these settings.
Under the Connection Tab, Choose "Standard TCP/IP over SSH" and then enter these parameters for your site:
- SSH Hostname: mydepartment.gatech.edu (port name ":22" at end is optional)
- SSH Username: myFTPaccount (for your SSH or "Local FTP" account on Web Hosting)
- SSH Password: myFTPpassword (for your SSH or "Local FTP" account on Web Hosting)
- MySQL Hostname: mysql.localhost (for web hosting, just use this instead of worrying about which server you're on)
- MySQL Server Port (leave same): 3306
- Username: database_user (for this database only)
- Password: database_password (for this database only)
- Default Schema: leave blank
Navicat (Mac, Windows, Linux)
Mike Alberghini (a member of the GT Drupal community) has a preference for Navicat because the software:
- Has a good GUI
- Handles multiple databases well,
- Has Mac OS X support
- Is 40% off for educational users
- Saves connection info for ssh tunnels and start them as needed to connect to servers
Screenshots of a successful Web hosting database connection with Navicat are below.
For Navicat, use the following settings on the "General" tab:
- Connection Name = My Department Site
- Hostname/IP Address = mysql.localhost (this is important for you to connect to Web Hosting)
- Port (leave same) = 3306
- User name = This is the username for your DATABASE's user.
- Password = This is the password for your DATABASE's user.
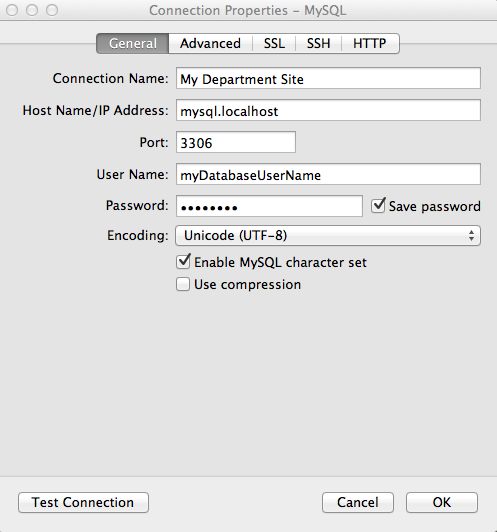
To finish your connection with Navicat, use the following settings on the "SSH" tab:
- Use SSH tunnel = check YES
- Hostname/IP Address = mydepartment.gatech.edu
- Port (leave same) = 22
- Username = This is the username of the web hosting FTP account for this site.
- password = This is the password for the web hosting FTP account for this site.
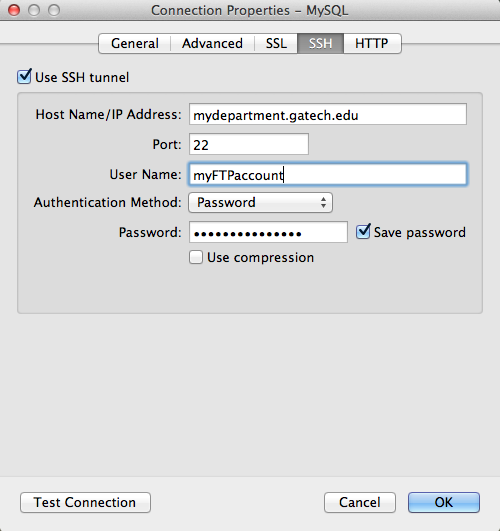
Sequel Pro (Mac)
Adam Arrowood (a member of the GT Drupal community) has a preference for Sequel Pro because the product:
- Has a nice GUI, ssh tunneling, etc. as found in other similar products.
- Runs (only) on Mac OS X.
- Is a free product.
MySQL Restrictions in Drupal 8 and Later
MySQL Restrictions in Drupal 8 and LaterDrupal 7 began forcing mySQL to act like a traditional SQL server so that all SQL code used in Drupal will be highly compatible with other database systems like PostgreSQL or SQLite. This means that mySQL statements that syntactically work in other contexts may produce errors under Drupal 7 or 9. Drupal 8+ adds the 'ONLY_FULL_GROUP_BY' restriction, which can potentially cause custom mySQL code that worked in Drupal 7 to fail with errors in Drupal 8+.
Here's the exact settings being used in Drupal 8:
- SET sql_mode = 'ANSI, STRICT_TRANS_TABLES, STRICT_ALL_TABLES, NO_ZERO_IN_DATE, NO_ZERO_DATE, ERROR_FOR_DIVISION_BY_ZERO, NO_AUTO_CREATE_USER, ONLY_FULL_GROUP_BY'
The mySQL Reference Guide has full details on these SQL modes and their effects. (See especially the section on STRICT mode and ONLY_FULL_GROUP_BY mode.)
Code Snippets
Code SnippetsThis section is for sharing sample code that does useful things for site administrators and developers. Please do not add anything directly to this page, but rather create a sub page for each individual snippet.
Listing Enabled Modules Using a bash Script
Listing Enabled Modules Using a bash ScriptA shell script that prints out a list of enabled modules in all accessible databases, designed for ssh use when you need to check multiple Drupal 6 or 7 databases at one time.
Editor's Note: A similar concept would work just as well for Drupal 8, but the database table names and structures have changed in Drupal 8, so you would need to adjust the script accordingly. Also, be aware that this script will not work on any Drupal instance where you have used a custom table prefix for all of your Drupal site tables.
With thanks to Abdul Manaf on DBA.stackexchange for the basic code.
# mysql credential
user="root"
pass="pwd"

all_dbs="$(mysql -u $user -p$pass -Bse 'show databases')"

# Exclude databases you don't want to check, such as non-Drupal 6 or 7 dbs.
# Then output database name and an alphabetized list of Enabled modules.
for db in $all_dbs
     do
        if [[ "$db" != "information_schema" &&
            "$db" != "mysql" &&
            "$db" != "performance_schema" &&
            "$db" != "test" ]] ; then
            echo '====================='
            echo "DATABASE: $db (ENABLED Modules)"
            echo "---------------------------"
            mysql -u$user -p$pass $db -sN -e "SELECT name FROM system WHERE status = 1 AND type = 'module' ORDER BY name ASC;"
        fi
     done
Listing Enabled Modules Using phpMyAdmin
Listing Enabled Modules Using phpMyAdminBelow is SQL code that prints out SQL statements that you can copy and paste back into phpMyAdmin (or any MySQL management tool that can connect to your Drupal database). These statements will help you get a list of enabled modules, when you need to check multiple Drupal 6 or 7 databases at one time.
With thanks to Aaron Brown on DBA.stackexchange for the basic code.
Be careful to copy the backquotes/backticks (that look a little like left-leaning apostrophes) exactly.
SELECT CONCAT('SELECT \`name\` FROM ', schema_name, '.\`system\` WHERE \`status\` =\'1\' AND \`type\` =\'module\' ORDER BY \`name\` ASC;')
FROM information_schema.schemata
WHERE schema_name NOT IN ('information_schema','mysql','performance_schema','test', 'excluded_database');
This will print out a series of SQL statements, like the one below, which you could paste into the SQL tab of phpmyAdmin, in order to create lists of enabled modules. This can be helpful if you don't have ssh access to your site, but still want an easy way to get a simple text list of enabled modules.
SELECT `name` FROM ms6_sample1.`system` WHERE `status` ='1' AND `type` ='module' ORDER BY `name` ASC; SELECT `name` FROM ms7_sample2.`system` WHERE `status` ='1' AND `type` ='module' ORDER BY `name` ASC;
Sunsetting Drupal Sites
Sunsetting Drupal SitesEventually, the time comes to say goodbye to a Drupal site, but doing so is not always as easy as it may seem. Below are tips and tricks for shutting down a site gracefully without losing your sanity along the way.
Creating an Archive (The Easy Way)
If your stakeholder(s) are agreeable, the easiest way to shut down a site is to make an archival copy of the filesystem and database, and then take the site offline. With OIT Web Hosting, you can make both backups easily from your Plesk Control Panel, and then copy the resulting archive files to an internal departmental server. After that, simply put in a request to OIT to have the web hosting account deleted.
The Realistic Way
Reality doesn't always work out so easily, and all too often your stakeholder(s) will acknowledge that a site isn't going to be updated any longer, but they'll still want a readable copy of the site kept around somewhere. While you could keep the Drupal site itself running indefinitely, there are major roadblocks to doing this:
- Any Drupal site that isn't monitored regular is a vector for hacking and other security nightmares. If the content isn't being updated, then it's unlikely that anyone in your unit will be checking the site even on a monthly basis to see if it's still intact or not.
- Drupal has to be kept up-to-date, and you likely won't have the time to do that for sites where content is not being updated regularly.
- Eventually Drupal has to be upgraded to the next major version. If you don't have time for updates, you certainly won't have time to do major upgrades.
For all these reasons (and more), it's best to get Drupal out of the equation as soon as a site goes "dormant". There are two parts to this: preparing the site for the afterlife, then exporting it to a static archive that can replace the site in its current web hosting account.
Preparing the Site for the Afterlife
Nothing automated will work with a static copy of a website, so you need to go through and look for everything automated and remove those pieces from the site. This includes:
- Removing the Search link from the menu bar
- Removing all exposed filters from Views
- Removing all visible 'Login' links
If you're thinking you can just do all that to the exported HTML files, think again: even a moderately large site will generate many dozens of HTML files (sometimes multiple files for the same page, when that page is referenced through different aliases). This makes it near impossible to go through those pages by hand to remove stuff that doesn't work. Save yourself the headache and remove all of the automated components before you do your static export.
Generating the Static Export
There are two methods currently recommend, depending on your skill set and abilities:
SiteSucker (Runs on MacOS)
SiteSucker has been reported to work well for exporting Drupal 9 sites into static HTML files. The basic version is available for free (unclear how it is licensed), while the 'pro' version must be purchased.
wget (Runs on MacOS or Linux)
wget is a command line utility for retrieving web pages. When given the right command parameters, it can act like a web crawler, recursively pulling down an entire website and writing it out to a collection of static HTML files on your local computer. Here is the formulation that works well with OIT Web Hosting Plesk servers:
/usr/bin/wget -e robots=off -rdkE --restrict-file-names=windows <site-URL-here>The 'windows' flag is needed due to OIT's Plesk servers not handling the question mark ('?') symbol in filenames. By having wget output files with Windows compliant filenames, no question marks are used, making the files work under Plesk as well.
Note: MacOS does not come with 'wget', but you can either compile it from source, or install it via the Brew package manager.
Drupal-generated Static Export
Drupal websites can use Tome (not available for Drupal 7) to generate a static version of their Drupal website using their provided configuration instructions for existing websites.
Tome configuration
Configure your Drupal website's settings.php with the following setting to exclude cas-related pages:
$settings['tome_static_path_exclude'] = ['/cas', '/caslogin', '/casproxycallback', '/casservice'];
PHP 7 and 8 Upgrading Resources
PHP 7 and 8 Upgrading ResourcesThe currently supported releases of PHP are 8.0, 8.1, and 8.2. 8.0 will reach its end of life on November 26, 2023.
Units who have their own web servers are strongly urged to keep them up-to-date with at least PHP 8.0, and ideally a later version. Any OIT Web Hosting site can be easily switched to any of the supported PHP versions through the Plesk control panel. Please note that upgrading PHP may break some applications, so you should test carefully and be prepared to roll back to an older version of PHP if needed until you can fix problems that arise. For this reason, it is best to start your testing early, long before the version of PHP that you are running reaches its end-of-life.
Helpful Tips and Information
- Version Compatibility
- Drupal 10 is core compatible with PHP 8.1 and PHP 8.2
- Drupal 9.4+ is core compatible with PHP 8.0 and 8.1
- Drupal 7.79 or later will support PHP 8.0
- Important: While the core of Drupal 7 is compatible with PHP as described above, many modules for Drupal 7 may not be receiving updates and thus may not be compatible with these later versions of PHP.
- Important: Drupal 7 itself will reach its end-of-life on November 28, 2022. If you are still running a Drupal 7 site, you should start planning now to upgrade it to Drupal 9 or 10 or migrate it to another content management system (e.g. Sites @ Georgia Tech).
- "Core compatible" only means that the core of Drupal is compatible with the listed PHP version. All third-party and custom modules and themes must be separately checked, tested, and updated as needed.
- Official PHP 7 Release Dates and EOL Dates
Troubleshooting: Questions and Answers
Troubleshooting: Questions and AnswersThis section is for general developer and administrator questions that commonly come up and their answers - particularly questions that don't really fit under any of the other existing topics. Please list one question per sub-page and follow the format of the first question about Drupal Sites on OIT Web Hosting Unable to Send Emails.
If you need some generic advice about how to deal with a Drupal site that has stopped working (e.g. the dreaded "white screen of death"), Kevin Pittman has written a fairly comprehensive guide called "So, You Blew Up Your Drupal 8 Site - Now What?". It's written for Drupal 8, but all of the concepts apply to earlier and later versions – the specific details will just be a little different.
Questions and Answers
A Drupal Site on OIT Web Hosting is Unable to Send Email
A Drupal Site on OIT Web Hosting is Unable to Send EmailIssue
Email from a Drupal website on OIT Web Hosting is being delivered to non-Georgia Tech email addresses, but is failing on Georgia Tech email addresses (@gatech.edu).
Solution
To fix this issue, ensure that the From: email address in Drupal (set in Configuration -> Site Information) is a valid Georgia Tech email address.
More details, per OIT Web Hosting:
Since this problem has come up more frequently, I’ll clarify what the issue is:
outbound.gatech.edu requires that if you are sending to *@*.gatech.edu address that the OIT MX servers handle (which is most of them), the “From:” address has to be a valid Georgia Tech address. Along with this, if the “From:” address isn’t valid, there is no way for outbound.gatech.edu to send a bounce message back.
This is a requirement of the OIT MX servers and isn’t related to anything that Web Hosting restricts. In fact, on the Web Hosting servers, the message shows as sent, but that just means it was sent on to outbound.gatech.edu.
Drupal 8.8 Upgrade Generates Temporary Directory Warning in Status Report
Drupal 8.8 Upgrade Generates Temporary Directory Warning in Status ReportIssue
You've upgraded your Drupal 8 site to 8.8+ and now get the following warning in your site's Status Report.
Deprecated configuration
You are using deprecated configuration for the temporary files path. Your temporary directory configuration
matches the OS default and can be safely removed.
Cause
Drupal 8.8 changed some of the configuration handling for the temporary file path, moving storage of that path into a config system key. However, that key is not directly editable, and under certain odd circumstances can get populated with the default system temporary directory path.
Solution
Warning: the following is minimally tested, and while it seems to work, be cautious and consider testing on a copy of your site first. At a minimum, back up your database before trying this to be safe.
Putting the following into a module file temporarily and pulling up any page in the site should clear the value of the config key:
\Drupal::service('config.factory') -> getEditable('system.file') -> clear('path.temporary') -> save();
If the warning message then disappears from your Status Report, you can remove the above line from wherever you put it.
How Do I Change a Site's Host Name / Domain Name?
How Do I Change a Site's Host Name / Domain Name?Issue
Below is a quick summary of what you need to do if you are changing your Drupal site's host name / domain name without moving it to a new web hosting location.
If you are moving the site to another location, then you'll also need to see the Site Migration section for additional guides.
Solution
-
First, go ahead and request that your new host name be created in DNS and pointed to your existing web server. You'll need to know the host name and/or IP address of your existing server to provide to your DNS administrator. If you don't know either, then provide the current host name for your website, and your DNS administrator should be able to determine the web server hostname and IP address from it.
-
Configure your web server to recognize the new host name. If you are using an automated web hosting solution like OIT's Web Hosting, then go into your control panel and add the new host name as a domain alias for your hosting account.
- Check your site for links hard coded to your old host name:
- The quickest way of doing this (though it does require some advanced knowledge) is to dump your database out to an SQL file and do a search through that file for instances of your old host name and then identify the pages that need to be updated.
- Alternatively, you could go through every page, opening each one up for editing, and check the page source for every inline link and every inline image.
If you don't fix these links, then users will be silently switched over to the old hostname when they follow those hard coded links, and when you eventually delete the old hostname from DNS, those links will simply break.
-
If you want to force everyone to view your site through the new host name (which is important for Search Engine Optimization), you can add something like the following to your .htaccess file, where oldsitename.gatech.edu and newsitename.gatech.edu are replaced with the appropriate values:
  RewriteCond %{HTTP_HOST} ^oldsitename.gatech.edu [NC]
  RewriteRule ^ http%{ENV:protossl}://newsitename.gatech.edu%{REQUEST_URI} [L,R=301]
What Do I Need to Do For the 2021 CAS Server Upgrade?
What Do I Need to Do For the 2021 CAS Server Upgrade?As announced by the Office of Information Technology on 2/4/2021:
We would like to inform you of changes to Identity & Access Management’s plan to upgrade Single Sign-On (SSO) services CAS 6. The CAS upgrade includes an upgrade from CAS 3 to CAS 6, merges CAS and Shibboleth/SAML2 SSO services, and improves the SSO service’s availability, security, and sustainability. Unlike the original plan, which involved a single upgrade window, this upgrade will occur in phases over the next several weeks to allow application owners to appropriately test, prepare, and upgrade in phases.
In order to streamline this process and avoid downtime, service owners are asked to test their applications against the new version throughout this process to make sure your applications remain compatible.
Remainder of post copied at the end of this page
If you are running a Drupal site that uses GT Account Username authentication (also known as CAS authentication), then you should know the following:
-
A CAS 6 server has been set up and is available at sso.gatech.edu . You can start testing against this server if you wish.
-
If your Drupal site is running Drupal 8 or Drupal 9, you do not have to do anything (but see the warning below).
-
If your Drupal site is running Drupal 7 or earlier, you should make sure you are on the latest version of phpCAS (currently 1.3.8).
-
Warning: If you do not update your configuration to point to sso.gatech.edu, your site editors will have to log in a second time to access your site during Phase 3 (see below for exact dates), and will receive a warning that your site is still using the legacy authentication server. If you don't mind this happening for a period of about one month, the warnings will go away at the start of Phase 4, when the old authentication server address will be automatically redirected to sso.gatech.edu
-
To update your site to point to sso.gatech.edu:
-
For Drupal 8 or 9:
-
Go to the CAS configuration page on the black administration toolbar under
Configuration -> People -> CAS; alternatively, you can access the configuration page by adding "/admin/config/people/cas" to the end of your site's front page URL. -
Under CAS Protocol version, select 3.0 or higher
-
Under Hostname, enter "sso.gatech.edu" (without the quotes).
-
If you want to check the rest of your settings, see our Drupal 8/9 CAS Configuration Page.
-
Don't forget to scroll down and Save configuration.
-
-
For Drupal 7:
-
Go to the CAS configuration page on the black administration toolbar under
Configuration -> People -> CAS settings; alternatively, you can access the configuration page by adding "/admin/config/people/cas" to the end of your site's front page URL. -
Under Version, select 3.0 or higher
-
Under Hostname, enter "sso.gatech.edu" (without the quotes).
-
If you want to check the rest of your settings, see our Drupal 7 CAS Configuration Page.
-
Don't forget to scroll down and Save configuration.
-
-
Remainder of original OIT post about CAS upgrades:
The schedule and impact for each phase is as follows:
Phase 1: Wednesday, February 10 – No Impact
Sso.gatech.edu will be launched as a new production instance of CAS 6. No action is required. Application owners should begin migrating or plan migration to the new system after this date. Testing is also encouraged to ensure that the migration will be successful.
Phase 2: Wednesday, February 17 – Possible Impact to Shibboleth Applications
Shibboleth/SAML2 applications (those that use idp.gatech.edu for logins) will transition to the new instance of CAS 6. Login sessions will be shared between CAS 6 and CAS even if application systems have not been upgraded. At this point, all application owners should be in the process of migrating to the new system. Testing is also encouraged to ensure that the migration will be successful.
Phase 3: Thursday, March 11– Impact to Any Applications that have not Upgraded
CAS 6 login sessions will no longer be shared with CAS. Users of applications that have not been migrated to CAS 6 will see warnings that they are using a deprecated login system and that the application should upgrade to sso.gatech.edu by Wednesday, April 21 or risk login problems. Application owners should continue migrating to the new system. Testing is also encouraged to ensure that the migration will be successful.
Phase 4: Wednesday, April 21 – Impact to Any Applications that have not Upgraded
At this phase, most applications should be upgraded to CAS 6. All remaining applications will automatically be upgraded. Login.gatech.edu will begin automatically redirecting to sso.gatech.edu.
Please note that CAS, SAML1, SAML2, Shibboleth, and ADFS will be affected by this upgrade. During the final phase (Wednesday, April 21), visits to login.gatech.edu will be automatically redirected to the new system at sso.gatech.edu.
Throughout the duration of this upgrade, application owners will receive regular communications including weekly updates surrounding each phase and ongoing reports to show the status of application upgrades. You will also receive a calendar invite from the IAM team shortly after receiving this message inviting you to weekly work sessions/open office hours for assistance with upgrading systems. Finally, "open mic" Teams sessions are scheduled during the change windows for instant collaboration between application owners, users, and the IAM team.
For additional information about this upgrade, using your VPN, please visit http://b.gatech.edu/CAS6-upgrade or contact Nadeem Rizvi at nrizvi@gatech.edu.